A Drill for Better Strikes & Trajectory

This is a fairly straightforward drill that will activate the trail side in the downswing and reduce any “tipping” tendency that might get the clubhead stuck behind the golfer. If you struggle with thins, and fats in tandem with blocks and hooks, then this is one for you to try.

A few points to note:

  • This drill works nicely with a 7 or 8 iron struck off a low tee.

  • Keep the stance fairly narrow and drop the trail foot back about a foot inside where you’d normally place it.

  • Rehearse and then rehearse again. Remember that as you practice this you’re trying to make technical changes, so go slowly and get it right….every time!

  • Try to feel the trail shoulder continuously moving through the impact zone. It should feel as if you’re “covering” the ball with that trail shoulder.

  • As you get more comfortable you can start to pick up the speed and move the back foot into a more neutral position.

This drill really has worked wonders for a few of my students in that it has upgraded both the quality of strike along with the ball flight. The next time you find yourself struggling with either strike or trajectory give this drill a try. I think you’ll be pleasantly surprised.

Watch the What?

Oh you’re going to like this one! This is a little drill I discovered a few weeks ago that will help any golfer who has issues with those small motion chip shots around the greens. Watch…

A few ideas that will help if you tend to struggle from close range:

  • Mark up the club face with a Sharpie dot to give you something to follow visually

  • Determine what your range is for watching the clubhead

  • Practice variety by alternating between smaller chips where you watch the face and bigger ones where you watch the ball

0911F4DE-E03B-49D6-B80E-0378D296660C.jpg

You might be wondering why this works so well? The reason is that it encourages a synchronized rotation through the strike with almost the entire body. Everything flows through impact together. Whether you’re a teacher or a player, whether you need this or not, tuck this little nugget in your back pocket for when you or a friend find yourself in the chipping doldrums.

Thanks for following along!

Develop Your Skills

Getting better at golf should be fun! As I become a more experienced coach I'm finally grasping the role that skill plays in lowering any golfer's score. I think of skill as what you can do with your technique. What shots can you hit? How well can you control your golf ball? That's achieved with skill. Check out this drill that I came up with to not only help you become a better golfer, but also to help you have more fun while you practice...

We all need skills. Hopefully wicked skills! By giving yourself ONE opportunity to hit each of the shots required to complete this drill you are continuously challenging your ability to adapt to the requirements of each unique situation. Something real golf requires on every shot! The seven required shots are a big slice, a medium fade, a baby fade, a straight one, a baby draw, a medium draw and a big hook. Don't hit them in order, but mix it up. Real golf doesn't work in a neat and smooth progression - neither should your practice. Keep a score too. It will help you strive to achieve full marks! 

Add golf skills to your resume...

Add golf skills to your resume...

Give this drill a try the next time you go out to practice. In fact, any skill based challenge or drill you can come up with will help you to develop wicked golf skills that you can take out on the course with you to start shooting lower scores.

Thanks for reading.

How to Shallow the Attack Angle

I teach far more golfers that hit down on the ball too much more than those that don't hit down enough. If you are one of those golfers that typically takes big divots and hits a low ball flight then stay with me....

Here's a helpful sequence to practice when your angle of attack is too steep or downward. If you're guilty of massive divots and/or low ball flight then this is for you. For more visit www.andrewricegolf.com

I have found this sequence to work nicely with all golfers looking to shallow their attack angle and improve the crispness of the strike. Try the following (with either irons or driver):

  • PHASE 1 - 5 drags over the top of the ball
  • PHASE 2 - 5 low to high pitch style shots, keeping clubhead low in the backswing
  • PHASE 3 - 5 half speed and half size swings sensing an ascending strike (even with irons)

(all shots are struck with the ball on a tee)

Another drill I like to use to help golfers learn to deliver an ascending strike with the driver is what I call the Box Drill pictured below...

Place an empty sleeve box between a teed golf ball and the target as indicated. The box should be approximately a grip length ahead of the ball. On a windy day it might be necessary to use tees to anchor the box in place. This is a costly addition to this drill!

If you can hit shots without running the clubhead into the box then chances are that you're no longer hitting down on the ball and you should see an increase in both distance and the altitude of your tee shots. Keep in mind that as you "upgrade" your attack angle, should you have an adjustable driver, you might need to alter the loft.

Here's a nifty, yet simple drill I've come up with to help my students get a feel for what its like to hit up on the ball. This has made all the difference to my driving. If you'd like to hit it longer, straighter and higher give this one a try.

Thanks for reading and I hope these ideas are going to help your game. Cheers!

No More Weak Iron Shots

We've all heard the sound. And we've all felt it too. That sense when you literally melt a ball off the clubface and you know instantaneously that you've hit the shot you've been waiting for all day. That feeling is compression! To learn more watch this....

Here is an example lesson where I felt it appropriate to use this drill with a student who was struggling with the quality of his strike and high, weak ball flight in particular. Here is his initial TrackMan data for a typical 7 iron shot...

It's important to be aware that the height of this particular shot was 103 feet! This player's club speed is only a few mph short of PGATour average, yet he is only carrying a 7 iron 145 yards. After working on his compression (spin loft) via the drill illustrated in the video this is what a typical shot looked like in drill mode (note the slower club speed)...

The exact same ball speed with more than 7 mph less club speed! The spin loft, which is not an easy change to make, has gone from 31.1º to a slightly low 24.8º and the height has come down to a more manageable 76 feet. I anticipate that as this golfer works to get comfortable with their new feel they would increase their compression to a more appropriate 26º or 27º.

Before on the left and while doing the Compression Drill on the right

Before on the left and while doing the Compression Drill on the right

Thanks for reading and for greater understanding on what compression really is please read:

 Compress the Golf Ball — Andrew Rice Golf

A Sample Golf Lesson

I wanted to share a recent lesson I did. Keep in mind that that this lesson went completely as intended - it doesn't always work that way. My objective for Halle, who is a promising young high school golfer, is to improve the quality of her ball striking. Watch...

She improved her posture by not extending her lower back as much and her swing notes were:

  • Feel the hips working more up and down vs level - Sam Snead image. This would serve to improve body motion and discourage the arms from working behind her too much.
  • Consciously keep her arms more in front of her. A drill was to make back swings while backed up against a wall. This would keep her arms from getting deep and allow them to work in front of her on the way down.
  • Sense the hands tracking left of the target through impact. She has worked on the dispersion drill in the past and has had good success with it.

Hand path is often over looked and is an important part of what I teach on a daily basis. Thanks for watching!

This free website's biggest source of support is when you decide to book a lesson or golf school. You can contact me HERE. If you live in another state or country please consider making a purchase HERE or  HERE. It will help your game in addition to helping me to keep adding to this free website. Thanks again for your support! Andrew.

A Drill for Skill

As anyone who follows me here or on social media is aware I am a huge fan of skill development for my students. I believe the ability to precisely control the clubhead, clubface and strike point though impact is what makes the difference between a great golfer and someone who is merely, a golfer.

I recorded the following TrackMan screencast following a lesson I recently did with a strong collegiate golfer named Seth Gandy. My objective was to not only give Seth the feel necessary to be able to hit draws, but also to improve his ability at controlling the amount of draw. Watch...

I created what I called the Clubpath Ladder Drill for any golfer to become skillful at controlling the shape of their golf shots. I am a big proponent of what I call practicing "outside the lines" and this drill forces the golfer to hit a sequence of shots where not two are alike. Keep in mind I wanted Seth to be able to hit his go to baby fade, but by making him practice shots that are outside his comfort zone he is improving his skill at making the club communicate his intent to the ball - a necessity for great golf.

If you are a coach who uses radar technology or even a golfer looking to improve your skills I would encourage to add this type of practice into your improvement plan. You can apply this ladder type drill to a variety of elements including club speed, dynamic loft and even face angle.

Have some fun with this and if you can fit more than ten shots into the clubpath ladder drill please let me know. That's very good!

Remember this - technique will get you into the arena, but it's skill that gets you onto the podium!.

Understanding Heel and Toe Klankers...

As the size of the clubhead has increased over the last two decades so has the role that gear effect plays on off-center strikes. As the volume of the head increases so does the importance of a quality strike. I think the following video will go a long way towards explaining how this works and what it can mean for your game...

Now keep in mind that gear effect can be a help or a hindrance - it can cause your ball to curve to the target or away from it. Here's an example of how an understanding of the importance of strike point, particularly with the driver, can help any golfer avoid trying to fix something that isn't broken.

A Neutral Swing with a Heel Strike

A Neutral Swing with a Heel Strike

The Same Neutral Swing with a Toe Strike

The Same Neutral Swing with a Toe Strike

Notice how the delivery numbers (attack angle & clubpath) from the above two shots are eerily similar, yet the resultant ball flight could not be more different. The difference in the outcome of the examples above is purely due to the location of the strike for each shot. While the two shots are very different I see no need for this player to address their swing. They simply need to develop their skill at striking the ball in a consistent location on the face.

  • Toe sided strikes will lead to more draw or less fade.
  • Heel sided strikes will lead to more fade or less draw.
  • High strikes on the face elevate launch and decrease spin.
  • Low strikes on the face lower launch and increase spin.
  • Gear effect works in 3D - the head will twist away from the strike location.
  • If the CoG is closer to the strike point, then there will be less curvature from gear effect on off-center hits. 
  • If the CoG is further from the strike point, then there will be more curvature from gear effect on off-center hits. 
  • Controlling the strike location is a skill - practice accordingly.

If you're looking to gain a better understanding of how you're striking the ball with your  "headcover" clubs, buy yourself a few cans of Dr. Scholl's Odor X. Spray the face of your driver the next time you're warming up or practicing to get some all important feedback.

Your next question might be - "How do I upgrade where I'm striking the ball?" Valid. I am of the opinion that controlling the strike point is a skill. A fun drill is to practicing striking the ball in a variety of unusual, yet intentional, locations on the clubface. Here are additional resources to help you understand and manage the strike point:

Collision! — Andrew Rice Golf

Strike Point Drill — Andrew Rice Golf

Optimal Strike Point for Longer Drives — Andrew Rice Golf

Spin Rate and the Driver — Andrew Rice Golf

Swing Pattern vs Strike Point — Andrew Rice Golf

Controlling the Clubface

Here's a great drill that will help to create awareness of where the clubface is angled at impact...

Keep in mind that the clubface is PRIMARILY responsible for where the ball launches, while the clubpath is PRIMARILY responsible for the curvature of the shot. If you know the predominant shape of your shots, the key is to launch the ball in the proper direction - this drill will help! Give it a try and please let me know if you've made any progress.

Strike Point Drill

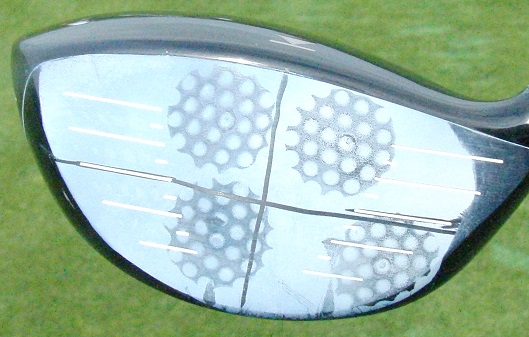
Strike Point Drill I have had so many people ask me how to better control where they strike the ball on the face that I had to share this drill. Most golfers display a consistent pattern when striking the golf ball and although the impacts points may not be in the exact same position, after hitting a handful of shots a definite pattern will start to emerge. Many golfers want to hit draws and a slight toe side bias to that strike pattern will encourage draws. The ideal strike point with the driver is above and outside of center. Here's how to build your strike point awareness and ultimately improve your ability to hit it on the good part of the face.

I spray the clubface with Dr. Scholl's Odor X foot spray and then divide the clubface into four quadrants. The objective is to place the center of the ball in each intended quadrant.

  • The frist shot should be the high toe strike
  • Followed by the low heel
  • Then the more difficult shots, the low toe
  • And the high heel.

The above photo is the first time I have ever seen anyone complete this drill on the first try. The more I learn about the importance of impact location, the better I feel about this quote from my Twitter feed:

I see a higher correlation between quality shots and where the ball is hit on the face, than just about any other factor in the swing.

You may ask why don't we just practice hitting the shot on the intended location? As my friend and fellow coach Chris Como once shared:

Repeatability does not necessarily come from just trying to be more repeatable. Learn to solve similar 'problems' a variety of ways...

In other words - learning to hit the ball in a variety of locations on the face will actually make you better at hitting it in the desired location.  If you can learn to better (you'll never be perfect!) control where you impact the ball on the clubface you will dramatically improve the consistency and quality of your shots. Give it a try and feel free to share your experience and photos.

Any idea which shot went the longest out of the four? Read the link below for the answer...

Optimal Strike Point for Longer Drives | Andrew Rice Golf