A Lesson to Learn From...

I recently gave an old friend a lesson. Having not taught him for a few years I had an inkling as to what to expect, but things came together so well I thought the information might be beneficial to more than just one student.

This is why looking at still frames of an athletic motion can be deceiving. There are six different images/videos here that we will go through in a specific order. To get the most out of this post please make sure you go through this it slowly. Be sure you comprehend each image before moving to the next…

614EC106-E63C-4C19-B0D3-B858E784B158.JPG

(The original/before is always on the right in all of the images/videos)
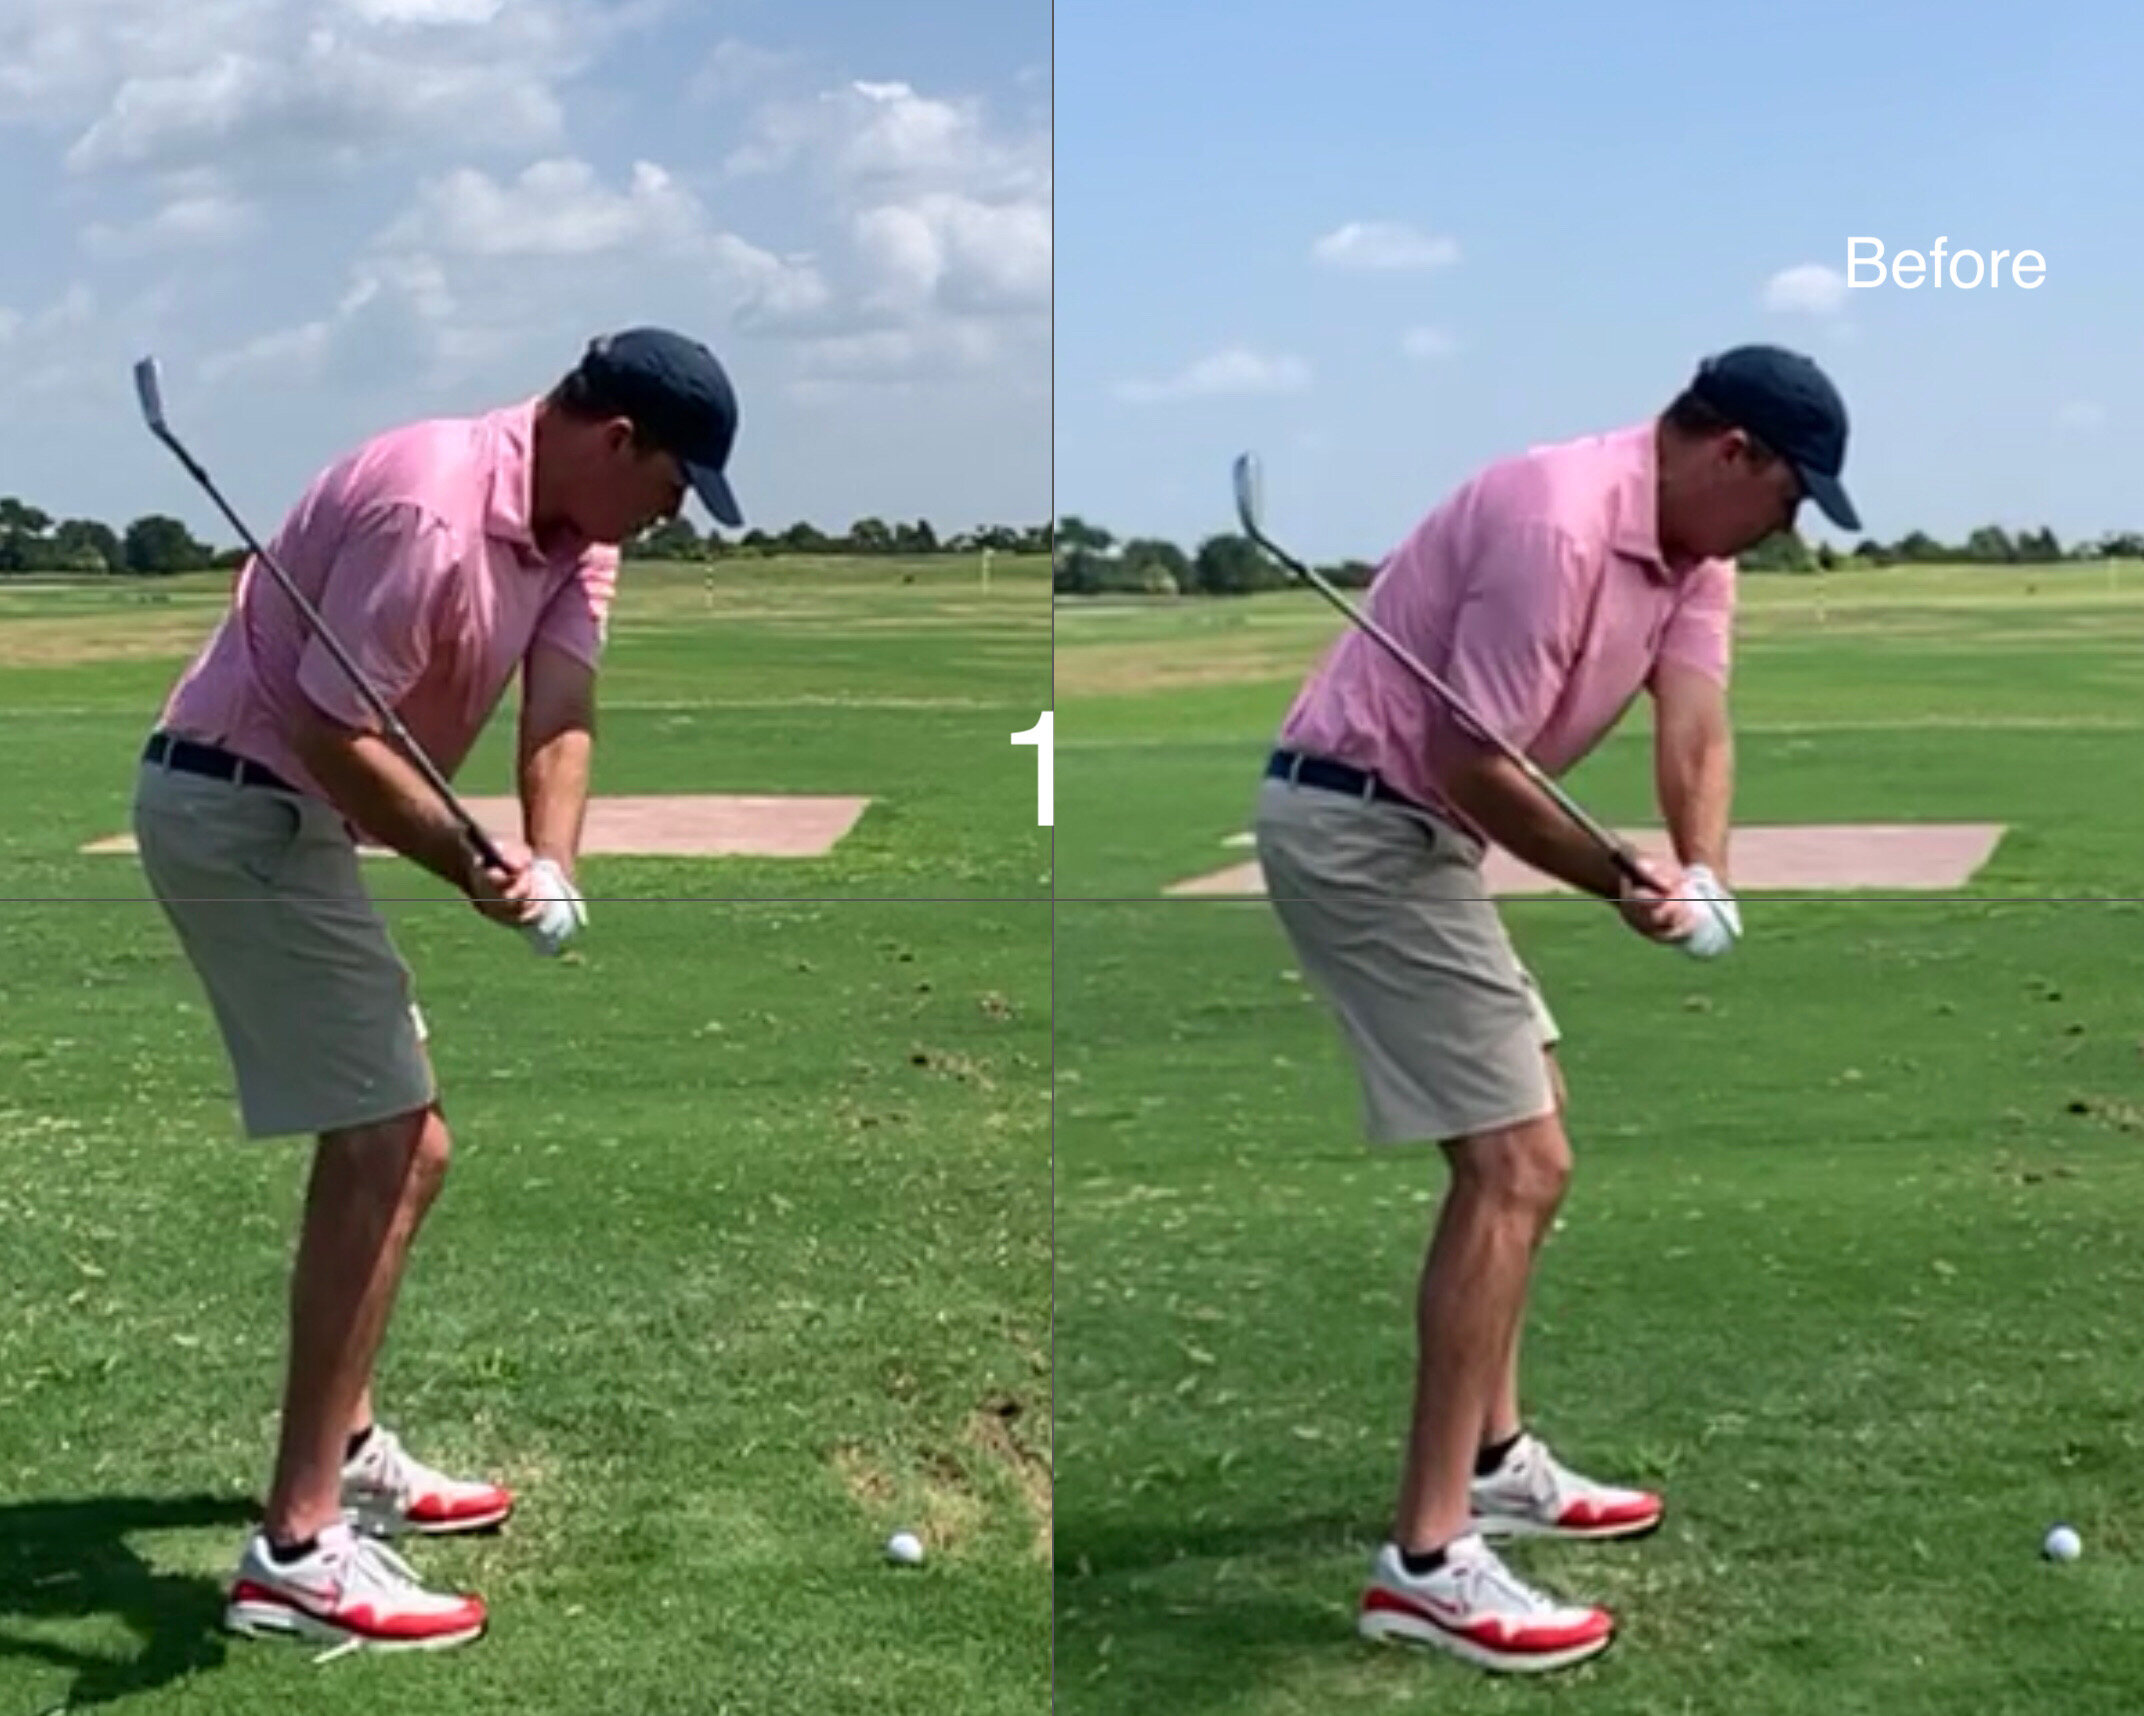
Image 1:

Notice how these two images appear to be somewhat similar. I think many of us would give them both a thumbs up! They might be somewhat similar, but the outcomes are very different due to the unseen forces being applied to the club. Do not be deceived!
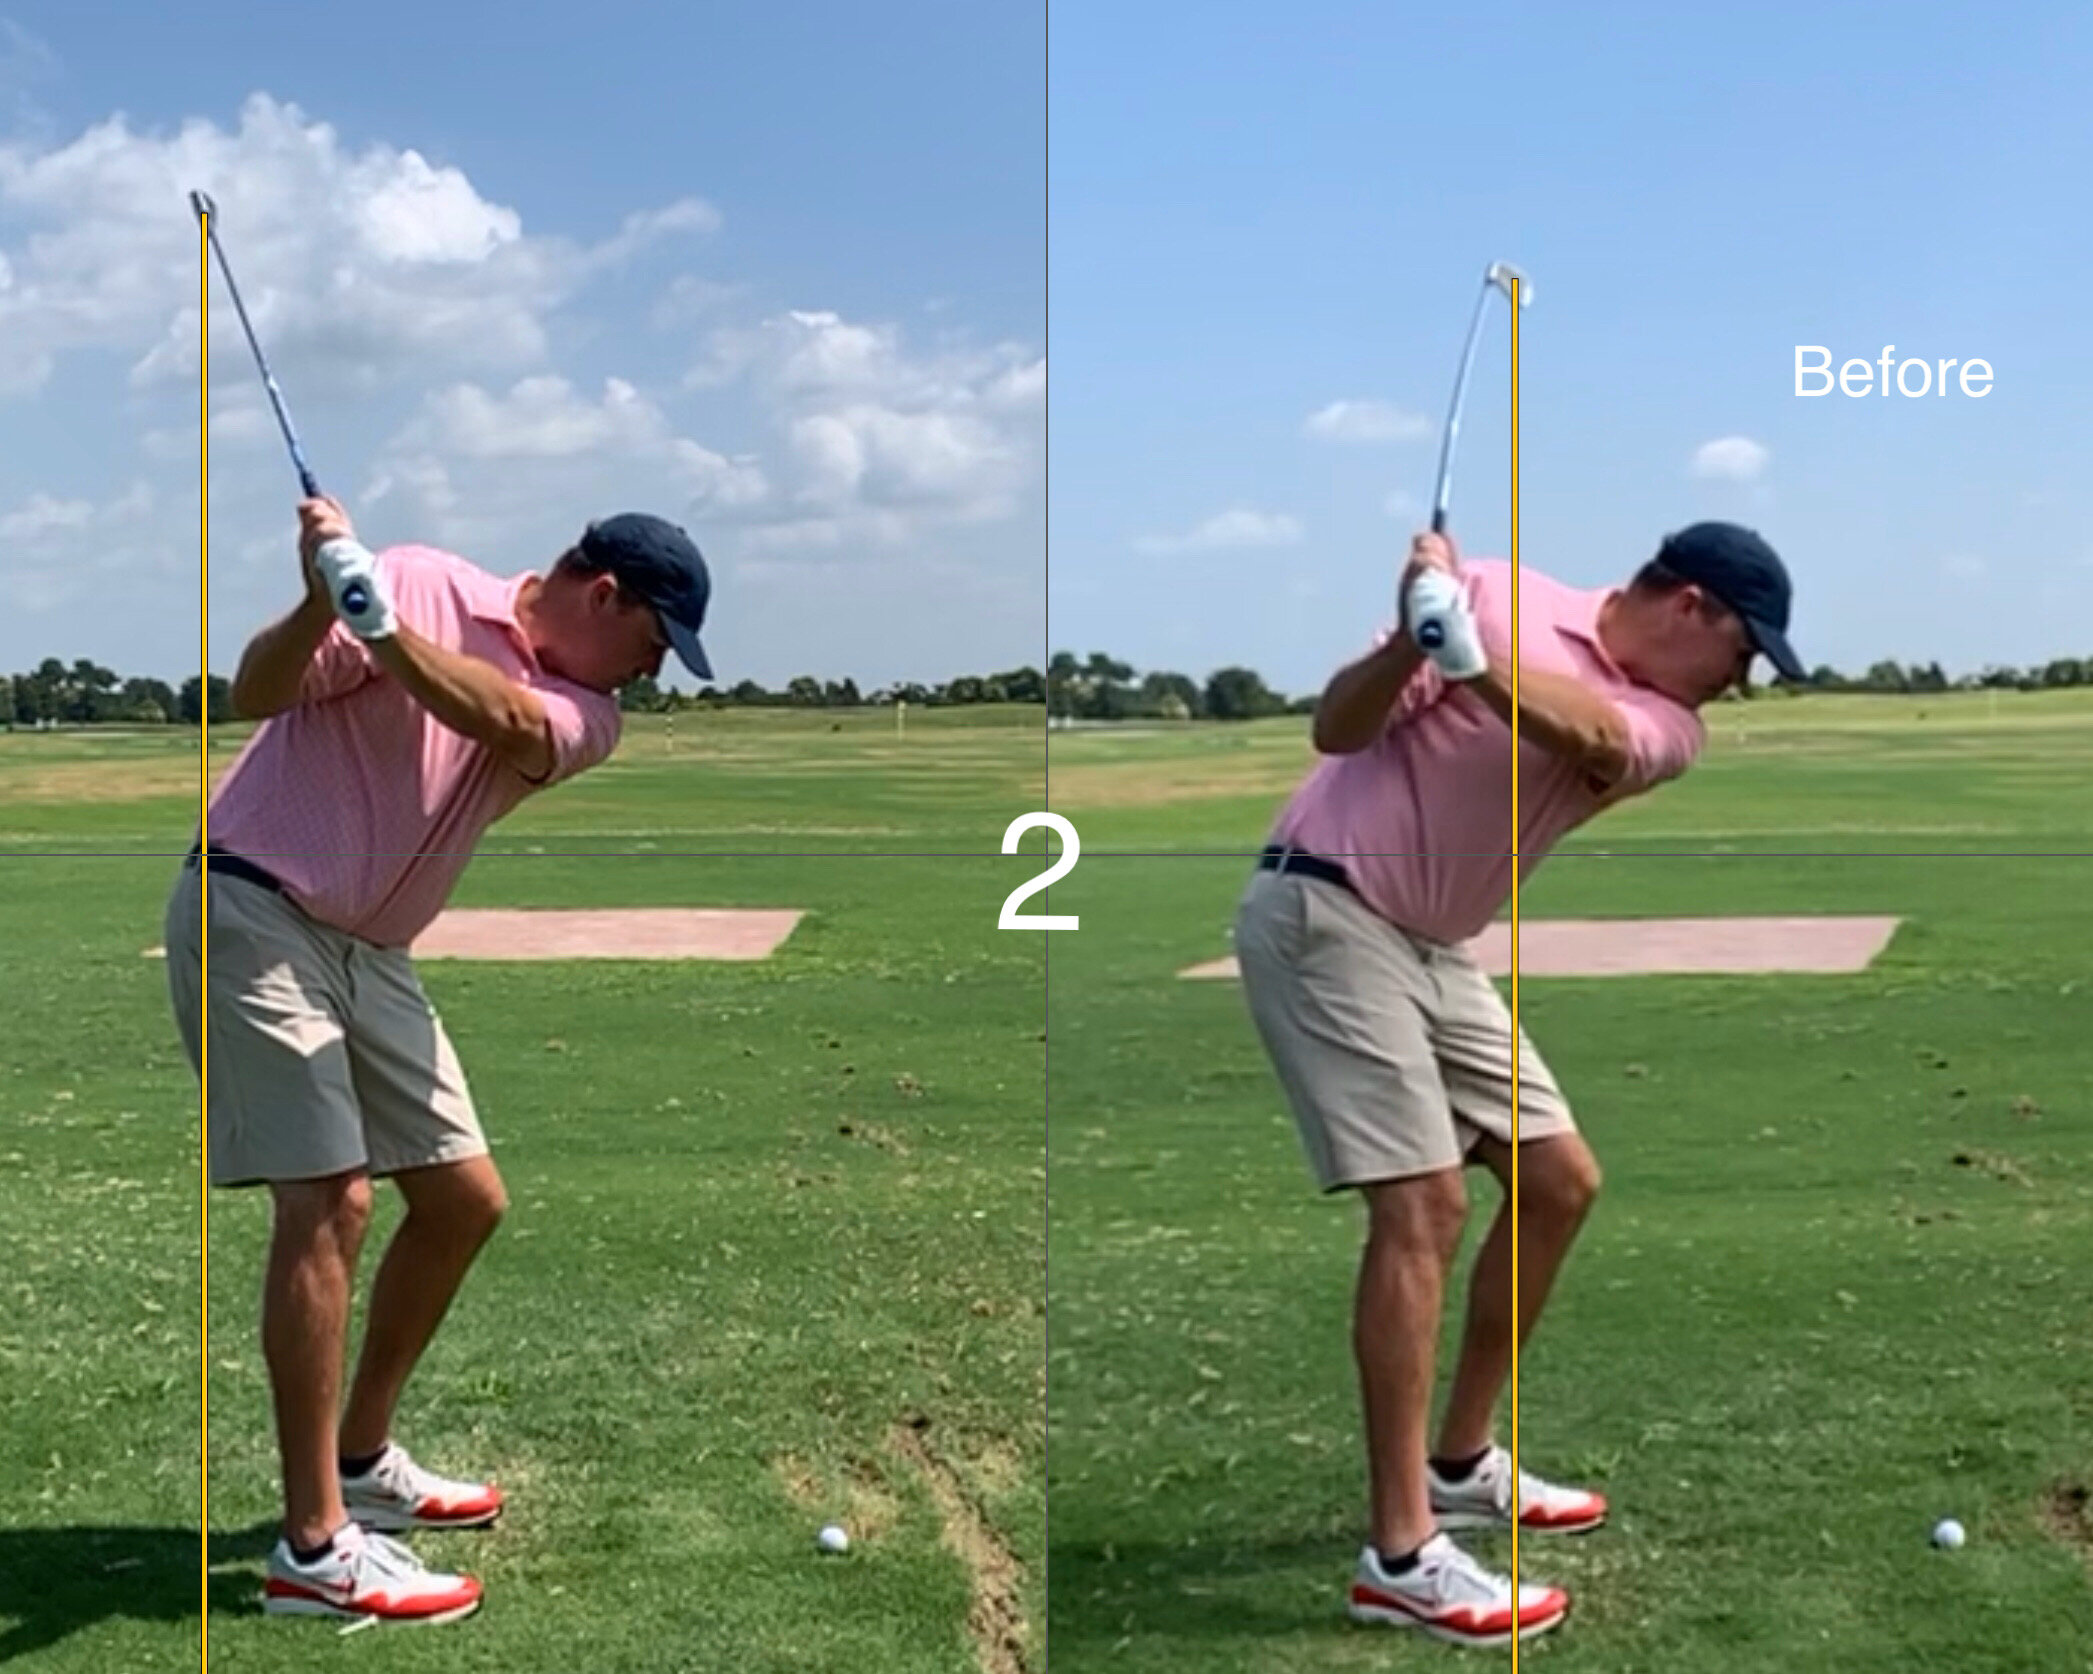
DB255940-B2A6-477C-B9A5-F8545133331B.JPG

Image 2:

The player at the top of the backswing. The yellow line indicates where the sweet spot is relative to the feet and the golf ball. Notice that in the ‘after’ version the club head is significantly further to the inside than the original. This is shown by the distance between the line and the golf ball.
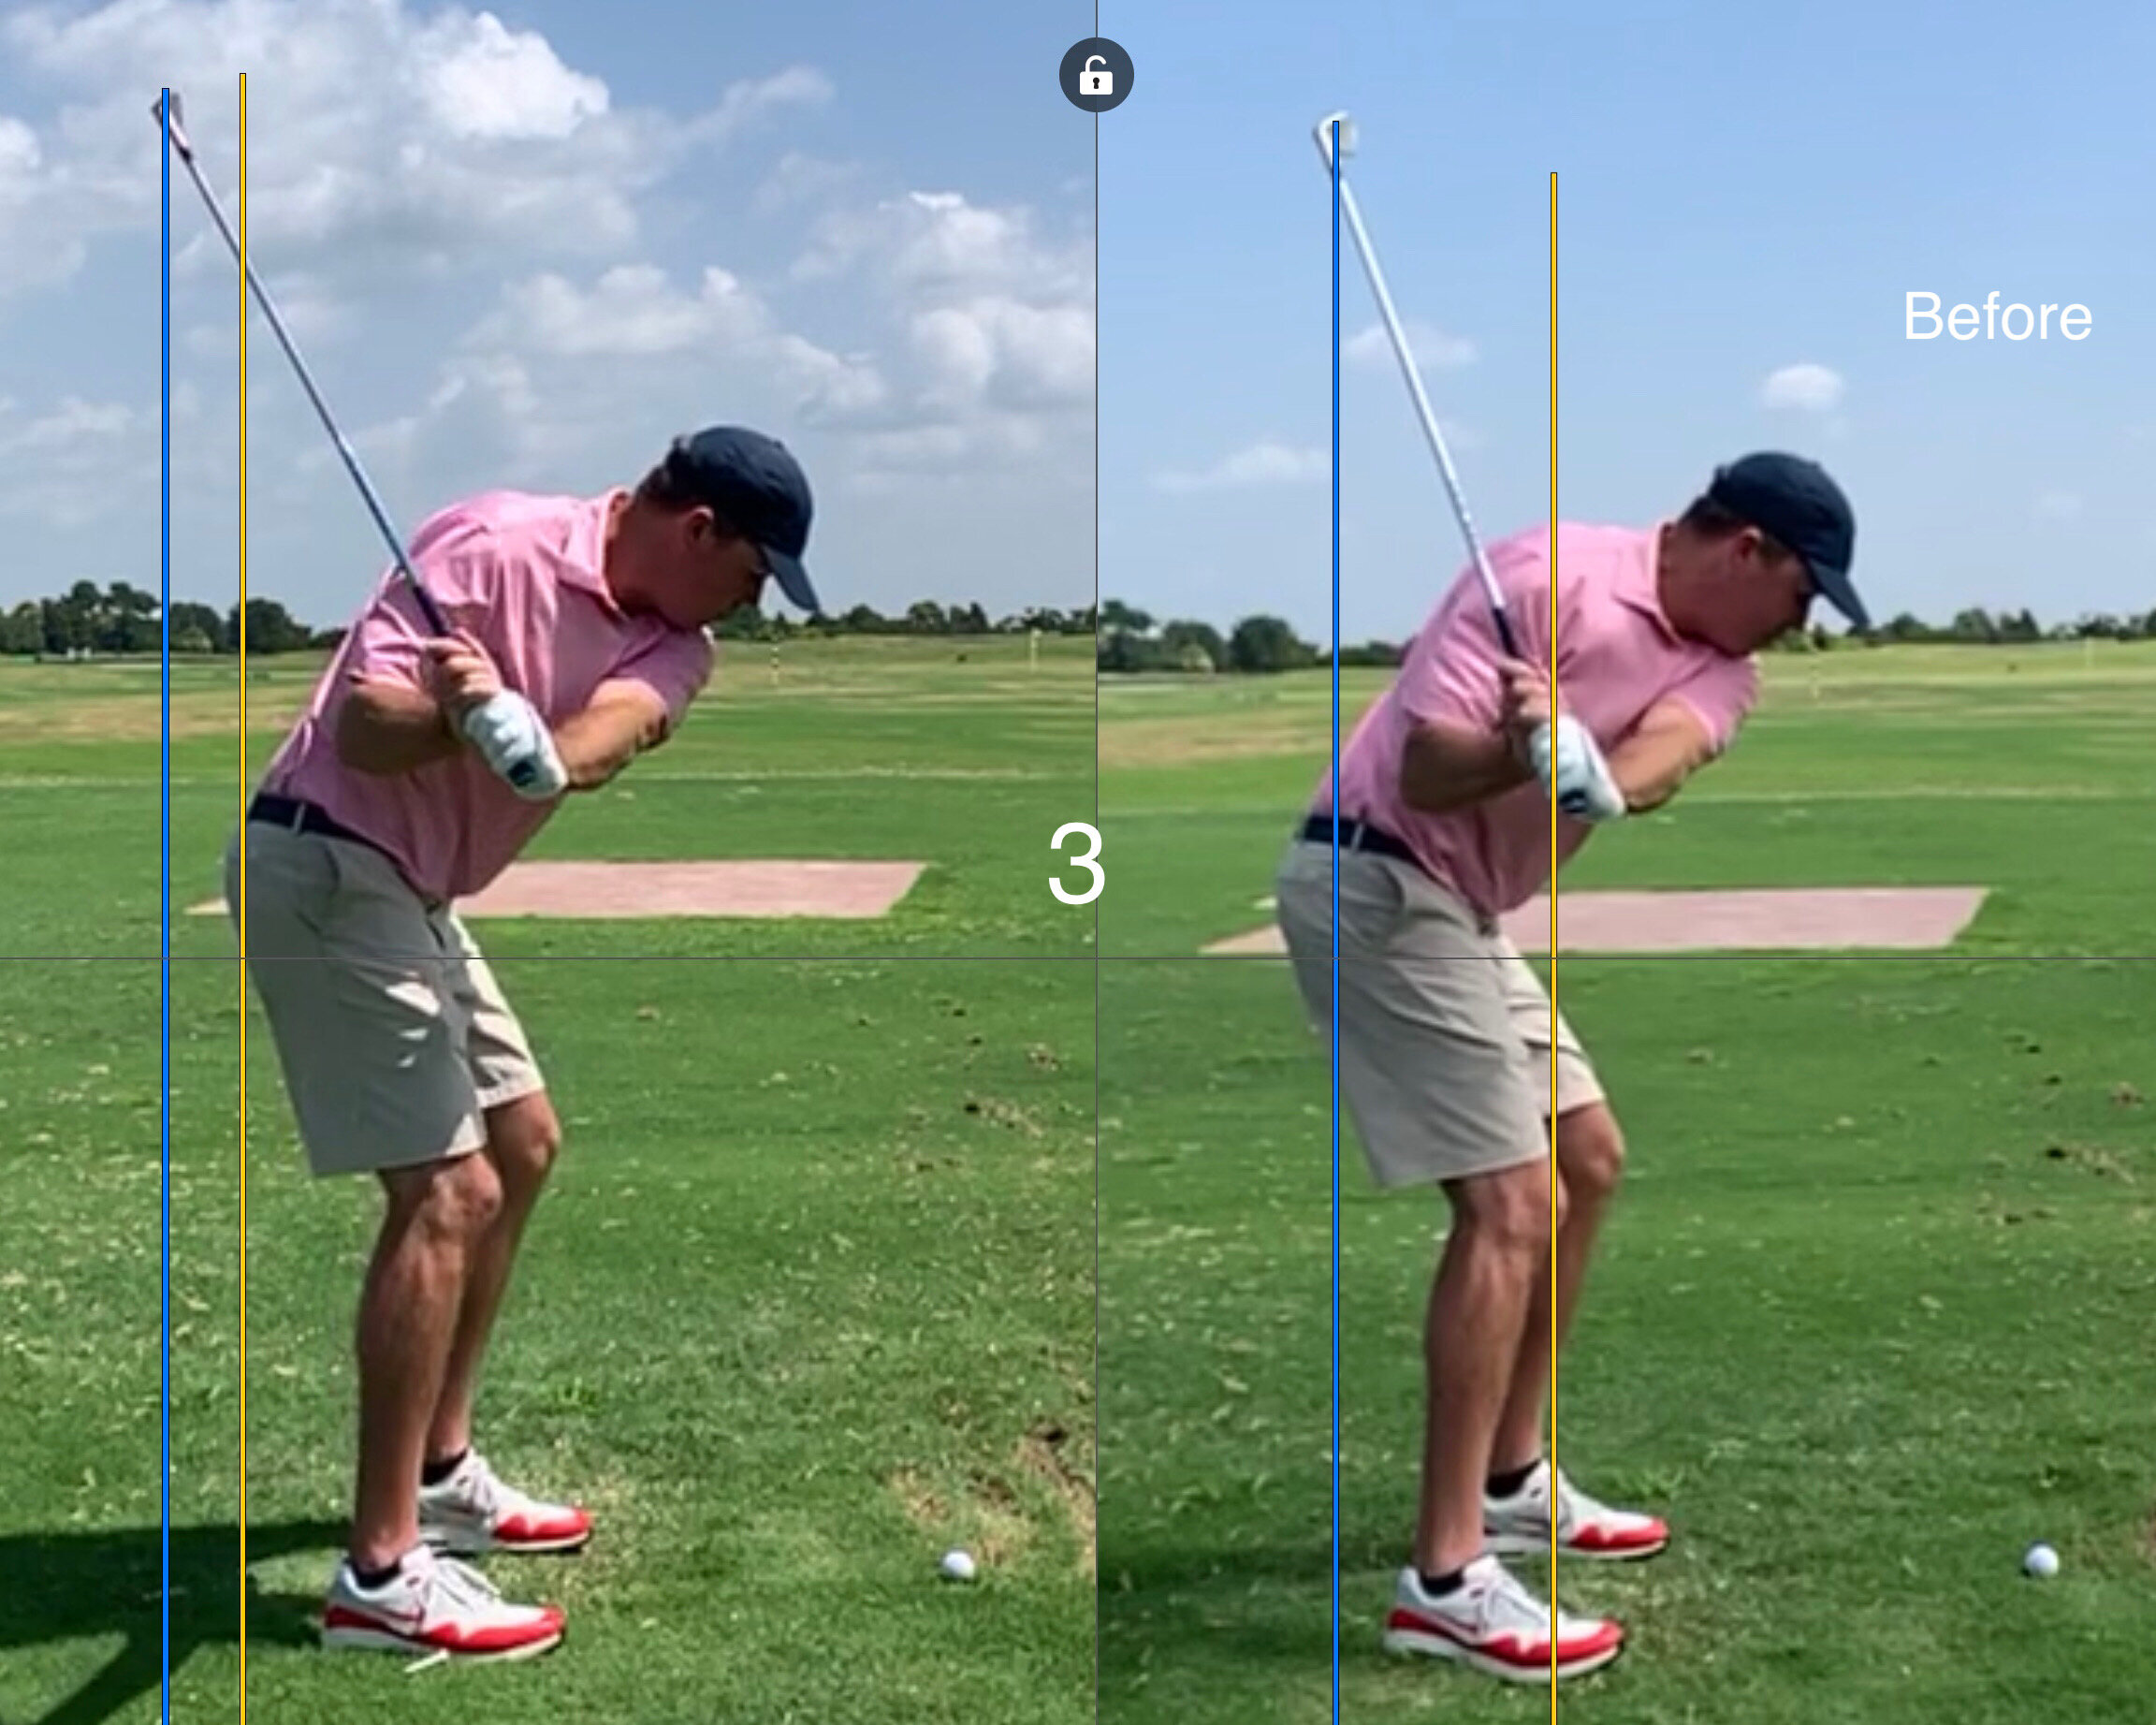
6F07DEF0-8421-449C-A111-4320A3C4E2B8.JPG

Image 3:

At approximately lead arm parallel to the ground notice how the golfer has had to force the club head to lay down on the before side. This is indicated by the difference in gap between the yellow and blue lines. Not much difference here, but the force the player is exerting on the club is very different here.
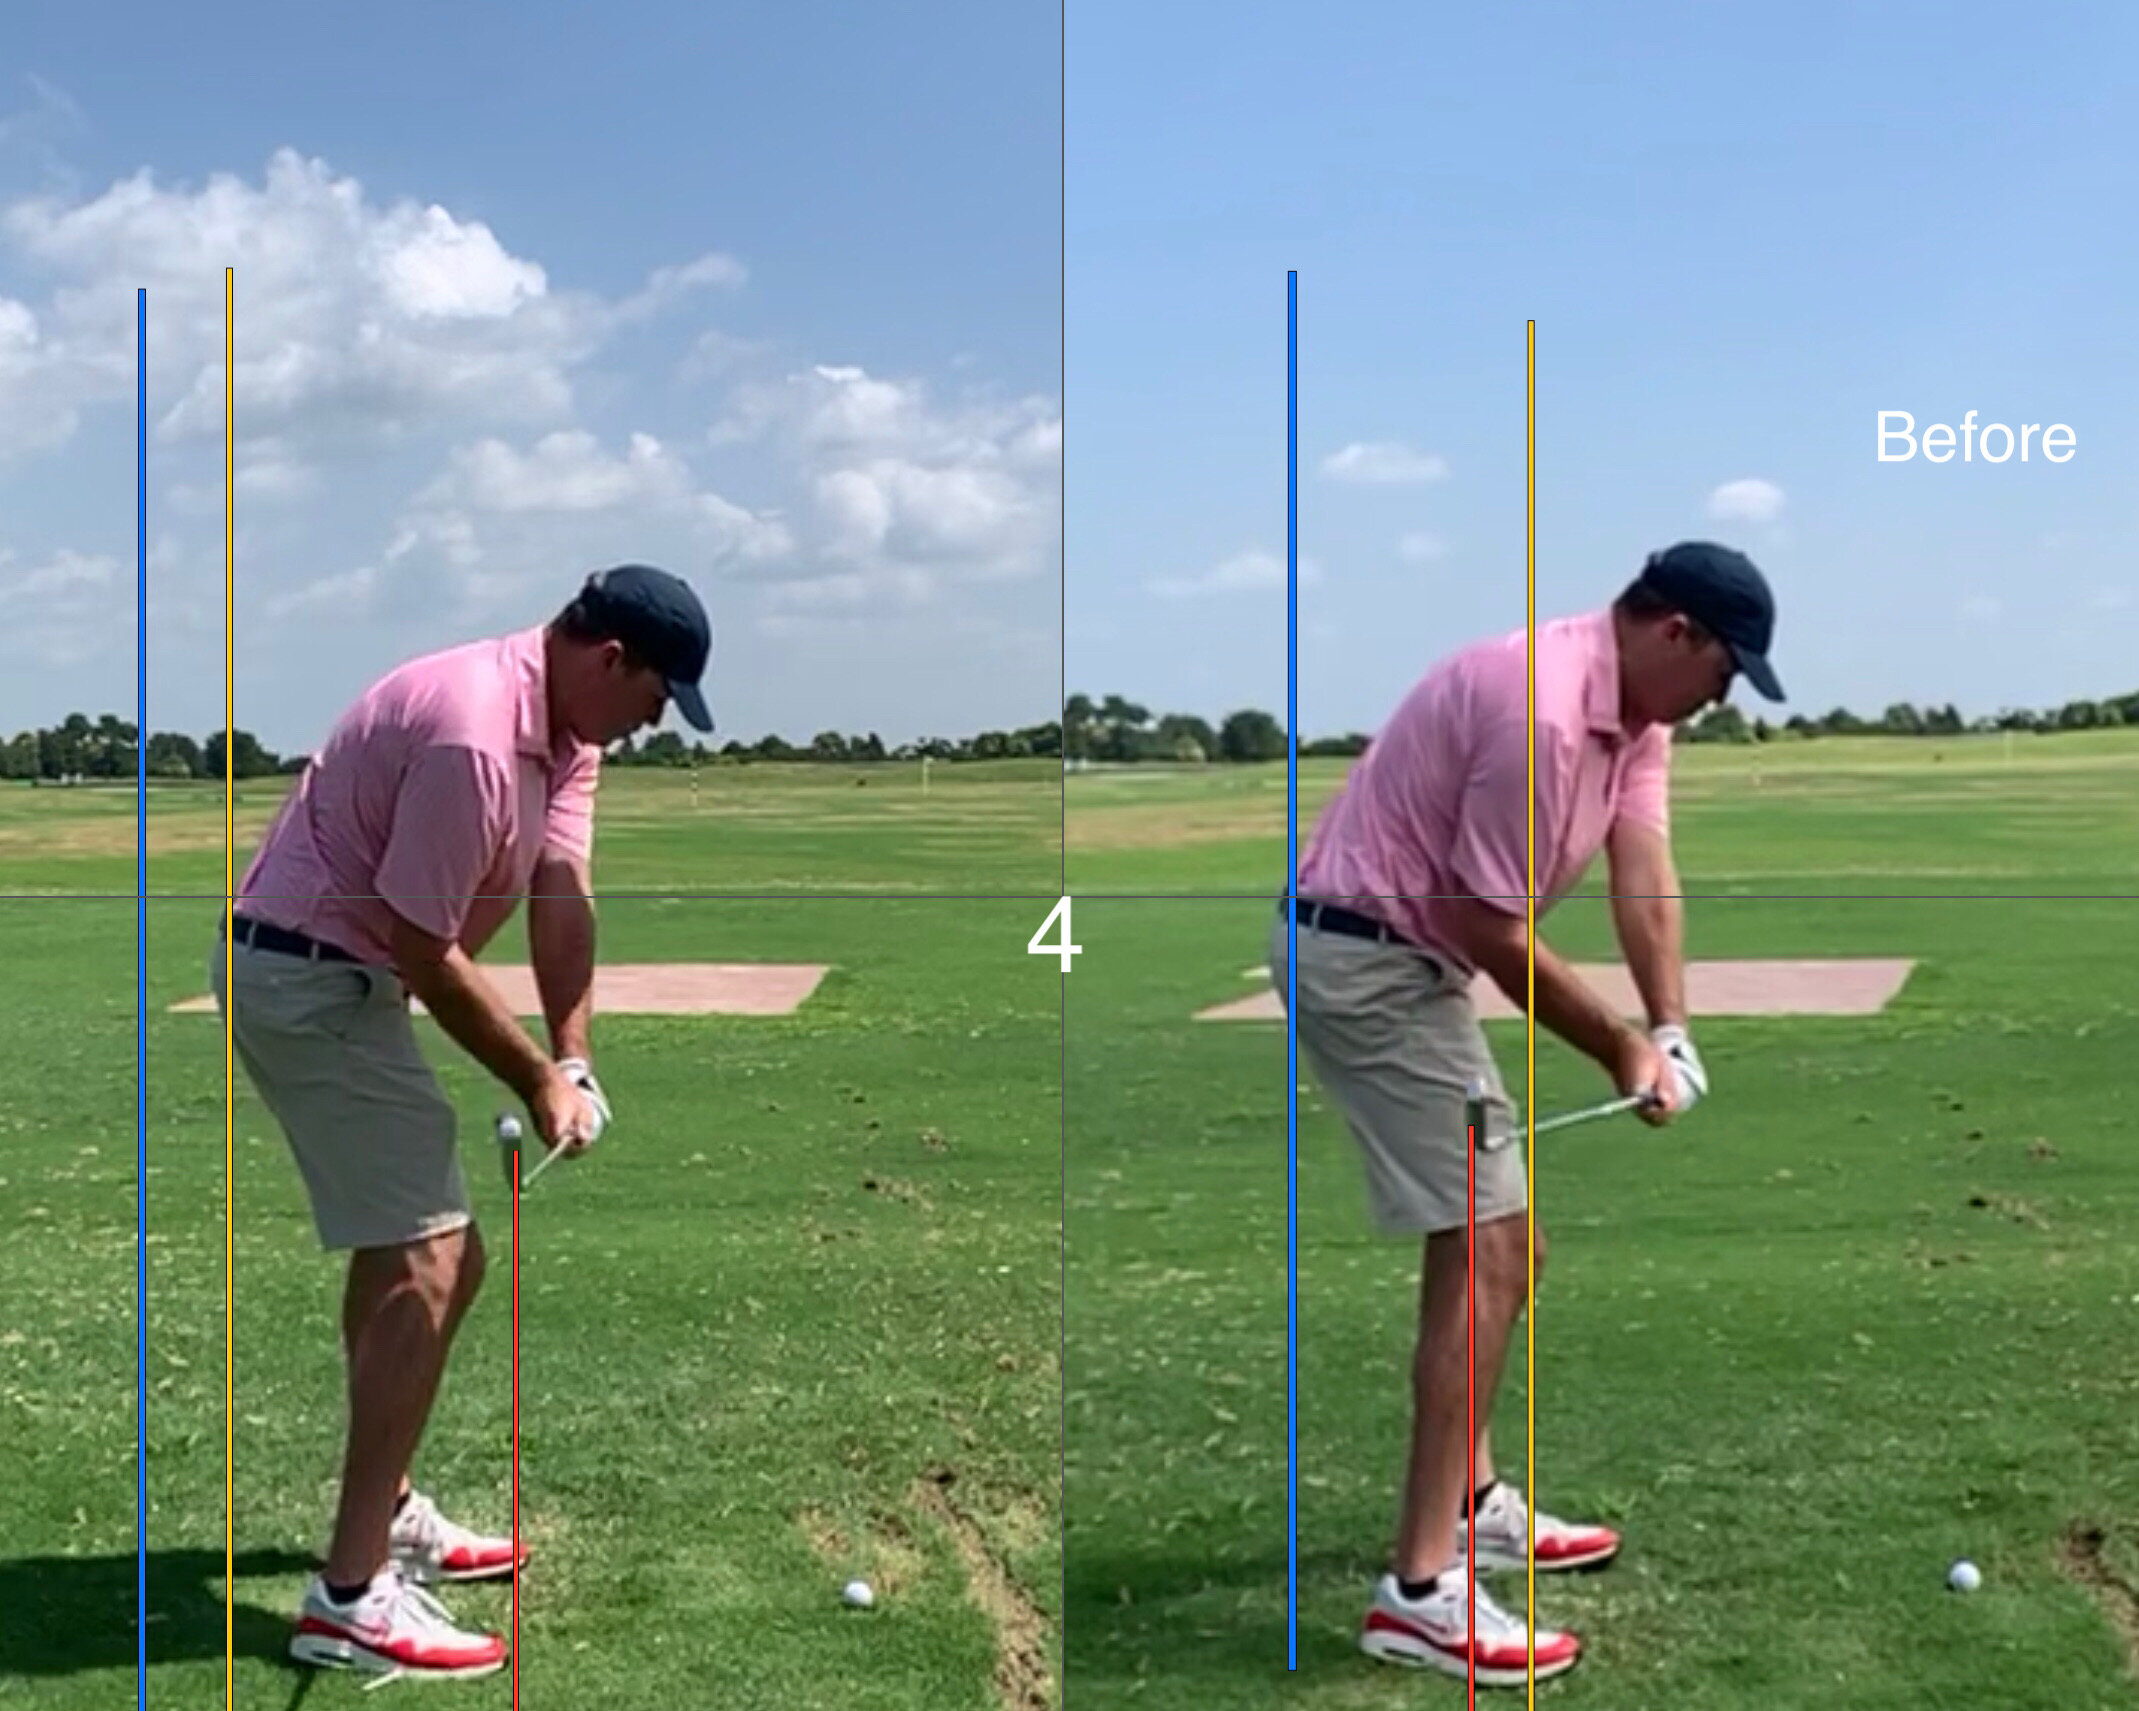
F07F5352-2ECE-48A5-BDD0-EE6285807F13.JPG

Image 4:

This is where the difference starts to show. On the right side you’ll notice that the excessive, yet necessary, lay down force has bled over and now has the club head in a position where the path will be too far out to the right, strike quality will be compromised and the player is dealing with blocks and hooks. Notice how the gap between blue and red line on the left is greater on the left side. That’s due to the fact that the golfer is free to rotate instead of having to force the club head to the inside in the downswing. Who wouldn’t want to turn hard and fire in the downswing?

Image 5:

The original downswing! With this move the golfer gets the club head too far to the inside coming into the golf ball and will struggle with blocks, hooks and poor quality strikes. Success with this downswing is very much timing reliant.

Image 6:

The objective for the downswing! With this move the golfer will deliver the club with a more neutral path, will hit down on the ball appropriately and be far less reliant on timing coming into impact. A happy golfer and coach.

So how did we get it done? With a short-ish backswing the club head needed to be in a better position at the top of the backswing as the player had very little time to calibrate and position the club head for a proper delivery. Our goal was to improve the position at the top of the backswing in order to make the downswing free-er so the golfer could rotate hard left through impact. A good recipe for crisp strikes coupled with improved accuracy.

The results here were as intended - a more neutral path and better attack angle for straighter and properly struck shots.

Please don’t ever judge a golf swing by one picture.

Build a Better Backswing

If you watch any golf on TV you’ll notice that there certainly doesn’t seem to be one backswing that is universal to all Tour players. Their backswings range from long to short, laid off to across the line and fast to slow. The million dollar question is which one will work best for you and your game. Watch this video to start to understand your options…

Length of Backswing

  1. Don’t be overly anxious to shorten your backswing. If the arms are collapsing or the hands are letting go then by all means work towards making the necessary upgrades.

  2. Longer backswings should almost have an across the line look, while shorter backswings simply must have the clubhead more behind them with a laid off look.

Amount of Time

  1. Ideally the amount of time taken once the club starts the motion away from the ball is right around 1 second. 0.75 seconds up to the top and 0.25 seconds for the downswing.

  2. Try the rapid fire drill to gain a sense of the appropriate amount of time as the vast majority of golfers take too much time and actually swing too slowly.

  3. The rolling start drill gets the club moving as it kicks the motion off.

Clubface Position

  1. Open face golfers will typically have a difficult time hitting low shots and generating enough compression. The clubface is almost always open in the early downswing and this leads to flipping through impact to get the clubface around.

  2. Closed face golfers will struggle to get their long irons in the air. Compression is fine and the ball goes far enough, but getting an appropriate trajectory is a challenge. Get the clubface vertical in the early part of the backswing. Have the intent to hit the ball really high in practice.

Ponder a few of these ideas, try a few of the drills and I hope that a few of these ideas help you to enjoy your next round of golf that much more.

SpiethTop.JPG

Cheers!

A Long Swing or a Short Swing?

The good news is that either one can get the job done, but we cannot view these two very different golf swings through the same lens. There are certain fundamental differences that we must keep in mind. Watch...

For the shorter backswing:

  • Get the wrists, arms and shaft organized early in the backswing
  • The club should favor being laid off at the top
  • The lead wrist should be flat or bowed at the top

For the longer backswing:

  • There is more freedom in the backswing as player has more time available to organize in transition and on the way down
  • The club should favor being across the line
  • The lead wrist can be either cupped or bowed

I do typically prefer slightly longer swings over shorter swings, but above all else I prefer swings that work. If you look at the greatest players of all time you'll see significantly more long swings than noticeably short swings. I have also found that longer swings will typically produce faster club speeds. Never a bad thing!

Keep in mind that these are generalized ideas that have been found to work on the students I have been fortunate to coach over the years. They have also been verified by other coaches and a scientist or two, but they are not set in stone. The objective is always improved performance.

.

How to Shallow the Shaft

For most golfers this is a biggie! If they can manage to get the shaft to shallow or flatten in the early stages of the downswing their chances of drawing the ball, along with a consistently crisp strike are greatly improved.

There are a few key factors to implement that will firm up your ability to shallow the shaft in transition. Watch...

My three important keys are:

  1. A flat lead wrist at the top of the backswing. If you can shoot in the 60's this is not imperative, but it will make the job of flattening the lead wrist in transition and the downswing that much easier.
  2. Get the shaft either straight or laid-off at the top of the backswing. Where you point the handle ultimately determines where the shaft is angled and it's much easier to manage it this way.
  3. Allow the hands to travel out or in front of you slightly as you start down. Be careful you don't over do this, but there are few things worse than getting the hands tucked in behind you in the downswing.
Woods, Trevino, Pettersson and Snead

Woods, Trevino, Pettersson and Snead

In the above image Tiger displays a flat left wrist and a slightly laid-off shaft, Trevino has shallowed the shaft and has a flat lead wrist, Carl Pettersson really gets his hands to travel out at the start of the downswing and Snead follows suit. All positive swing elements to emulate.

I would recommend you start your quest to improve this important swing factor in front of a mirror. Get a feel for each of the three keys by watching them and "seeing" what they need to feel like and then you'll be free to head out to the practice ground.

This free website's biggest source of support is when you decide to book a lesson or golf school. You can contact me HERE. If you live in another state or country please consider making a purchase HERE or HERE. It will help your game in addition to helping me to keep adding to this free website. Thanks again for your support! Andrew.