Hitting Up on the Driver

I often conduct this demonstration for my Three Day Golf students where I hit back to back shots and attempt to illustrate the value of hitting up on the driver and what it could mean to their tee shots. For good measure I also throw in a little fade versus draw at the same time. 

My intent is to maintain a similar club speed from one swing to the next and if possible strike the ball in a similar location on the club face. As you'll see this was an occasion where I managed to get pretty close...

IMG_2039.JPG

This TrackMan screenshot illustrates the first shot where the idea was to hit down and across the target line, imparting a low launching and fading ball flight...

The First Shot

The First Shot

This TrackMan screenshot illustrates the follow-up shot where the plan was to deliver the club head to the ball with it traveling up and outward, imparting a higher launch and gentle draw to the ball flight...

The Second Shot

The Second Shot

Let's take a deeper look to see what some of the important differences are between these two interesting shots:

  1. Attack Angle - The 9.1º difference is the primary reason why the second shot traveled significantly further than the initial attempt. This was achieved with a change in tee height, address position and intent.
  2. Club Path - The almost 14º difference here will generally lead to a huge change in ball flight curvature. My findings have shown that when it comes to shot shape the club path plays a primary role.
  3. Launch Angle - The old adage of 'hit down to make the ball go up' takes a beating here as the shot hit with an ascending strike launches significantly higher.
  4. Club Speed - Nothing much to see here other than to verify that the club head for each shot is traveling at virtually identical speeds.
  5. Ball Speed - Another interesting nugget here is that while the carry and total distances are significantly different there is very little difference in the ball speed from shot to shot.
  6. Carry - Wow! That's amazing isn't it? While impact location for the second shot was slightly higher on the face (and a hint more toward the toe) which might lend to slightly longer carry distance the direction the club head was traveling (up and out) is the primary difference maker here.
  7. Total - As you might imagine the increase in total distance follows suit along with the increase in carry distance.

I know we could all benefit from a gain in almost 30 yards off the tee. And keep in mind that's at the same speed and with the same club! No need to hit the gym or shop for a new driver. This video gives some insight into what's required to affect the changes you've seen in this demonstration...

Thanks for reading/watching. If you need hands-on help with your game I'd love to host you in Savannah at the Westin Savannah Harbor Resort for either a lesson or a Three Day Golf School. Email terri(at)andrewricegolf.com for details.

Driver Education

Here's a fun video I filmed in collaboration with Mark Crossfield and Denis Pugh. I believe it covers almost all the pertinent points any golfer should be looking into in order to be able to hit the ball longer and straighter...

I hope you enjoyed this and are keen to get out there and try a few of the suggested ideas and drills to see if you can improve off the tee.

Thanks for watching!

From Slicer to Bomber

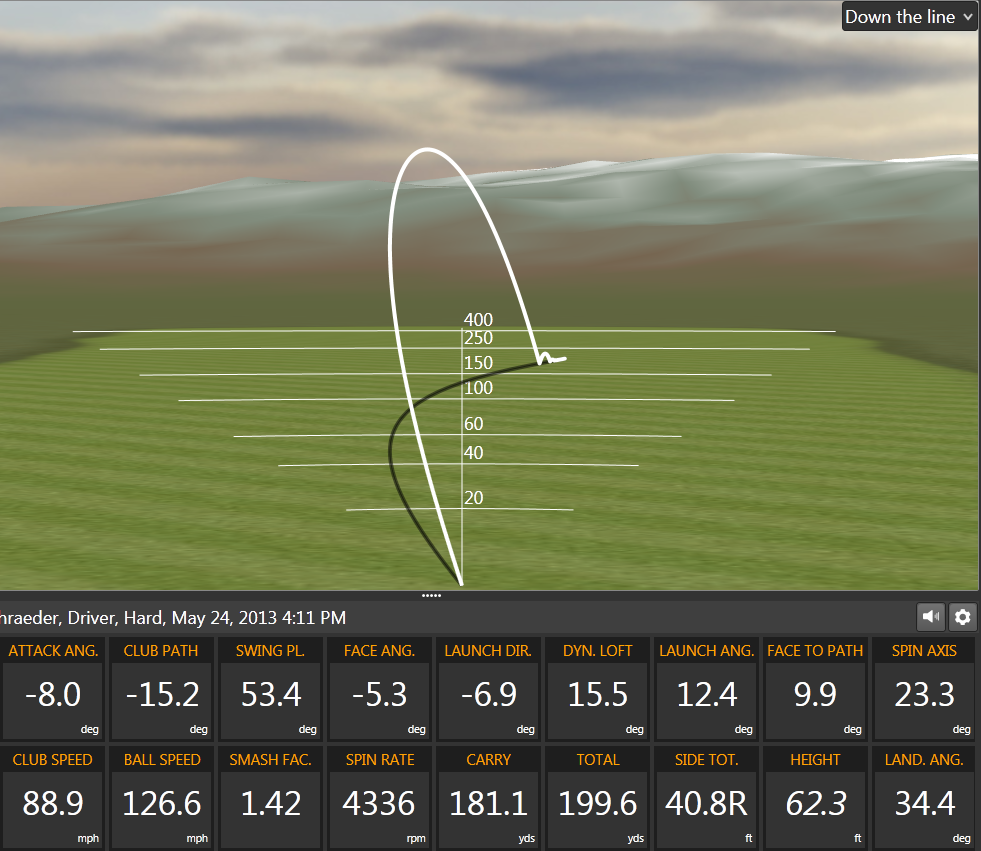
An Average Slicer Tee Ball The above TrackMan screenshot indicates a very typical pattern for the slicer - an overly inward club path (-15.2 degrees out to in) along with a clubface angle that is open/right of where the clubhead is travelling (9.9 degrees). This package results in shots that invariably launch left and curve aggressively right, often shaping across the target line. The end result is a far from optimal tee shot coupled with a healthy fear of any shot that leaks too far into right field!

The video below demonstrates what I did with the "owner" of the slice illustrated above. I have had tremendous success with this technique - primarily, I believe, because it taps into a golfer's instinct that screams - in order for my ball to not leak right I must swing as much to the left as possible. Essentially the drill gives the golfer a reason, something they've never had, to swing to the right. Take a look....


  • Tilt the face down 30 degrees (1 hour)
  • Take normal grip
  • Adjust shoulders and arms to square the face at address
  • Swing out to right field

After working on this drill for a while the golfer started to get comfortable and gain a measure of confidence that the ball actually would work back to the left.  This is what happened...

From Slicer to Bomber...

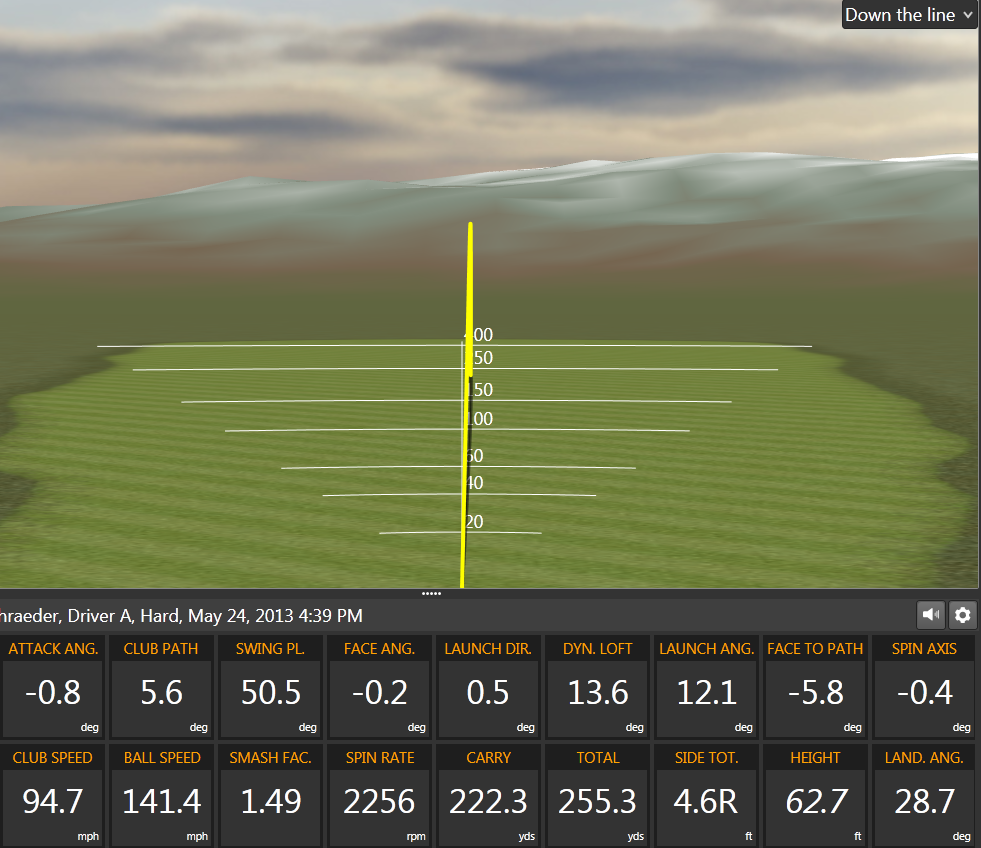
As you can tell from the above numbers the golfer has hit this shot more 55 yards longer. Part of that (15 yards) is due to an increase in speed, but as you can see - this player is now swinging from in to out, is hitting far less down on the ball, has substantially less spin and were it not for a slight heel side strike this would have been even longer.

These screenshots were taken during the course of a standard one hour lesson. They indicate an average shot from the player before the change and after. The golfer hit shots that were worse and better than both examples shown. Unfortunately an increase of 55 yards is not normal, but every little bit helps...!