Rotation Drill

Most of us should be working towards better rotation through impact. One of the biggest differences I see between the everyday golfer and the pros is the amount of hip rotation that has occurred at impact. What I call the “two cheek” impact position where both butt cheeks are visible from down the line at impact. This drill will help! Take a look…

Notes:

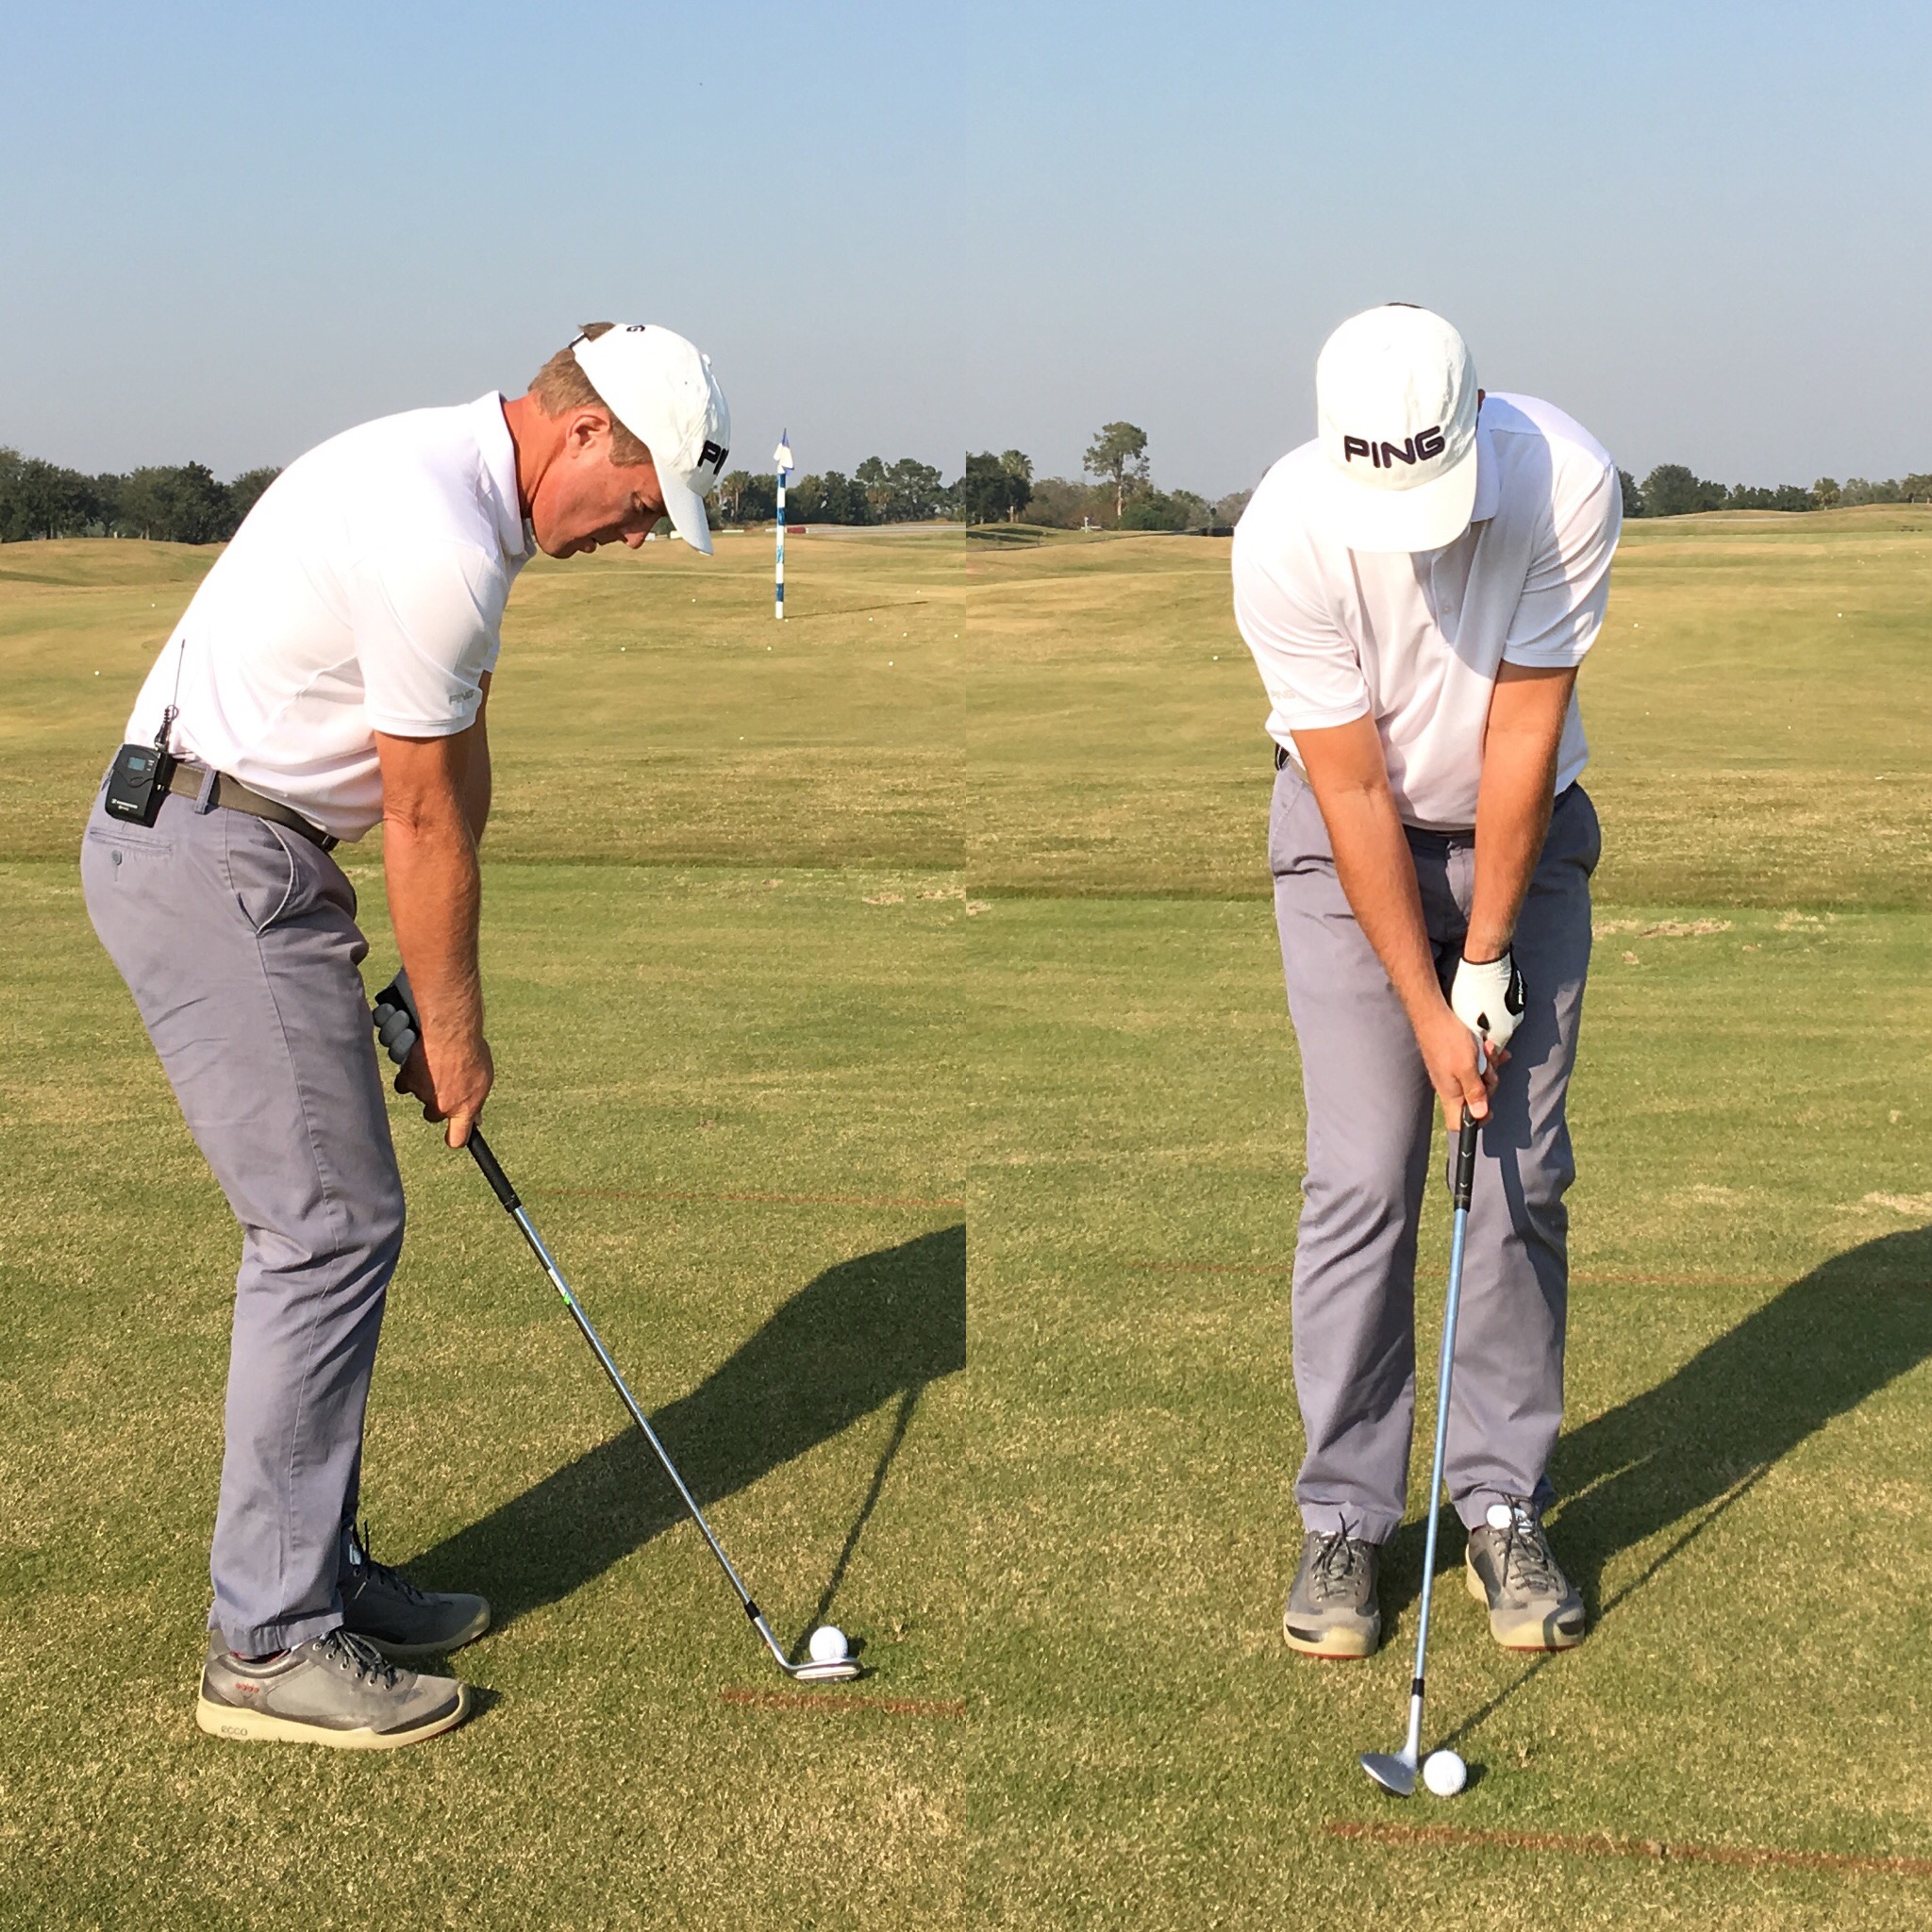
  • Grab an 8 or 9 iron and set up to the ball which initially should be on a tee.

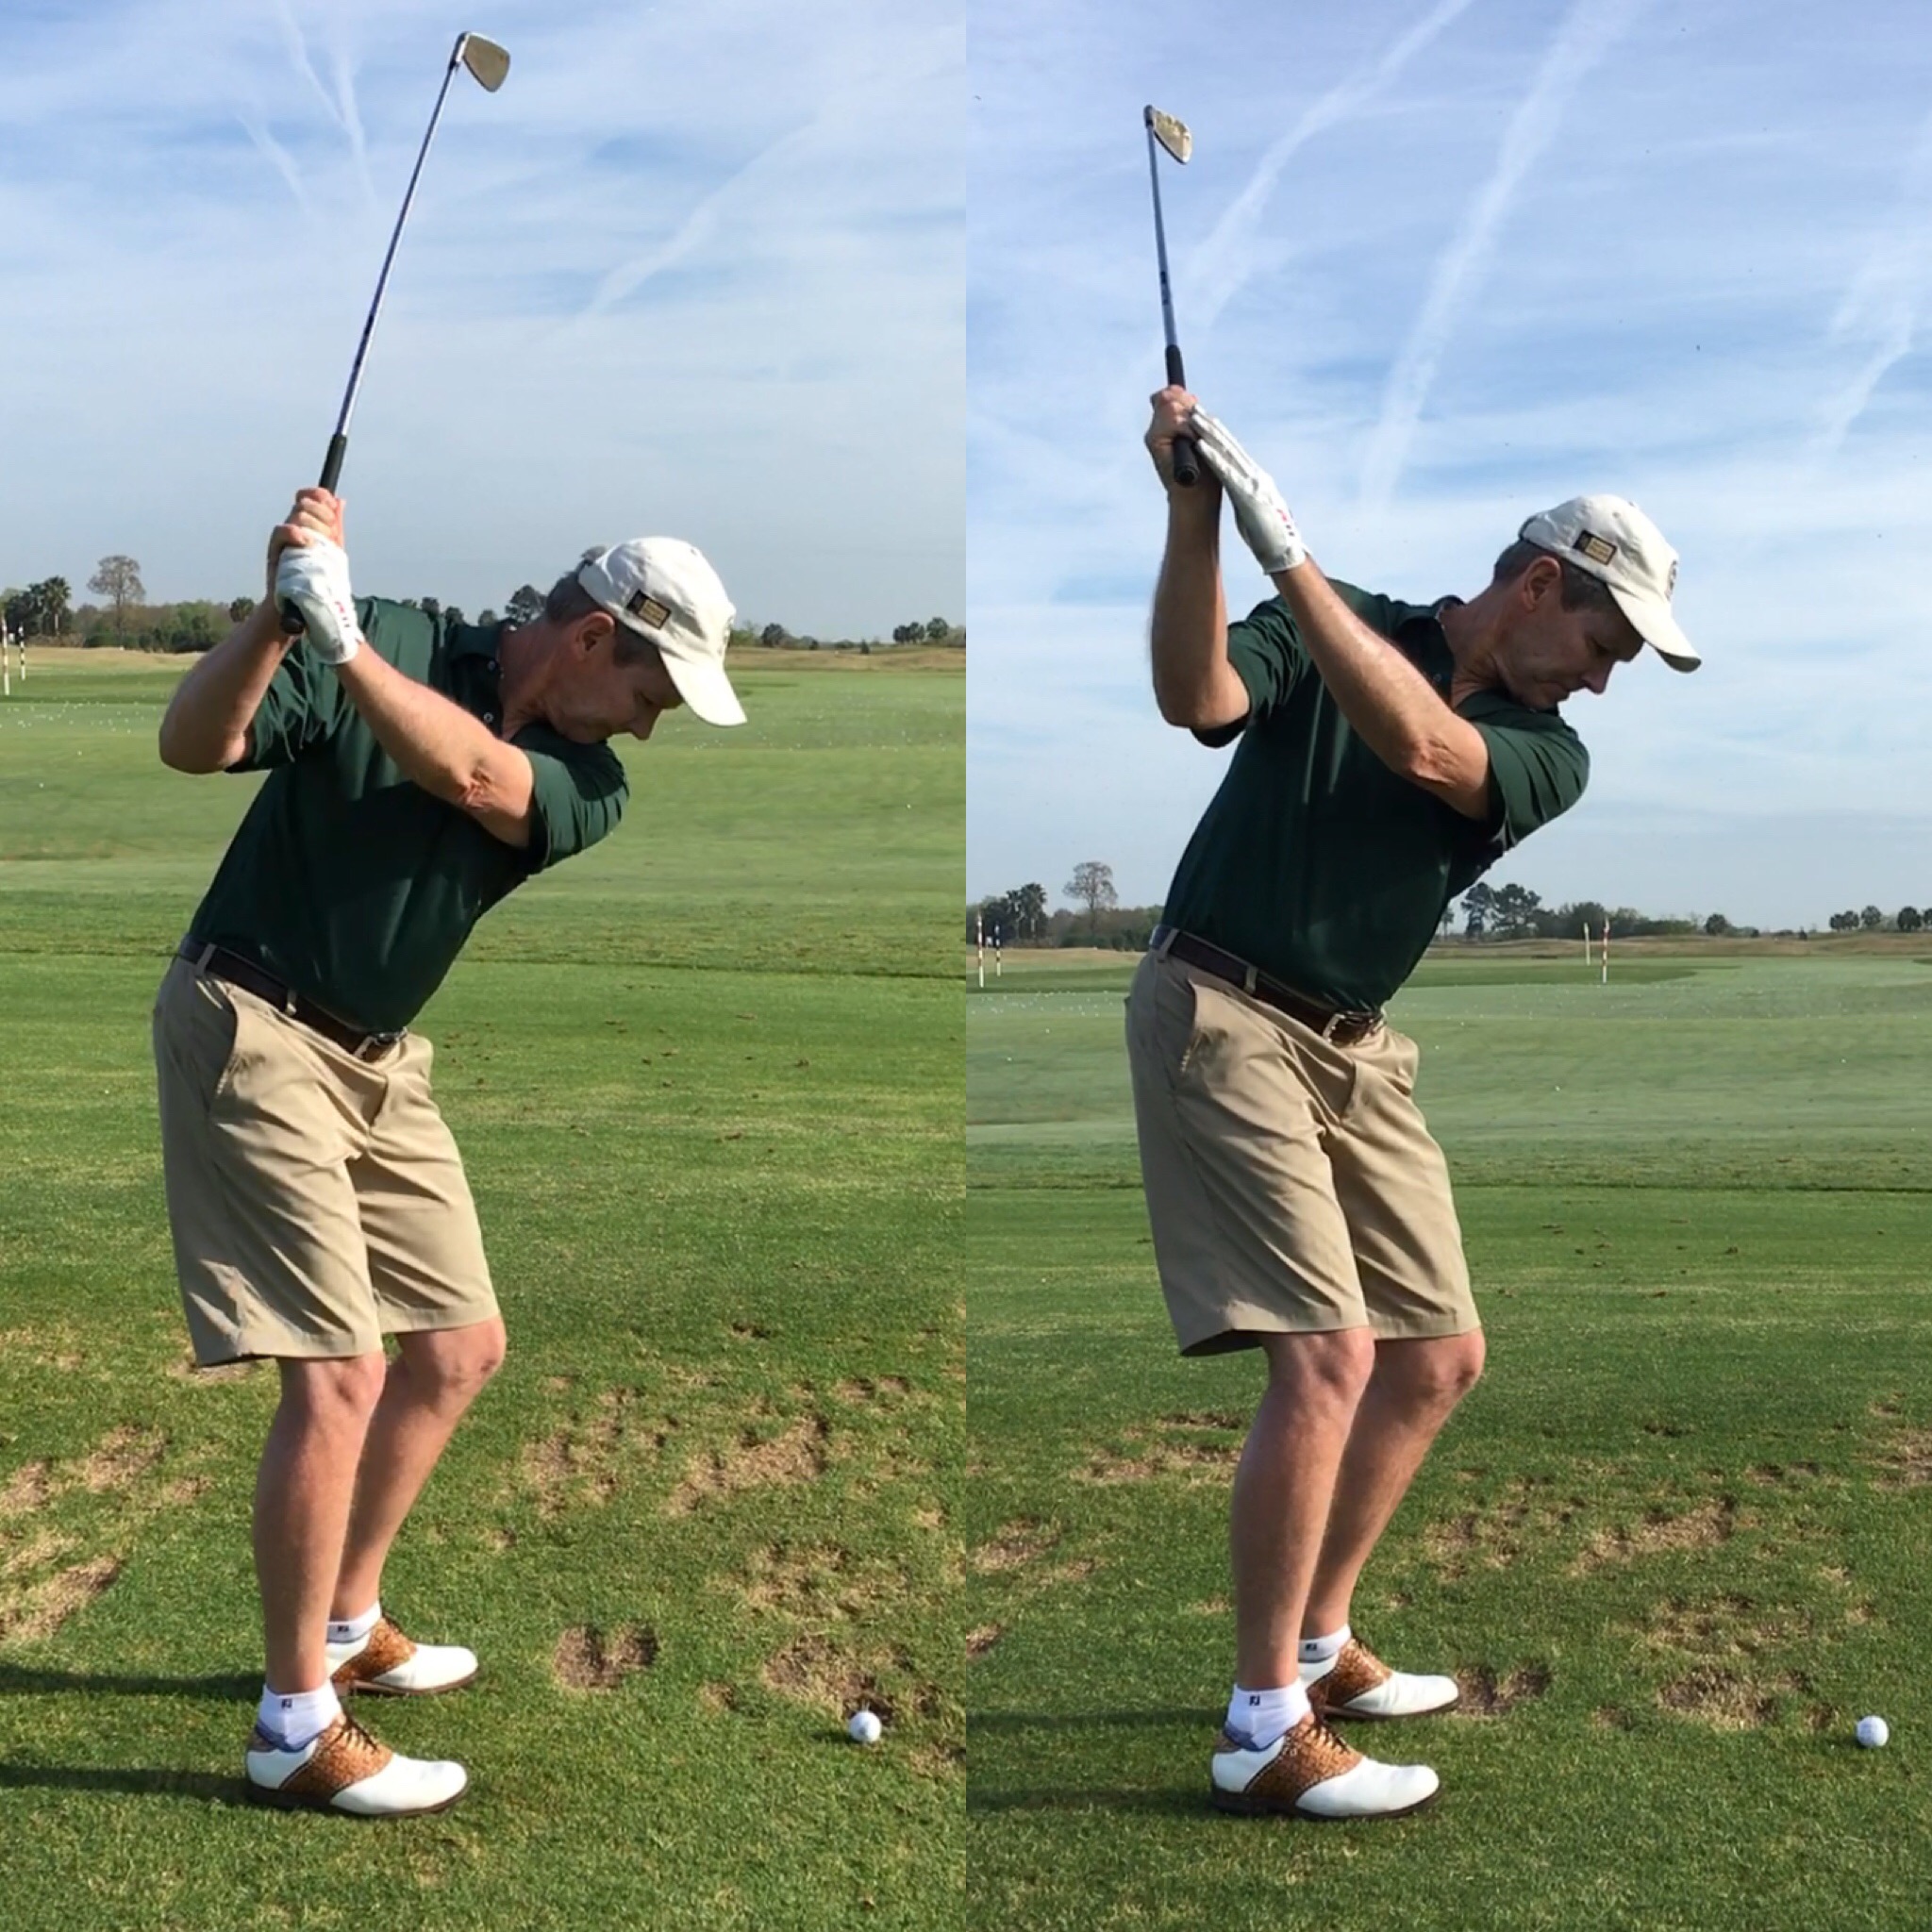
  • Wind about halfway back into the backswing and pump down to where the shaft is approximately parallel to the ground. Here you should feel your chest and hips as open as you can possibly get them.

  • After a few rehearsals give the ball a light hit and slowly build up speed while incorporating this sense into full speed swings.

Let’s keep in mind that in order to be able to rotate more freely through impact is largely an indicator of the clubhead and club face being in an acceptable position in the early part of the downswing. If your club face is wide open and you try to rotate more through impact there’s a strong chance you’ll actually hit the ball worse! Start with getting the clubhead deep in the early downswing and the club face fairly strong - from there this drill will work wonders for your ballstriking.

Thanks so much for watching/reading along. I hope that in some small way I am able to contribute to the joy you experience out on the links. Until next time…

Try This for Better Compression

Too many golfers that I teach are struggling to compress the golf ball! There is a distinct lack of energy being transferred from the clubhead to the ball. Getting the club face in position in the early part of the downswing is tremendously helpful in increasing compression and the sizzle factor off the face. Here’s how…

When trying this drill look for the following:

  • Don’t try to hit balls with this - it’s all about getting the correct feel

  • Hold the club at the bottom of the grip in your lead hand with the clubhead well off the ground

  • As you get to the top you should see the handle out in front of your forearm

Doing this drill correctly will ensure that you’re getting both the club face and the clubhead in a good spot to initiate the downswing without having to work hard to shallow the club or lay the shaft down.

This should be your view when you have the club at the top of the backswing. Give it a try and see if you can incorporate the feel into your next practice or warm-up session.

Thanks for reading/watching along and it is my wish that somehow I can manage to share something that helps you experience more joy while you’re out on the links.

Cheers!

Make a BIGGER Backswing!

I struggle with this one too! Making a bigger backswing. So many ‘seasoned’ golfers that I have the privilege of working with struggle to make a big enough backswing and it really hinders their ability to hit the ball both far enough and well enough. Watch…

A few keys to help you to start getting more out of your body and your backswing:

  • Work towards turning your hips as far back as you can

  • Free up your feet by allowing the lead heel to lift off the ground

  • Allow the trail leg to straighten significantly

  • Any amount of improvement in flexibility will help in this department

BubbaTop.JPG

Now, not many of us will be able to get to where Bubba is in the above image, but let it serve as inspiration for all of us. That bigger turn, when done properly, will allow for an increase in clubhead speed and more time to organize the club face as it approach impact.

Take your time, but start the journey today. Allocate one month to this endeavor by committing to make 20 BIG practice swings each day. I think you’ll be amazed!

A Lesson to Learn From...

I recently gave an old friend a lesson. Having not taught him for a few years I had an inkling as to what to expect, but things came together so well I thought the information might be beneficial to more than just one student.

This is why looking at still frames of an athletic motion can be deceiving. There are six different images/videos here that we will go through in a specific order. To get the most out of this post please make sure you go through this it slowly. Be sure you comprehend each image before moving to the next…

614EC106-E63C-4C19-B0D3-B858E784B158.JPG

(The original/before is always on the right in all of the images/videos)

Image 1:

Notice how these two images appear to be somewhat similar. I think many of us would give them both a thumbs up! They might be somewhat similar, but the outcomes are very different due to the unseen forces being applied to the club. Do not be deceived!

DB255940-B2A6-477C-B9A5-F8545133331B.JPG

Image 2:

The player at the top of the backswing. The yellow line indicates where the sweet spot is relative to the feet and the golf ball. Notice that in the ‘after’ version the club head is significantly further to the inside than the original. This is shown by the distance between the line and the golf ball.

6F07DEF0-8421-449C-A111-4320A3C4E2B8.JPG

Image 3:

At approximately lead arm parallel to the ground notice how the golfer has had to force the club head to lay down on the before side. This is indicated by the difference in gap between the yellow and blue lines. Not much difference here, but the force the player is exerting on the club is very different here.

F07F5352-2ECE-48A5-BDD0-EE6285807F13.JPG

Image 4:

This is where the difference starts to show. On the right side you’ll notice that the excessive, yet necessary, lay down force has bled over and now has the club head in a position where the path will be too far out to the right, strike quality will be compromised and the player is dealing with blocks and hooks. Notice how the gap between blue and red line on the left is greater on the left side. That’s due to the fact that the golfer is free to rotate instead of having to force the club head to the inside in the downswing. Who wouldn’t want to turn hard and fire in the downswing?

Image 5:

The original downswing! With this move the golfer gets the club head too far to the inside coming into the golf ball and will struggle with blocks, hooks and poor quality strikes. Success with this downswing is very much timing reliant.

Image 6:

The objective for the downswing! With this move the golfer will deliver the club with a more neutral path, will hit down on the ball appropriately and be far less reliant on timing coming into impact. A happy golfer and coach.

So how did we get it done? With a short-ish backswing the club head needed to be in a better position at the top of the backswing as the player had very little time to calibrate and position the club head for a proper delivery. Our goal was to improve the position at the top of the backswing in order to make the downswing free-er so the golfer could rotate hard left through impact. A good recipe for crisp strikes coupled with improved accuracy.

The results here were as intended - a more neutral path and better attack angle for straighter and properly struck shots.

Please don’t ever judge a golf swing by one picture.

Build a Better Backswing

If you watch any golf on TV you’ll notice that there certainly doesn’t seem to be one backswing that is universal to all Tour players. Their backswings range from long to short, laid off to across the line and fast to slow. The million dollar question is which one will work best for you and your game. Watch this video to start to understand your options…

Length of Backswing

  1. Don’t be overly anxious to shorten your backswing. If the arms are collapsing or the hands are letting go then by all means work towards making the necessary upgrades.

  2. Longer backswings should almost have an across the line look, while shorter backswings simply must have the clubhead more behind them with a laid off look.

Amount of Time

  1. Ideally the amount of time taken once the club starts the motion away from the ball is right around 1 second. 0.75 seconds up to the top and 0.25 seconds for the downswing.

  2. Try the rapid fire drill to gain a sense of the appropriate amount of time as the vast majority of golfers take too much time and actually swing too slowly.

  3. The rolling start drill gets the club moving as it kicks the motion off.

Clubface Position

  1. Open face golfers will typically have a difficult time hitting low shots and generating enough compression. The clubface is almost always open in the early downswing and this leads to flipping through impact to get the clubface around.

  2. Closed face golfers will struggle to get their long irons in the air. Compression is fine and the ball goes far enough, but getting an appropriate trajectory is a challenge. Get the clubface vertical in the early part of the backswing. Have the intent to hit the ball really high in practice.

Ponder a few of these ideas, try a few of the drills and I hope that a few of these ideas help you to enjoy your next round of golf that much more.

SpiethTop.JPG

Cheers!

Some "Different" Chipping Ideas

I’m sure we’ve all at some point or another received the all-time classic chipping advice - get the ball back, weight forward and trap the ball! You won’t hear anything like that in this lesson, but you will perhaps hear and see something you haven’t caught on to before.

Two of the best wedgers in recent memory have been Jose-Maria Olazabal and Brett Rumford. I’m sure you’ve heard of Ryder Cup star and Masters winner Olazabal, but you may not have heard of Rumford. The journeyman pro from Western Australia has won six times on the European Tour and has recently been battling wrist injury. Take it from me when I tell you he is as good, if not better than, anyone you’ve ever seen.

While their form in the video above is not identical (whose is?) there are two important movements they both incorporate. In the backswing they both shift the pressure forward, onto the front foot and in the downswing they both elevate or stand up through the strike.

Notice in the image below how Jose-Maria has moved ahead of the red line as he reaches the end of the backswing. My current opinion is that this stimulates motion (pressure shift) and encourages the chest to rotate through impact.

In the following image you can clearly see how Brett has elevated from the end of his backswing into the strike relative to the red line. This is perhaps the biggest mistake I see golfers make when wedging. They attempt to “stay down” and thus limit rotation and change the radius of their strike. This can have a mortifying effect on strike quality. And we all know that strike is king when it comes to the shortgame!

rumfordchipping.jpg

Be aware that these are not the only two great players that incorporate this motion - just two of the best.

There you have it, two simple ideas to go and try to incorporate into your next wedge practice session. Play around, be patient and I know you’ll start to crisp up your strikes around the greens. Thanks for reading and please share with a friend in need!

A Long Swing or a Short Swing?

The good news is that either one can get the job done, but we cannot view these two very different golf swings through the same lens. There are certain fundamental differences that we must keep in mind. Watch...

For the shorter backswing:

  • Get the wrists, arms and shaft organized early in the backswing
  • The club should favor being laid off at the top
  • The lead wrist should be flat or bowed at the top

For the longer backswing:

  • There is more freedom in the backswing as player has more time available to organize in transition and on the way down
  • The club should favor being across the line
  • The lead wrist can be either cupped or bowed

I do typically prefer slightly longer swings over shorter swings, but above all else I prefer swings that work. If you look at the greatest players of all time you'll see significantly more long swings than noticeably short swings. I have also found that longer swings will typically produce faster club speeds. Never a bad thing!

Keep in mind that these are generalized ideas that have been found to work on the students I have been fortunate to coach over the years. They have also been verified by other coaches and a scientist or two, but they are not set in stone. The objective is always improved performance.

.

My 3 Keys to Great Wedge Play

If you dread any form of pitch or chip shot then this article is expressly for you. If you feel like you could save a few more strokes around the greens then this article is for you. Utilizing better technique will literally make these shots easier. Here are a few straightforward improvements that will get the job done. Watch...

Key #1: Set Up

  • Feet should be close together. The most common mistake I see is a stance that's too wide.
  • Alignment should be square. Yes, square.
  • Ball position is centered to slightly forward.
  • Weight distribution is slightly favoring the front foot.
The Proper Set Up...

The Proper Set Up...

Key #2: Wrist Action

  • Wrists should be relatively quiet in the backswing.
  • Avoid excessive cupping in the lead wrist. The left wrist for you righties out there.

Key #3: Body Pivot

  • Keep the chest rotating through the strike in order to shallow the attack angle.
  • Extend the lead side through impact.
  • Avoid thoughts of "stay down", "hit down" or "pinch the ball".

As you work towards better technique be aware that your results are not going to transition from bad to good instantaneously. Taking ownership of the upgrades will take time and patience. Get the set up correct, use the wrists properly and shallow the angle of attack with good chest rotation. Now we're talking!

If you'd like to learn more about improving your wedge play check out the Wedge Project.


A Drill to Shallow the Shaft

Here is a simple drill that will help any golfer sense what the trail arm needs to be doing in the backswing. I call it the Tray Drill and it will not only improve the backswing, but should also eliminate the need for well-timed compensations on the way down into impact. Take a look...

Here's an image from a recent lesson with a golf professional that has always had a tough time getting his right arm to rotate properly in the backswing and as a result he's had to do so much in order to shallow the shaft. The before is on the left and the tray drill example is on the right. 

It's amazing what this simple drill can convey to any golfer who struggles to get their trail arm in a good spot leading into the downswing. Thanks for reading!

The Golf Swing and Time

A common complaint I hear from golfers is that their swings are too fast or aggressive.  They just have a sense that they are quick either in the transition or the downswing. Rhythm and pace are very important elements in the golf swing. When a golfer feels quick the first thing they do is try to 'slow down'...and in an attempt to get some rhythm in the swing they often go overboard and end up slowing everything down a little too much. This can lead to an overly slow start to the swing, which in turn leads to a rapid change in pace during the transition and on into impact.  It is this drastic change in speed that conveys the sense of quickness and aggression in the swing.

The PGATour average time for the backswing is right around 0.75 seconds, with an additional 0.25 seconds for the downswing. Notice that ideally there should be something close to a 3:1 ratio of backswing time vs. downswing time. That means that on average a Tour golfer will strike the ball in about a second from when the swing starts.  Ernie Els, one of the smoothest swings out there, takes just over a second to strike the ball while Nick Price, who has one of the faster swings, takes  around 0.8 seconds.  Far too many of golfers I teach take well over a second to complete just the backswing.  In watching Els or even Price, most golfers believe they swing a whole lot faster than either of those two top players - that is not the case.

Each of the above golfers are able to maintain a good rhythm in their swing because they maintain something close to a 3:1 ratio in their swings.  When a backswing takes over a second to complete the golfer is now faced with a 4:1 or even 5:1 ratio which feels way out of rhythm.

Here are a few pointers when trying to get better rhythm and pace back into your swing:

  • Don't try to speed up your backswing up too quickly - take one pill a day and not the whole bottle...
  • The body should not feel hurried; the wrists and arms will create much of the necessary increase in speed.
  • Try a few shots with the clubhead starting 2-3 feet ahead of the ball and then flow into the backswing in one motion. This gives the club a moving start and gradually increases the pace.
  • Remember that rhythm does not have to be slow...
  • Stay patient and gradually build up to it; try to build the speed in your downswing from the transition.

There are not many ways to track your timing ratio, but SwingCatalyst software does it for you.

Another factor to consider is that the less time your swing takes the less opportunity you have to get your body out of position. This is a very important factor and cannot be overlooked - keep the motion concise and it is more likely to be consistent. Give it a try....

The 84 Degree Secret Explained

The most interesting discovery I made when studying the top golfers of all-time for Its All About Impact was the 84 degree secret. It is uncanny how different all their swings are yet the vast majority of them find a way to obey this important element in the swing.

Please keep in mind that the 84 degree line is only important as it pertains to impact. It serves to position the weight correctly throughout the swing so that the body can easily glide into the proper impact position.

As you view the picture above picture a line running up this golfers right side (left as you view it).  The line forms an 84 degree angle off of vertical (90 degrees).  The line should run up the outside of the right leg, cut through a portion of the shoulder and just barely graze the side of the head. When studying swings I started to use this line to isolate body movement and quickly found it to be a good guide for the address position and as a player approached the top of the backswing.

Wright 84
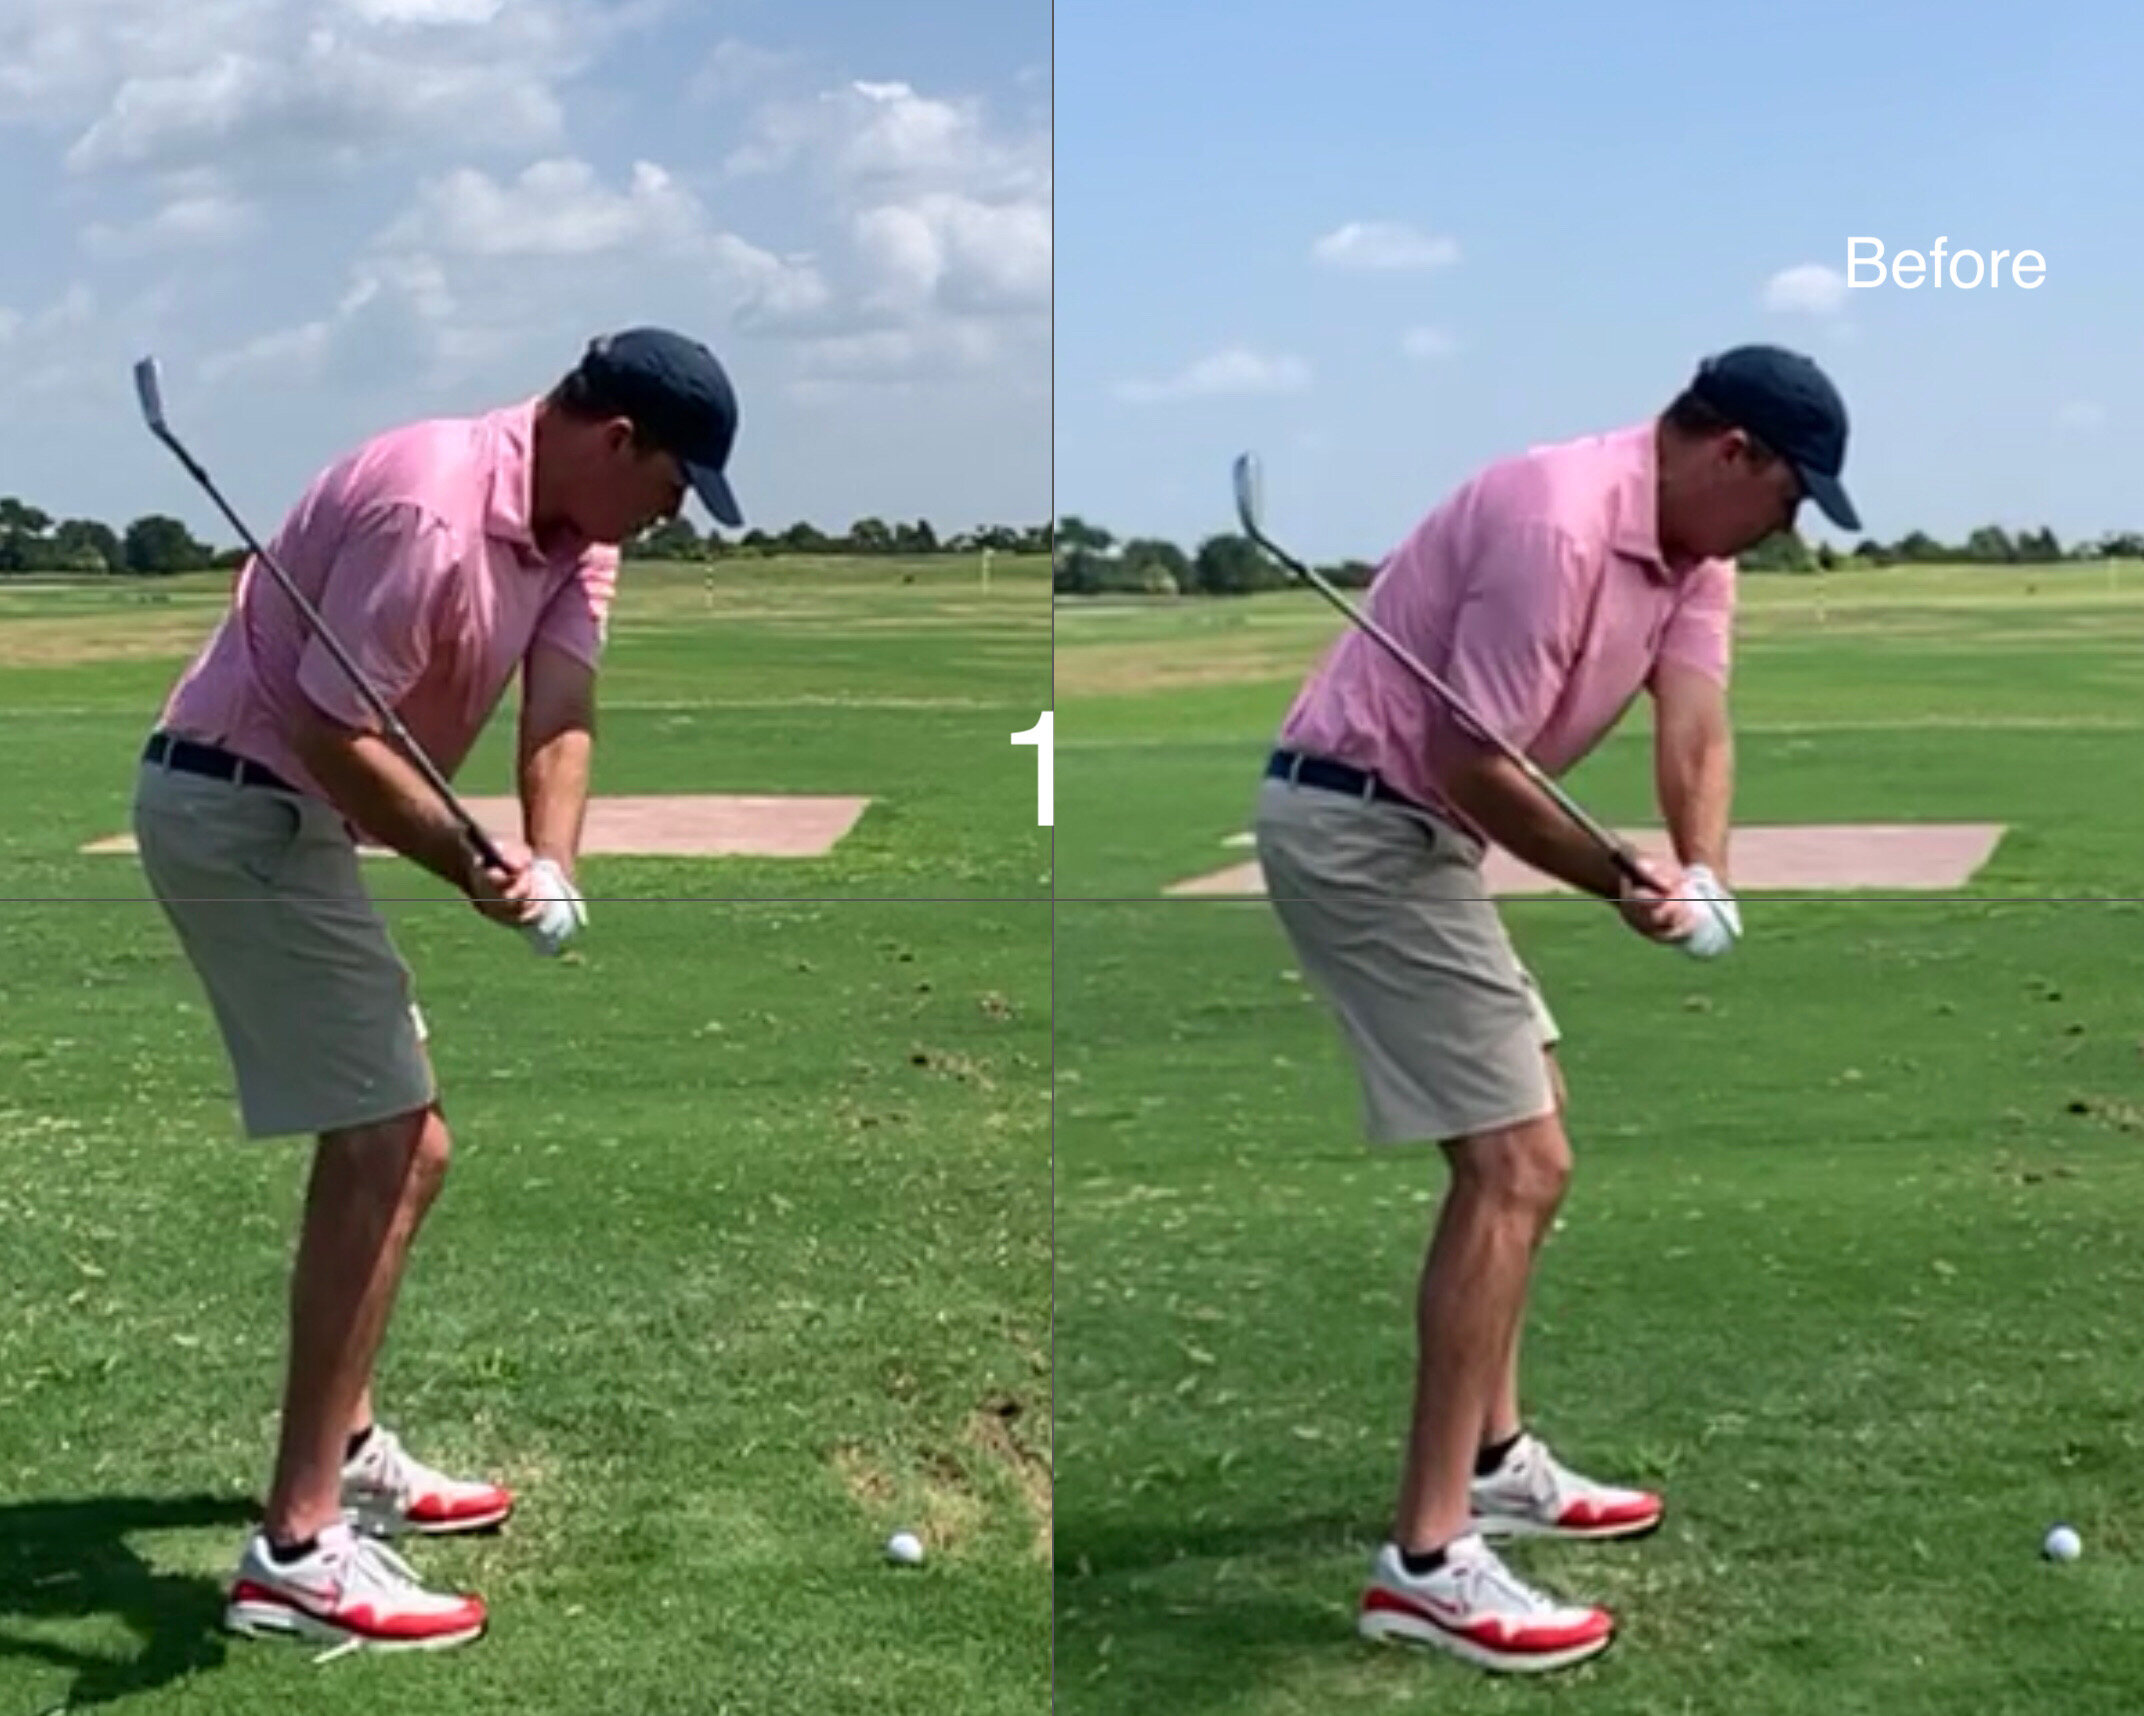
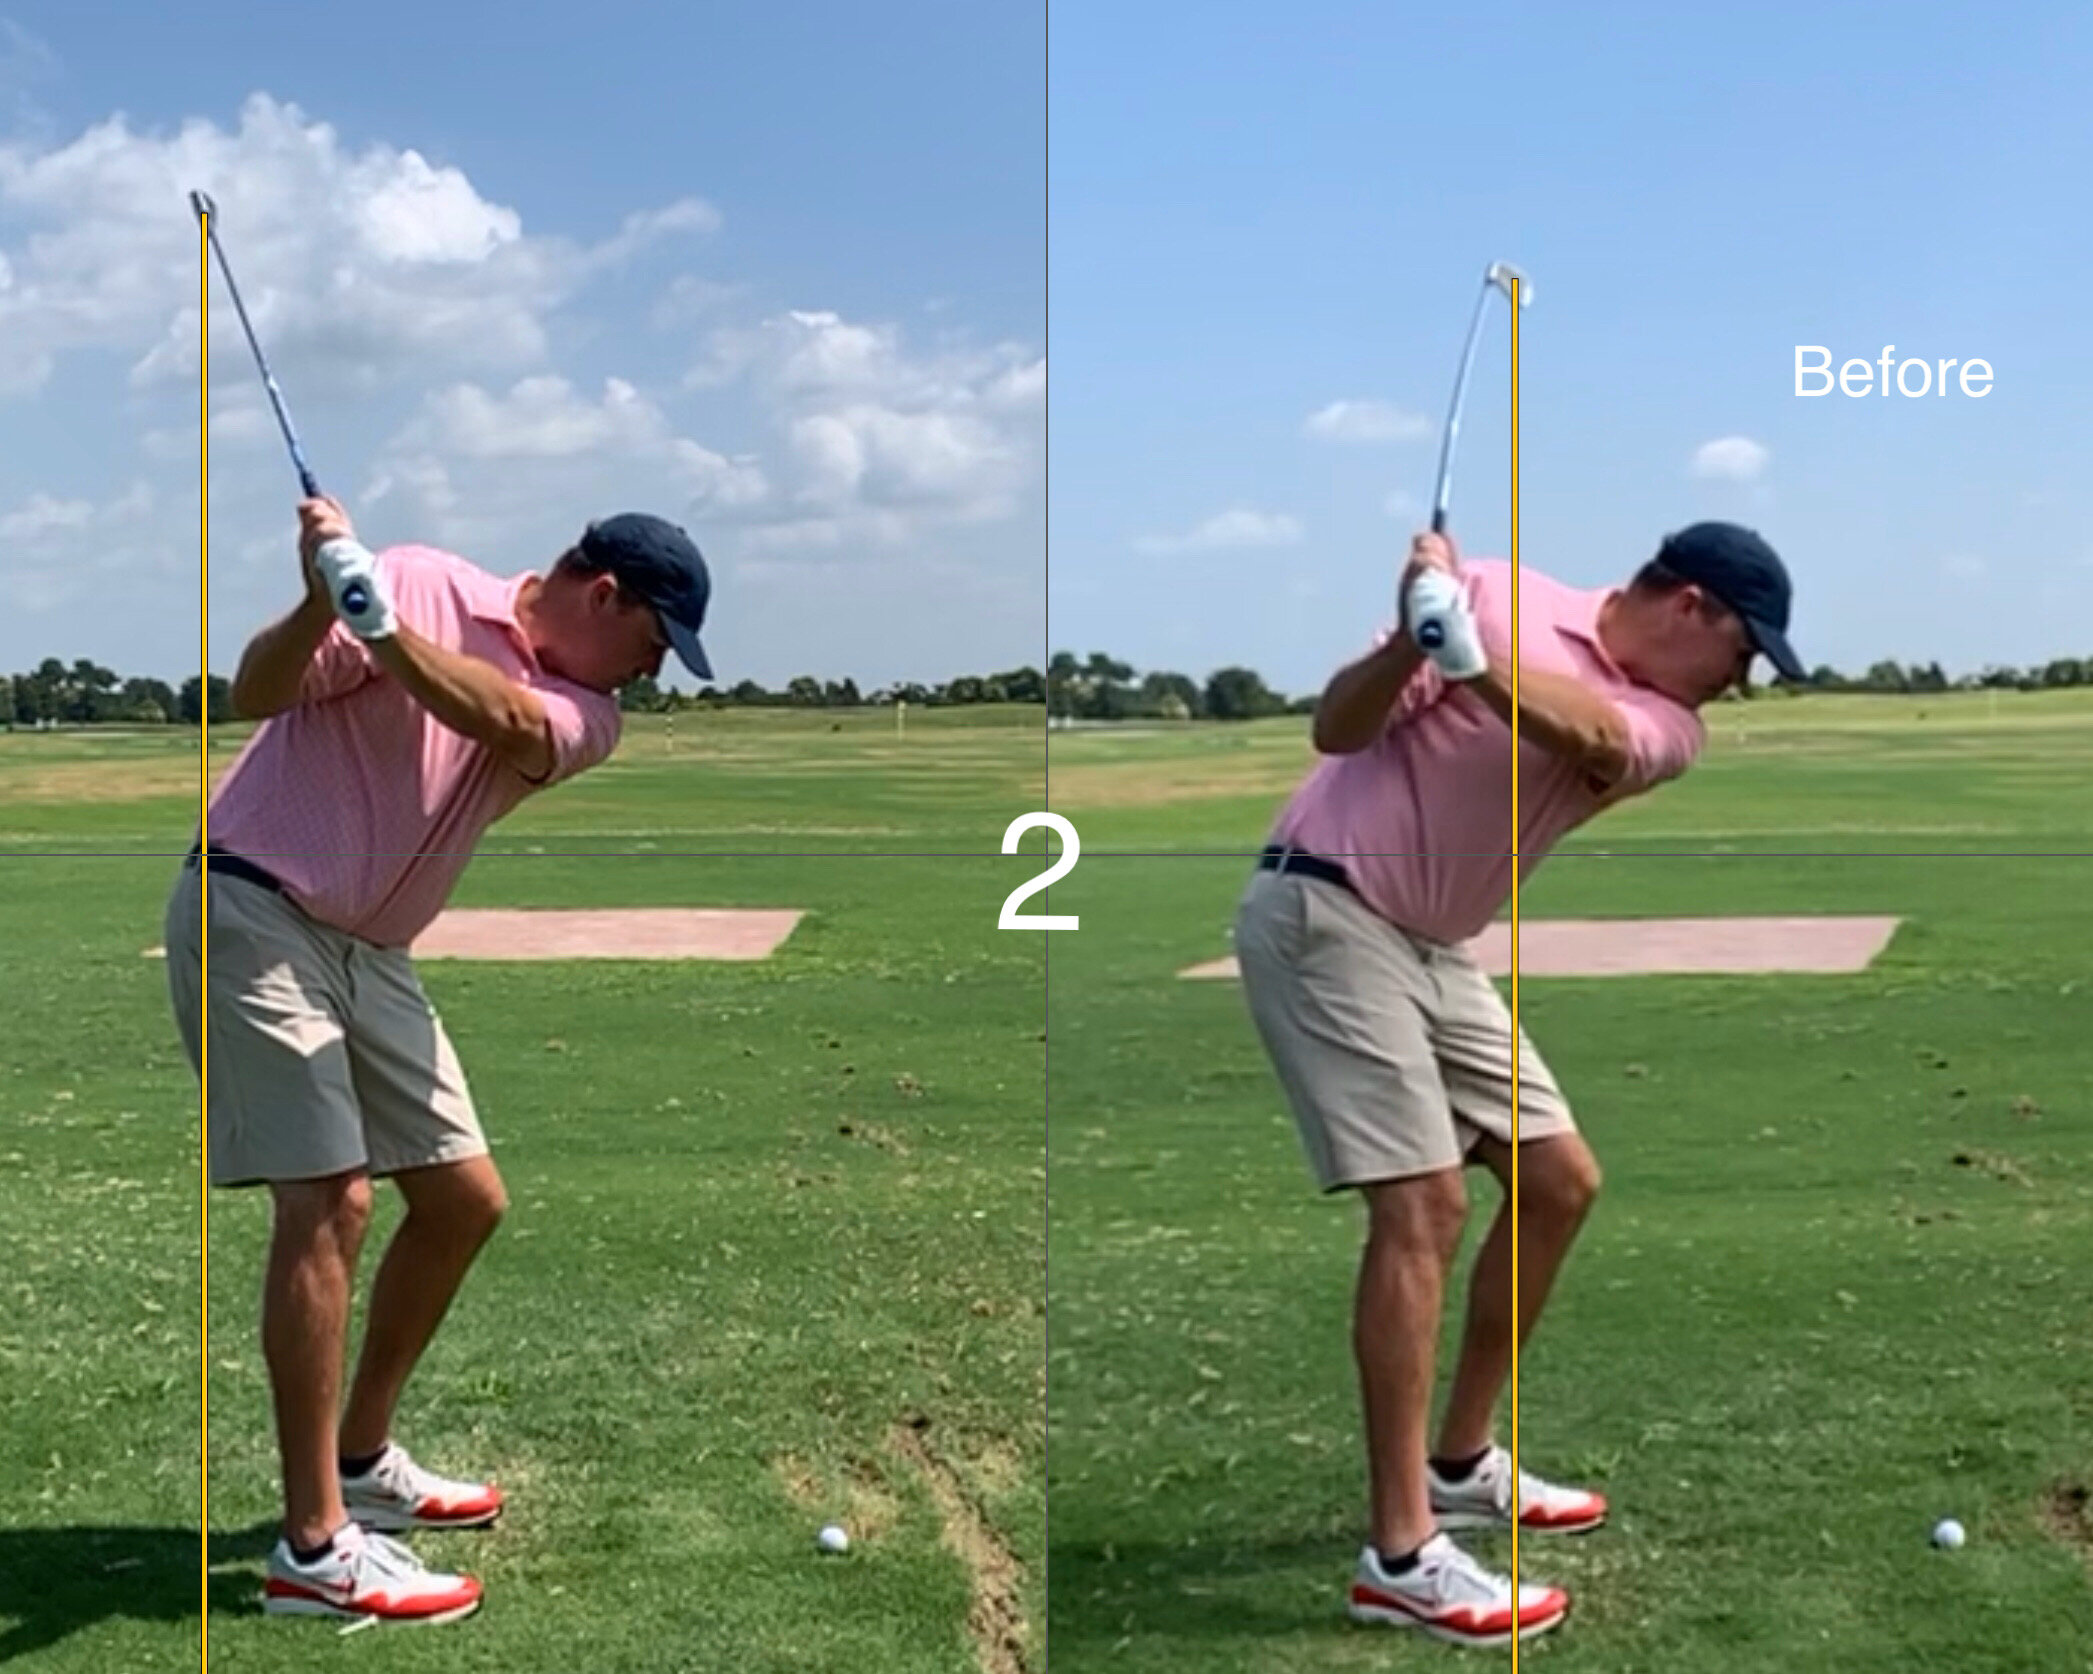
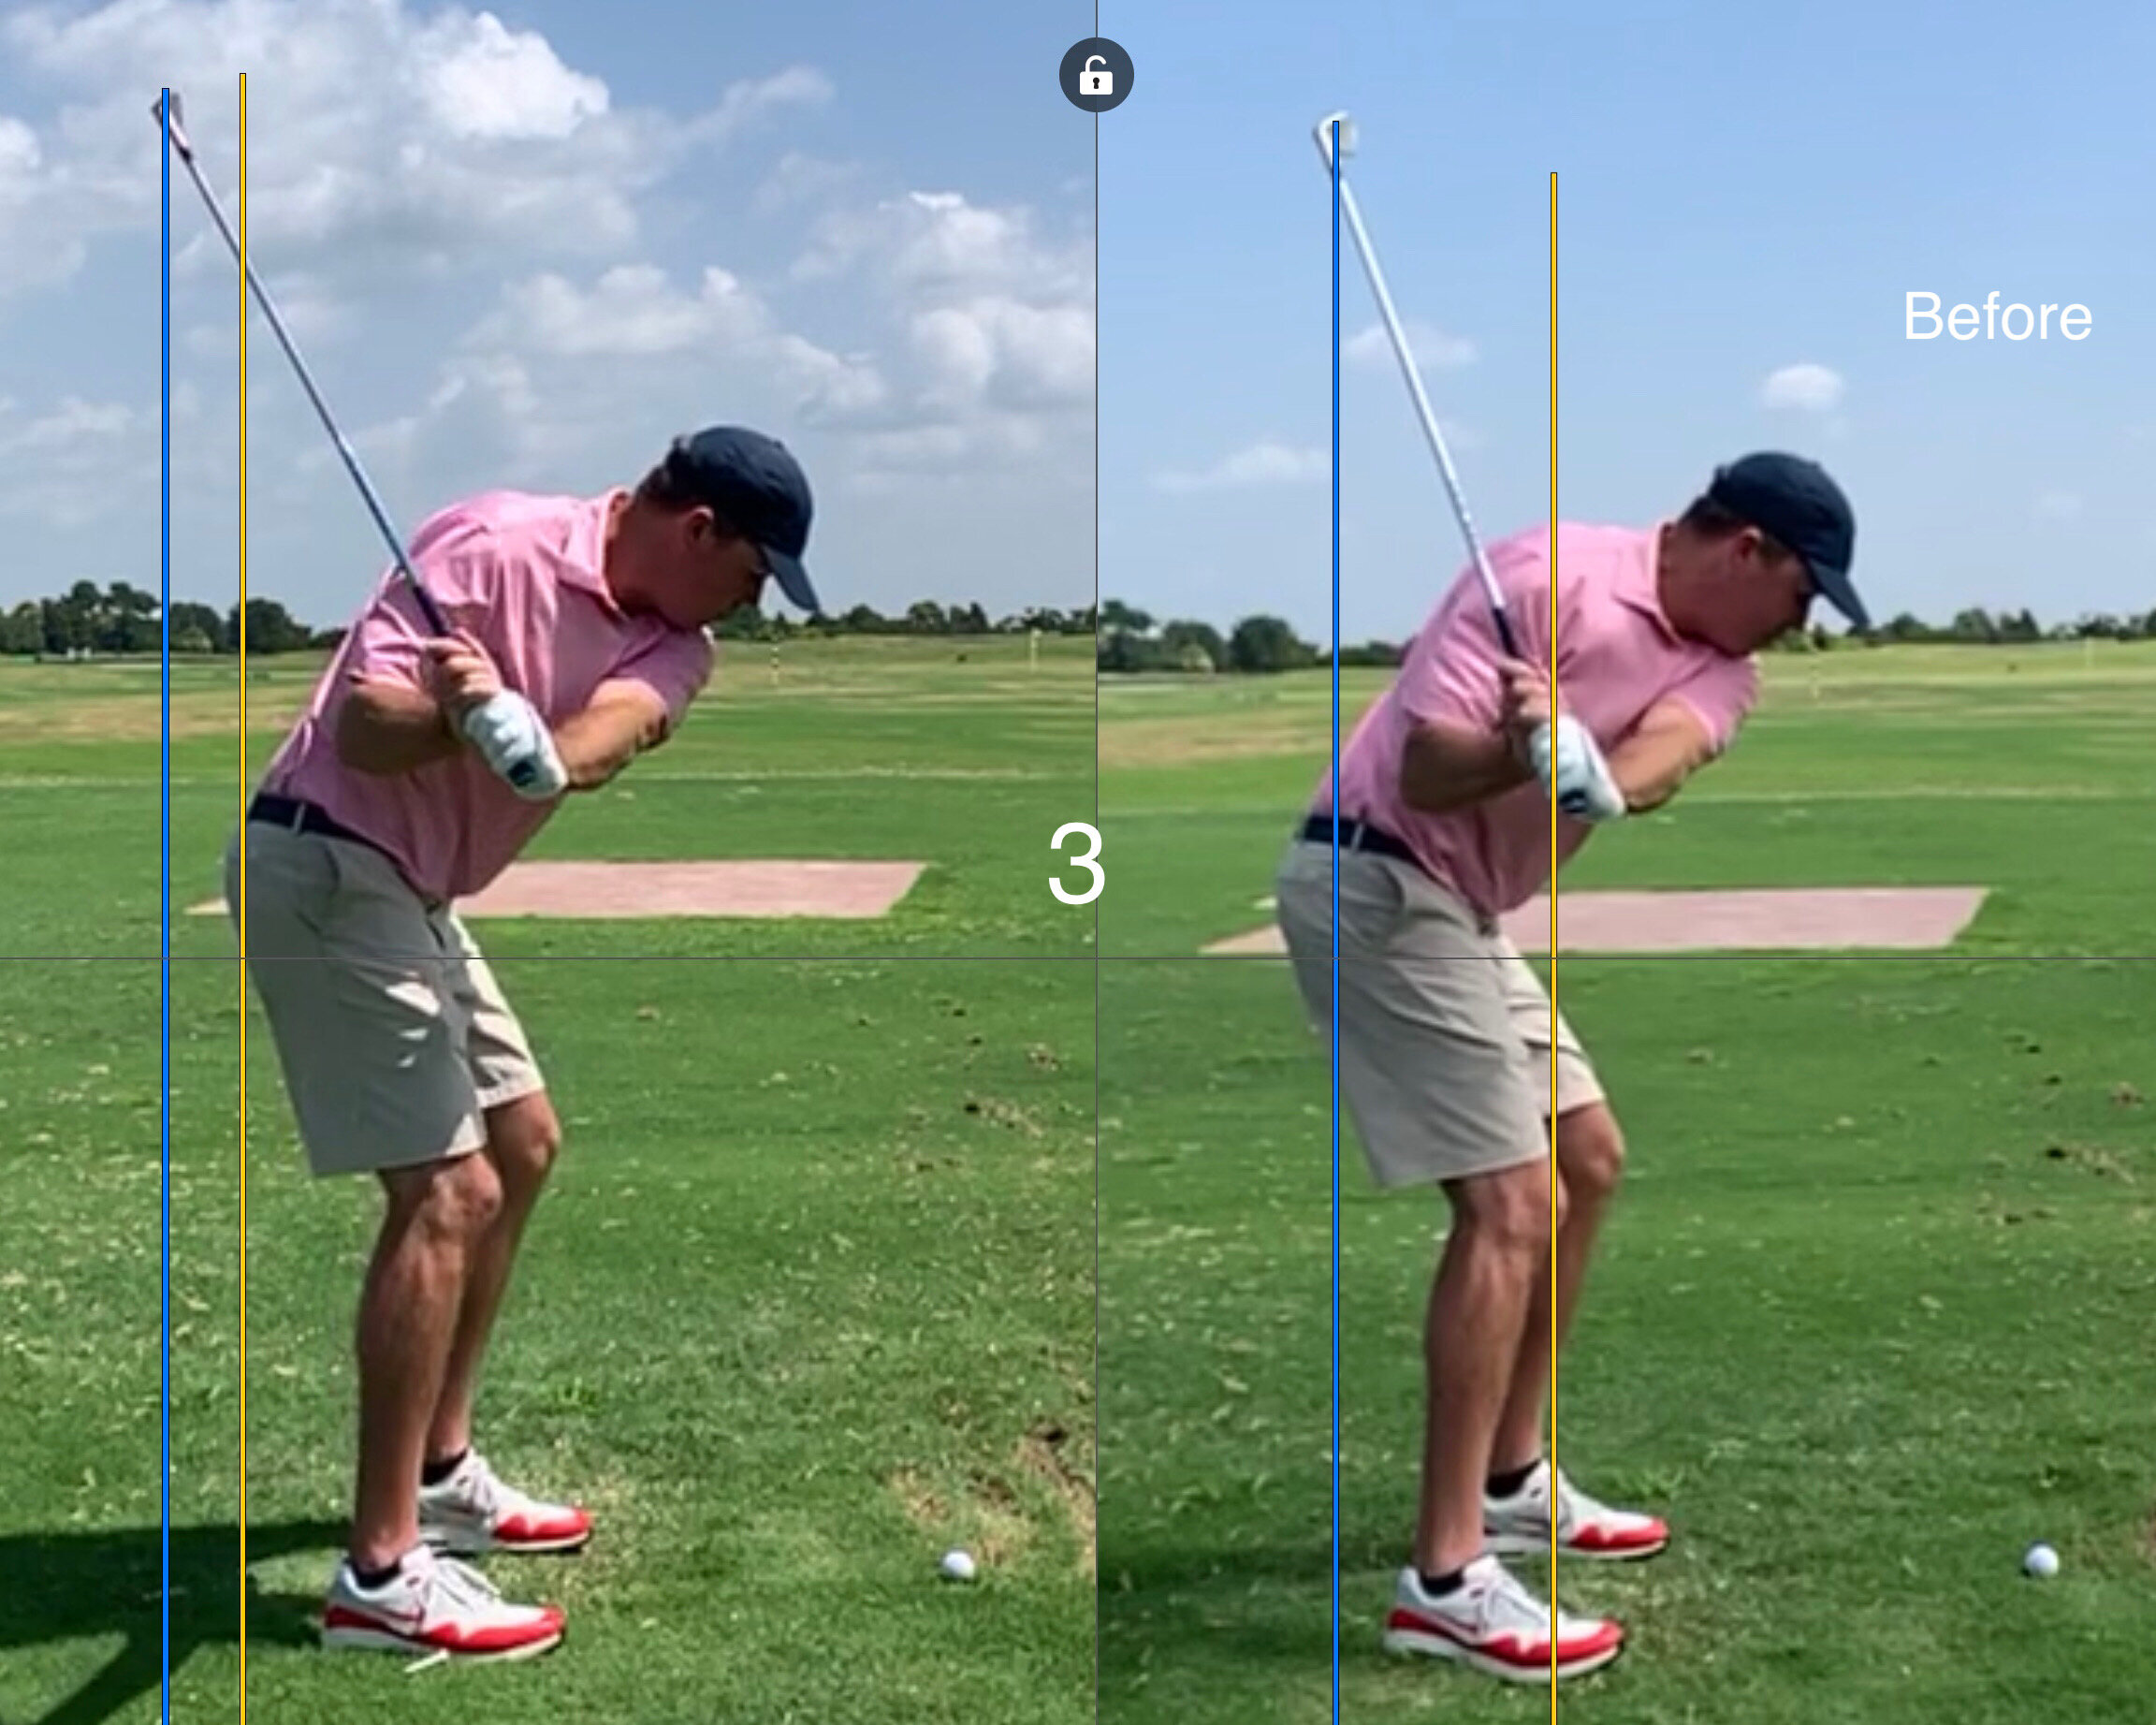
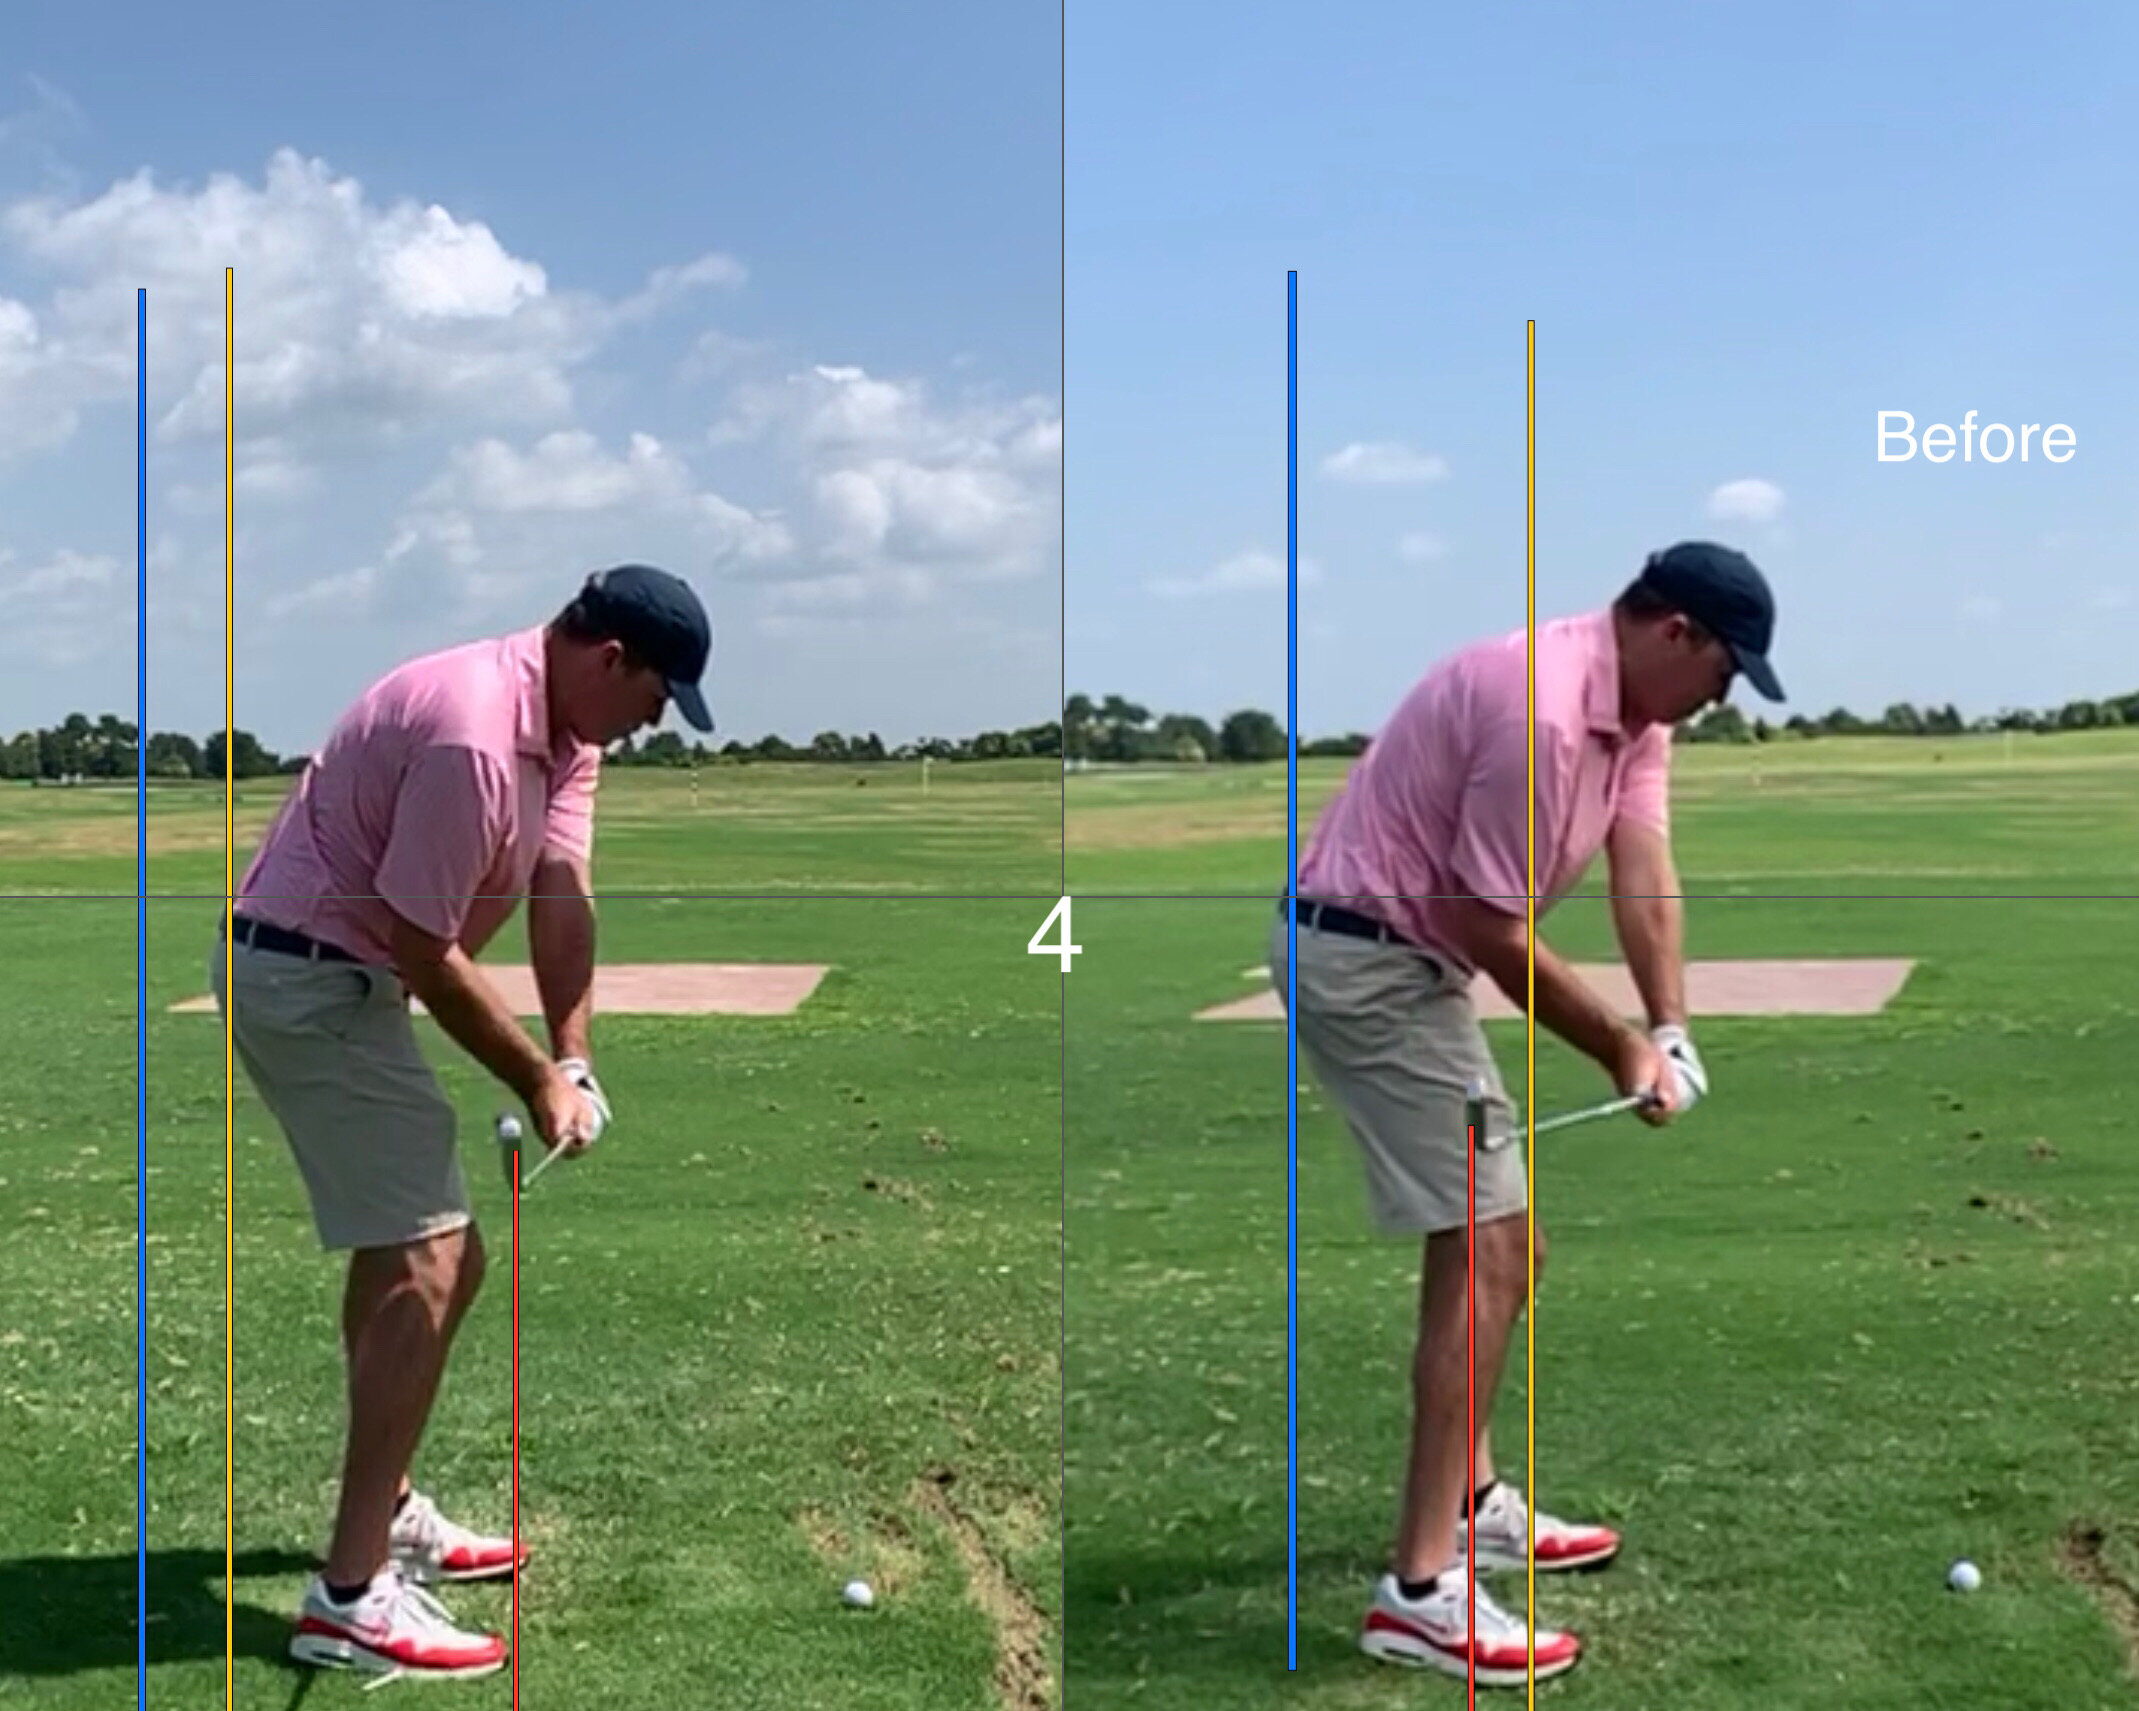
At address the head should not break the line. I noticed with golfers who had too much tilt at address this was quite prevalent and they all had a difficult time assuming the proper impact position once they had started poorly.  Notice the picture below.

Too Wide and Tilted

Another common fault was breaking the 84 degree line in the backswing with too much lateral motion. This fault very often originates with too much tilt at address. Try to feel centered over the ball throughout the backswing. Keep in mind that this can be done while still maintaining a sense of loading into the back side or leg.   Notice the picture below....

Too Much Lateral Motion

I have found that an excellent drill that conveys the appropriate feel is the ball drill pictured below.  Position your back foot up against a wall and place a basketball or soccerball between your head and the wall.  Crossing your arms across your chest, pivot into your back side feeling the wind and torque in your core muscles.  Hold the position at the top to absorb the sense or feel you have. This is what the body should feel like when it is correctly positioned to compress the ball at impact!

84 Degree Drill

The Shoulder Pivot (Part 3 of a Four Part Series)

The ProperShoulder Pivot
The Proper Shoulder Pivot

I often hear golfers speaking about 'turn' and getting their lead shoulder 'behind' the ball.  In my opinion these thoughts very often cause a golfer to pivot the body incorrectly; thus making it difficult to get into a sound impact position.

In my research conducted on the top golfers of all time one of the few factors that was consistent to each of them was the manner in which they wound/pivoted their shoulders.
As the picture illustrates, at halfway through the backswing the right forearm is always above the left forearm (speaking as a right hander).  This forearm position indicates that the lead shoulder is traveling down and the back shoulder is, conversely, working up.  When executed correctly this move will give the golfer a sense of torque building up in the body, without a great deal of length to the swing.  A correct shoulder pivot also deters the upper body from any unnecessary lateral movement.
As an exercise, place a club across the front of your shoulders with the grip pointing toward the target.  Positon a ball where it would normally be and assume your normal posture.  As you pivot into the backswing try to get the grip of the club to point at the ball.  While this gets the shoulders a little too steep it will serve you well in conveying the sense required to get the shoulders to work correctly.
This is one of the very few elements that top golfers have in common.
Shouldn't you have it in your swing?
Things to ponder:
  • Is Charles Howell really that bad with the putter?
  • Boo Weekley will win the Players Championship!
  • Jerry Kelly pulled an Angel - he vanished for most of the final round and then slipped back in the back door. Well done!
  • How does Sabbatini play the way he does with that move of his?
  • I played Callawassie Island for the first time yesterday and  would highly recommend it to anybody in the area!