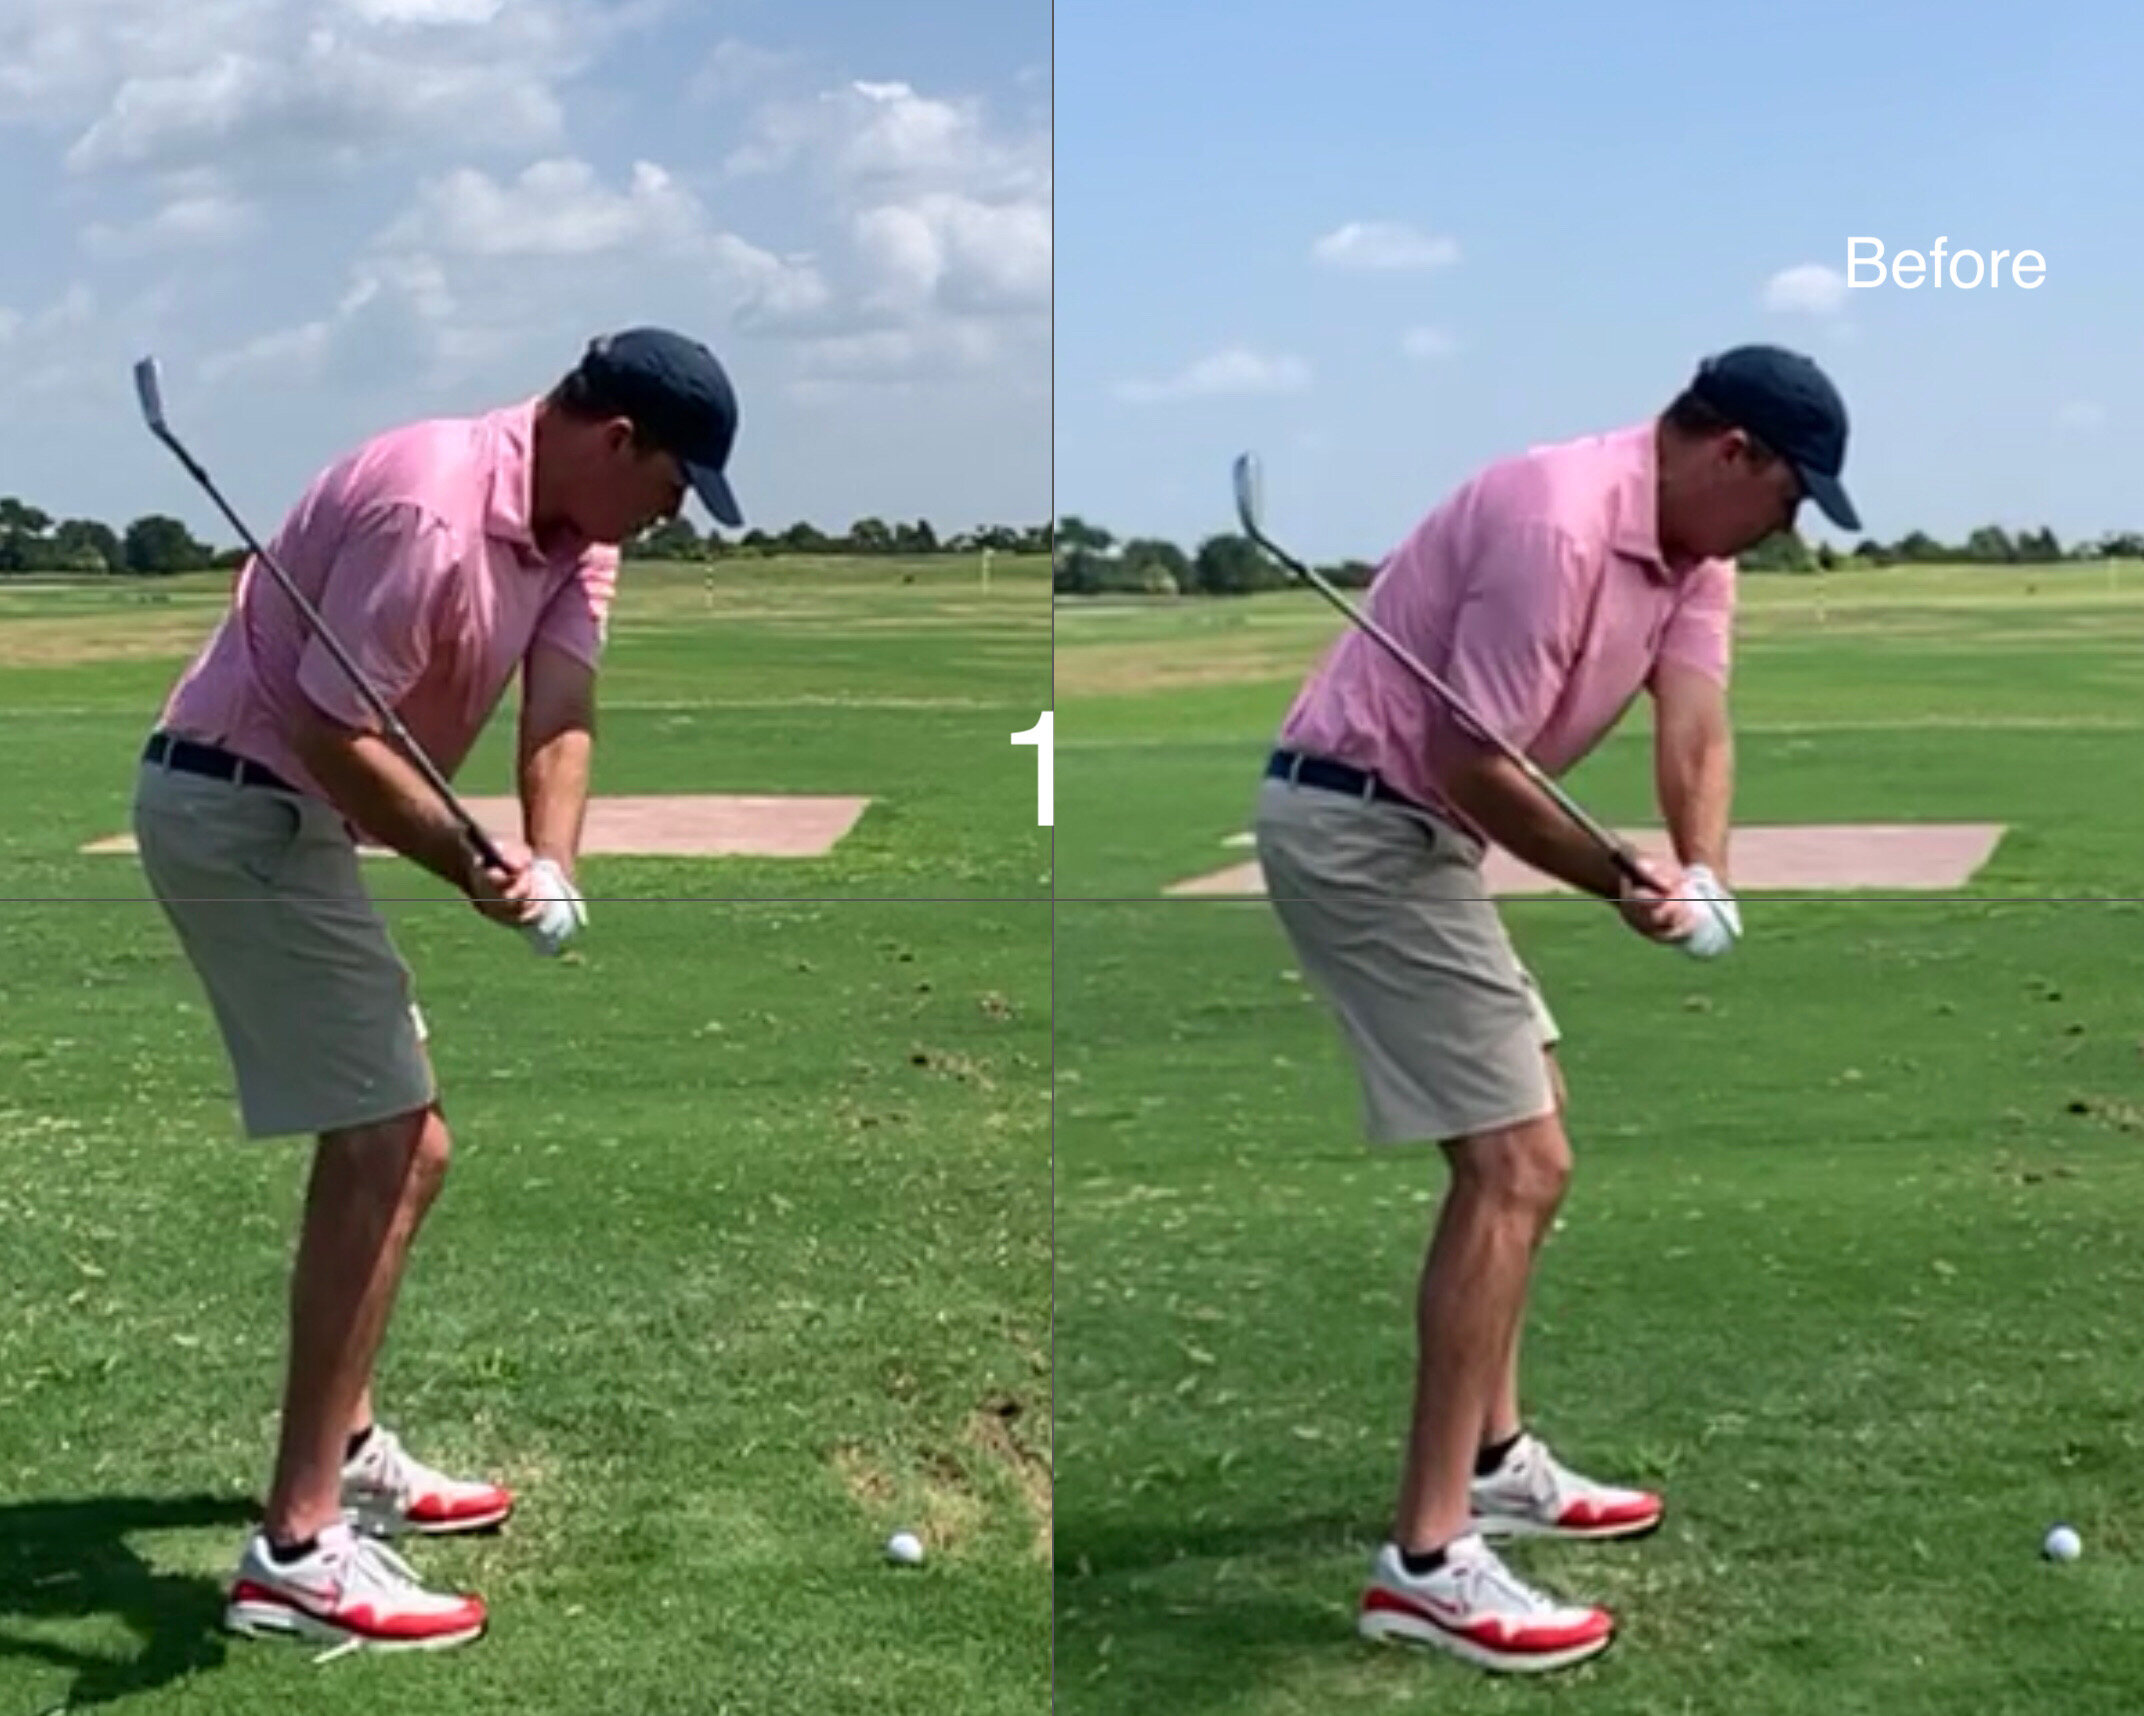
Lose Your Chicken Wing

If 2023 is going to be the year where you start compressing the golf ball with some sizzle and penetration off the club face then it’s time to get to work on that pesky little chicken wing you see at impact and beyond in your golf swing. It will take some time, but with a clear picture and a few solid practice sessions it can be done. Here’s how…

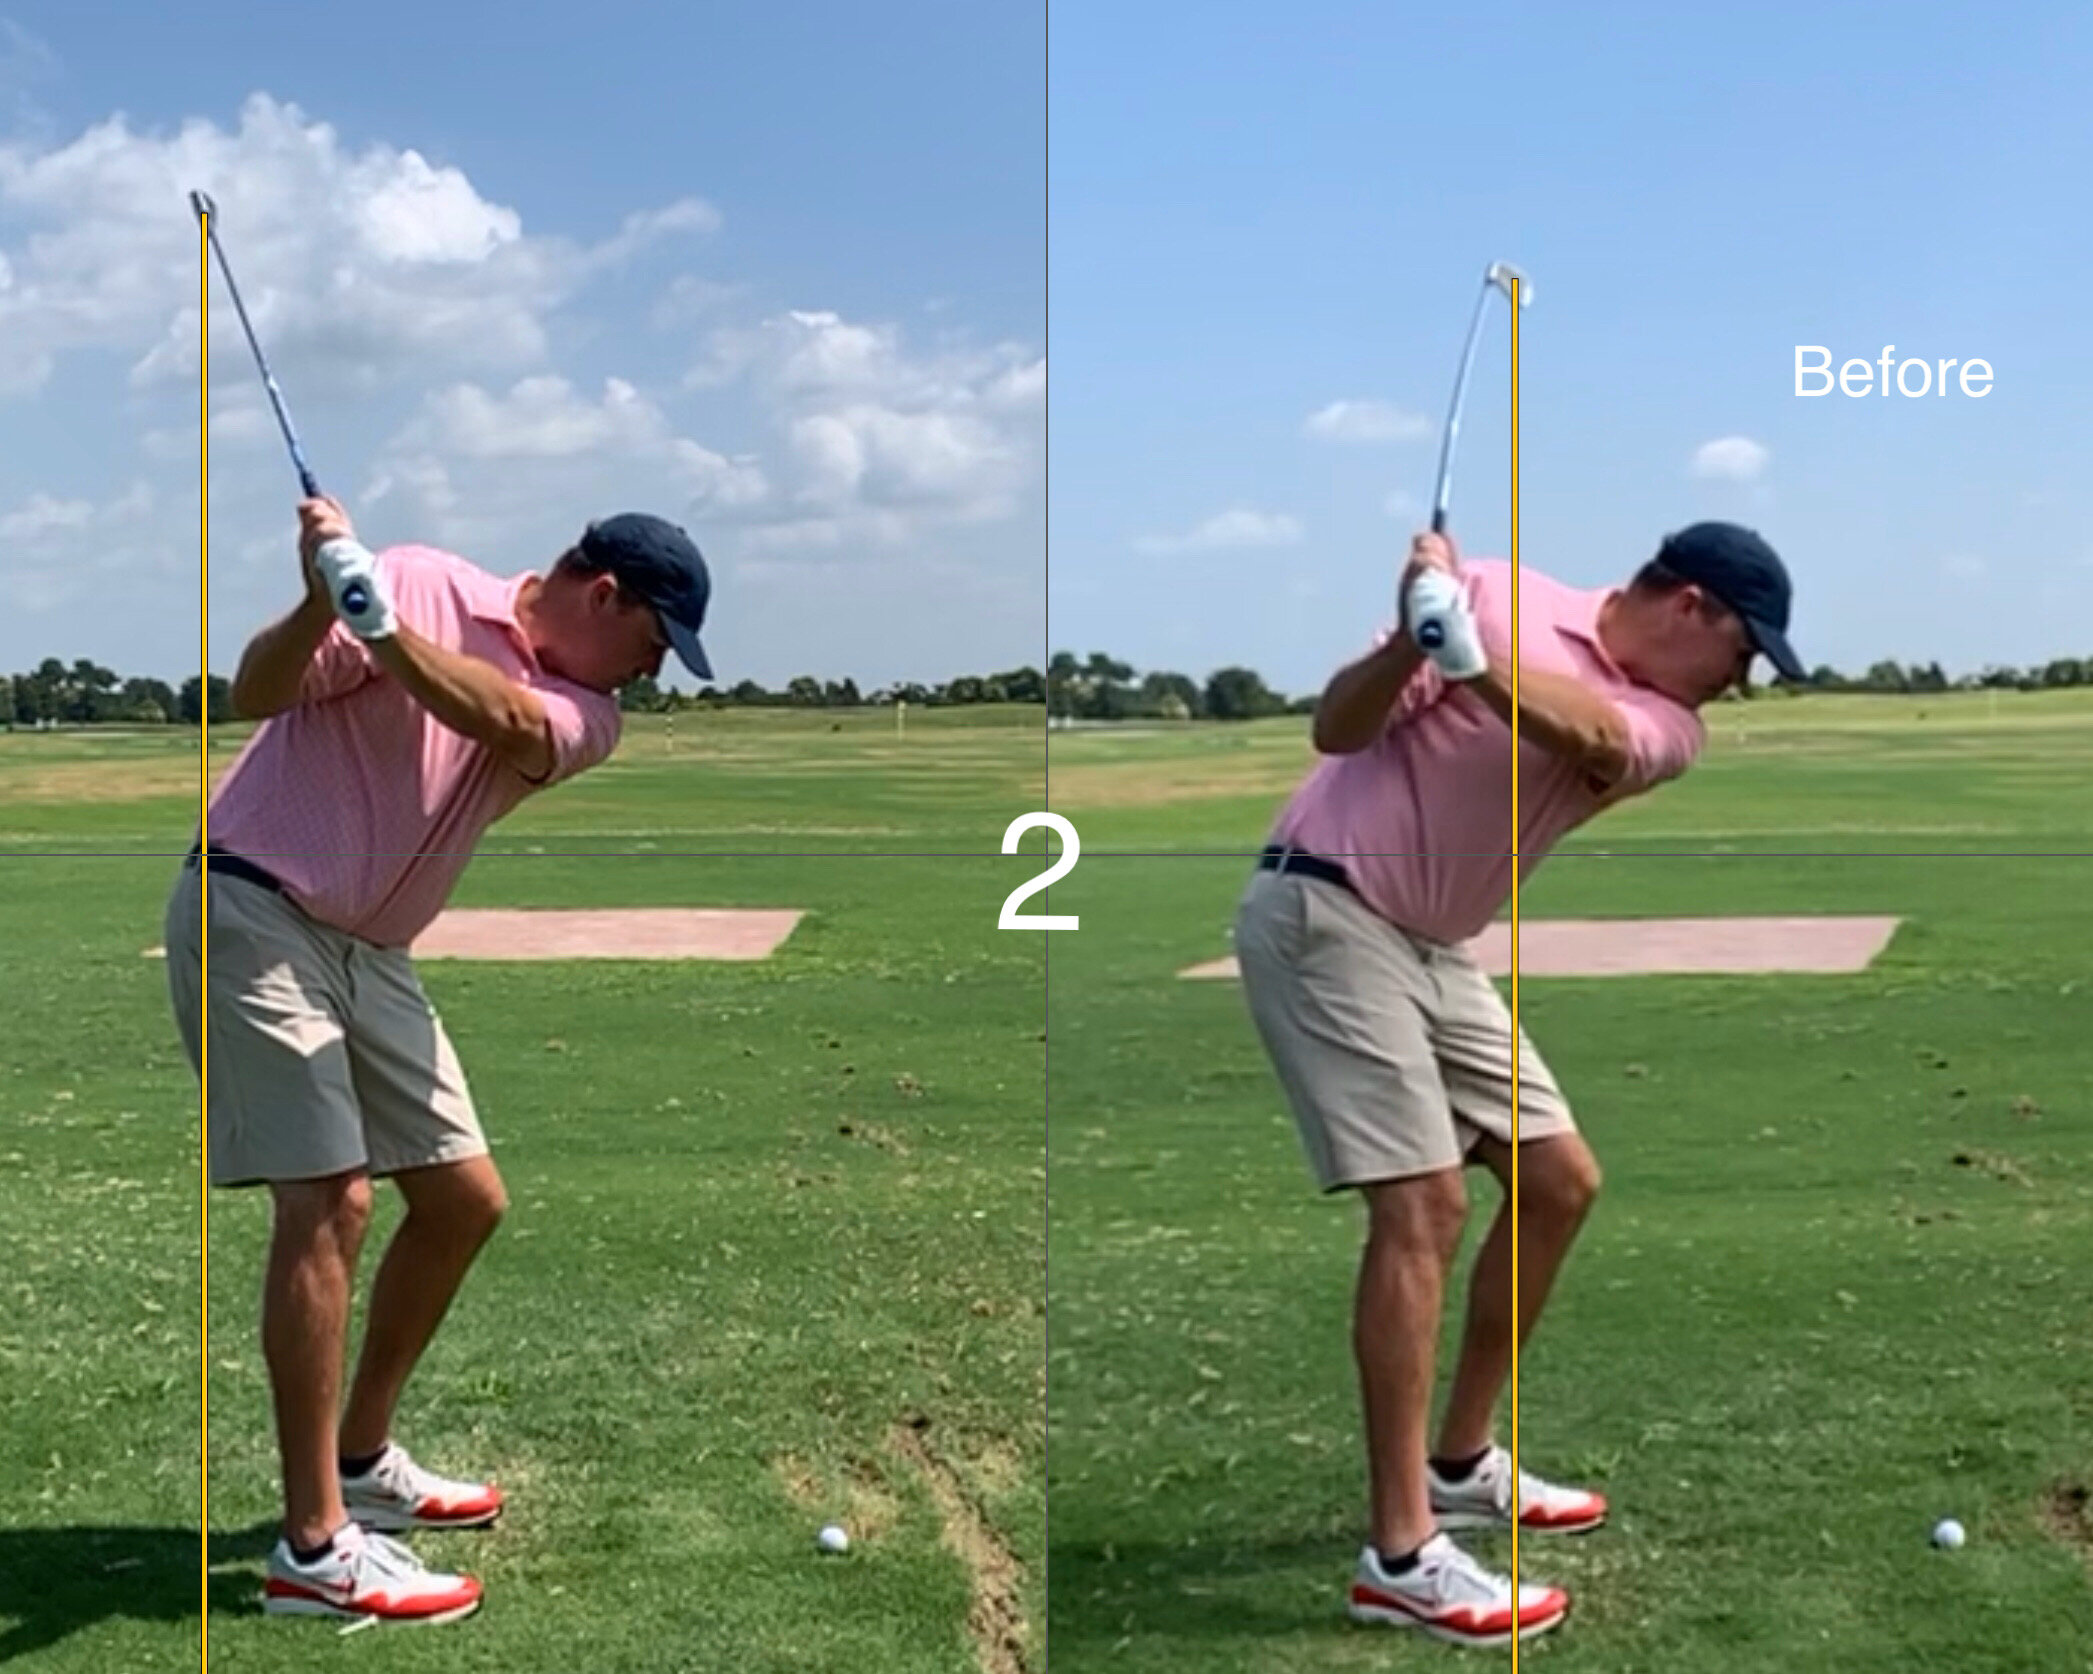
The two key areas are as follows:

  1. The club face is invariably the culprit here and its almost always overly weak or open. Practice the “pump drill” demonstrated in the video where you really exaggerate how closed you’re getting the club face. Yes, you’ll hit a few shots to the draw/hook end of the spectrum, but just the same way you learned to hit it “straight” with an open face, is how you’ll learn to hit it straight with a more neutral face.

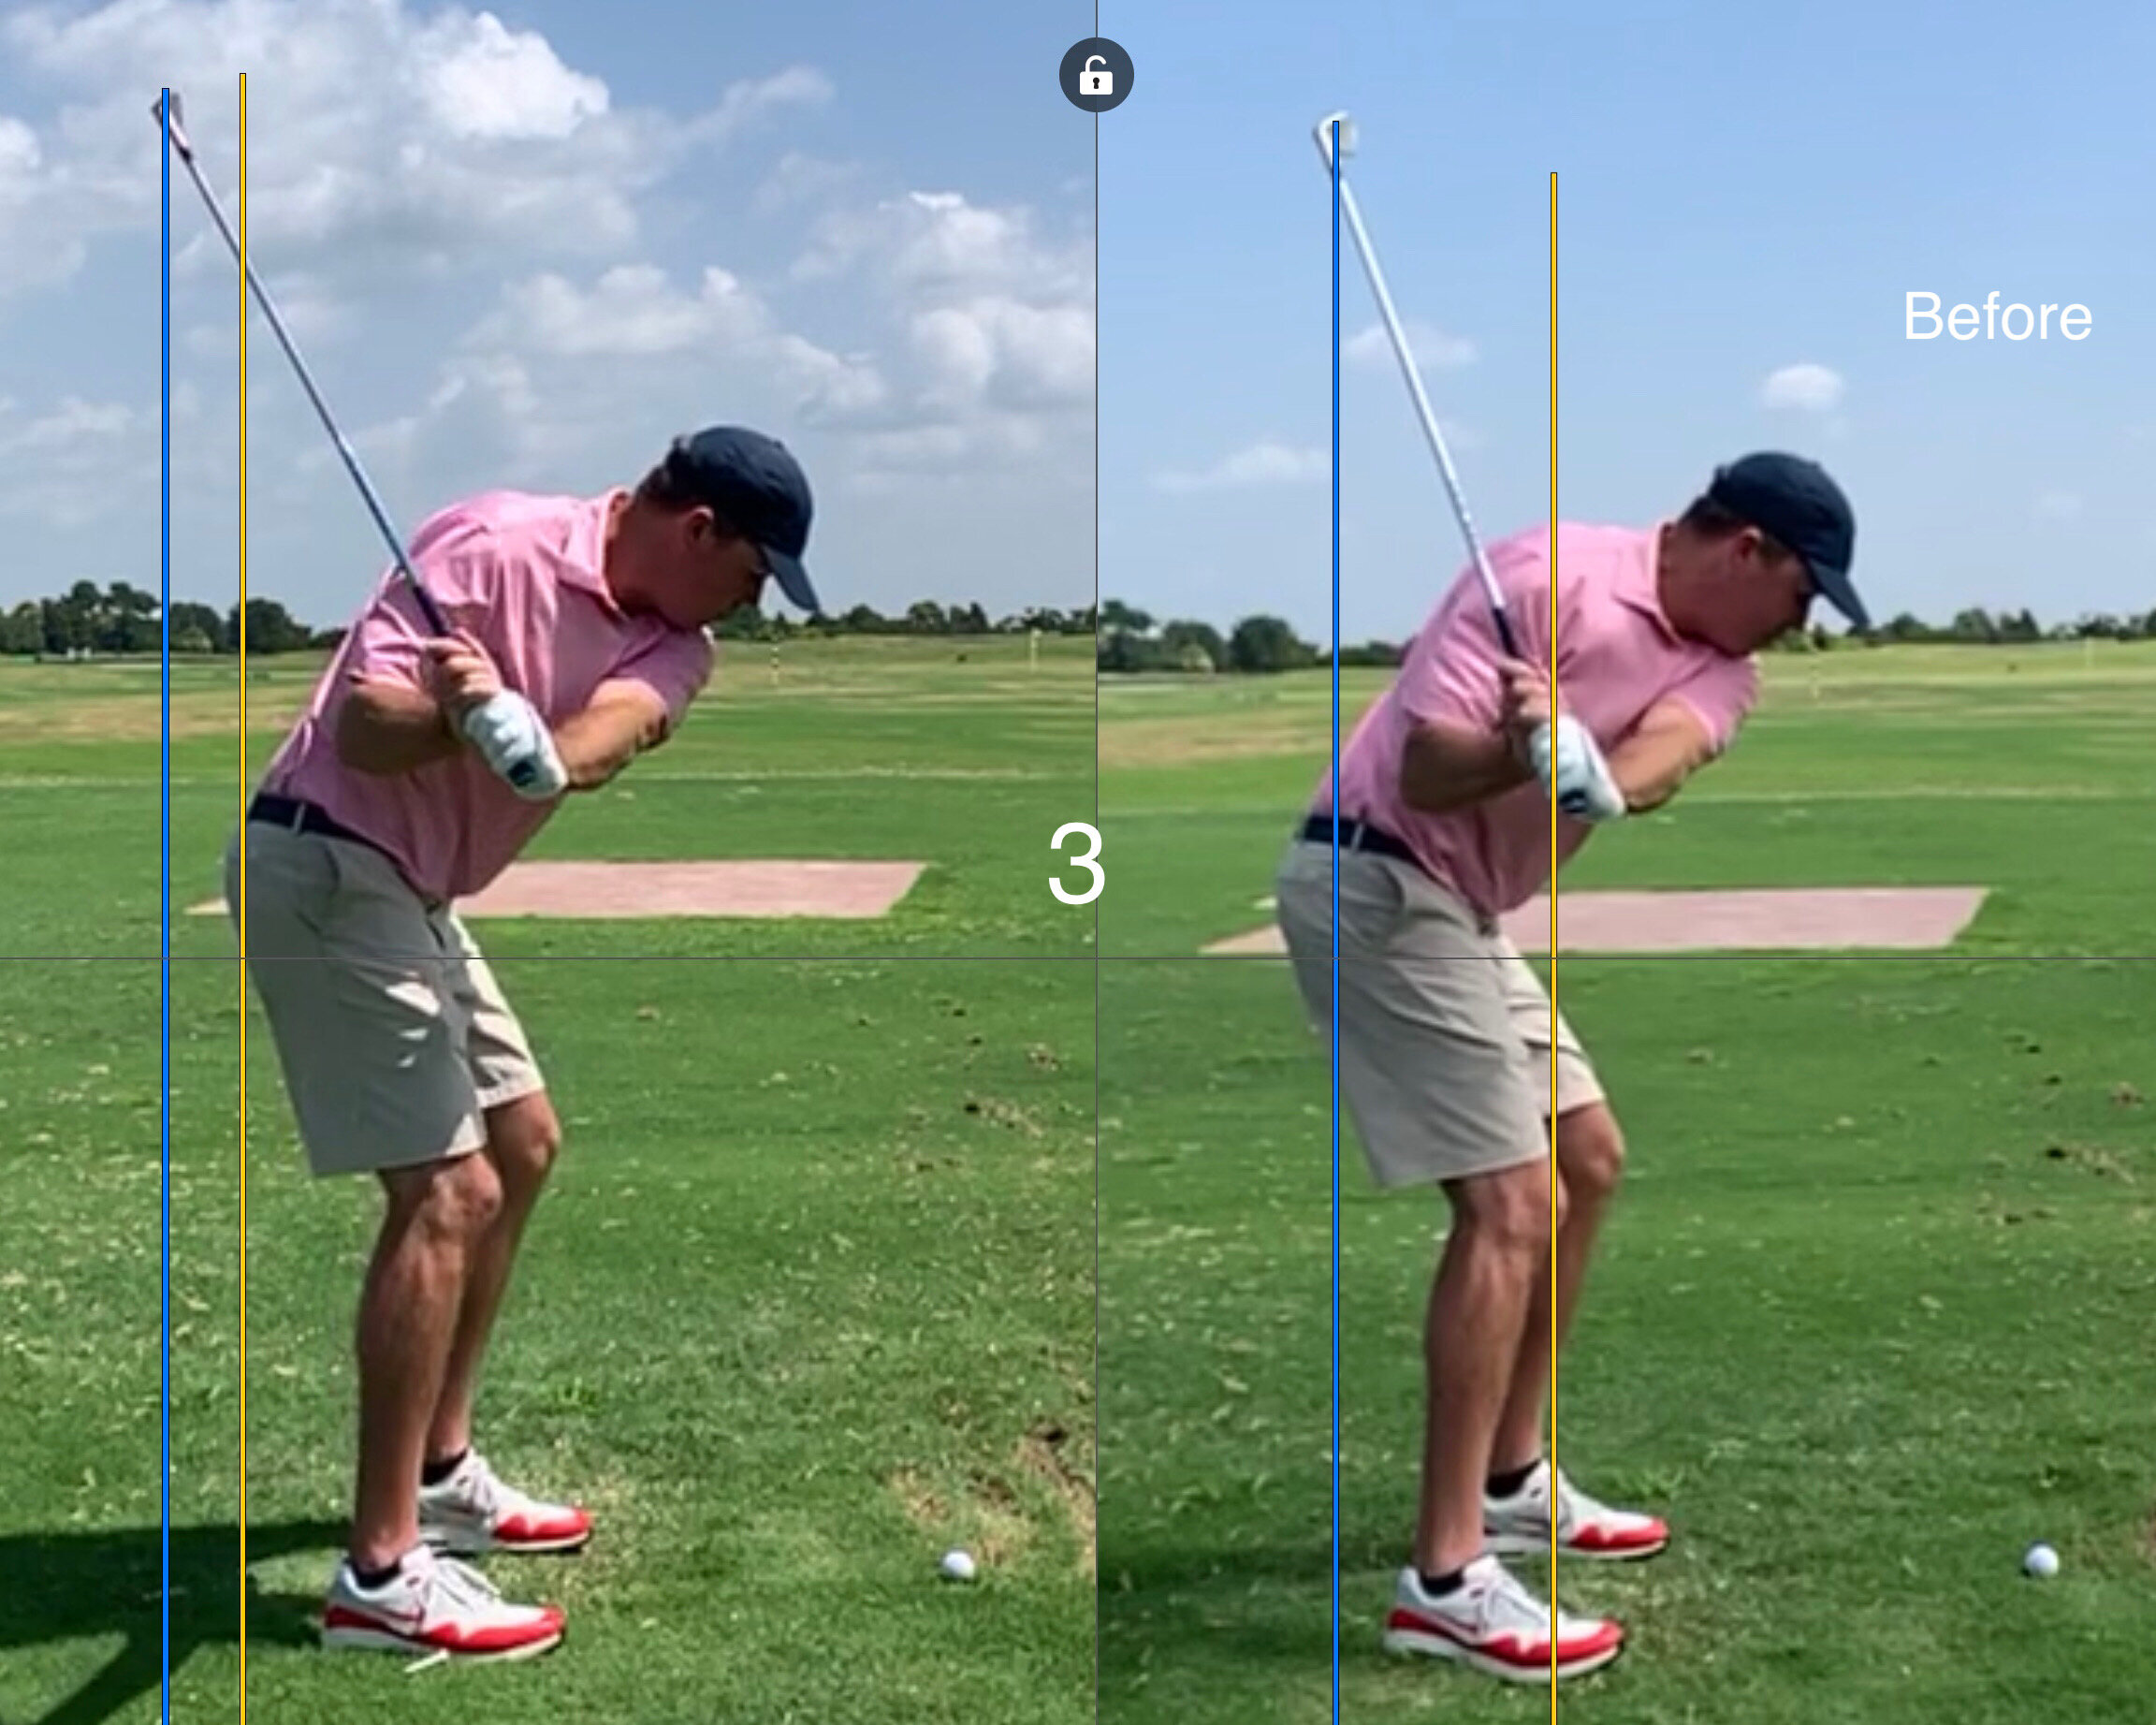
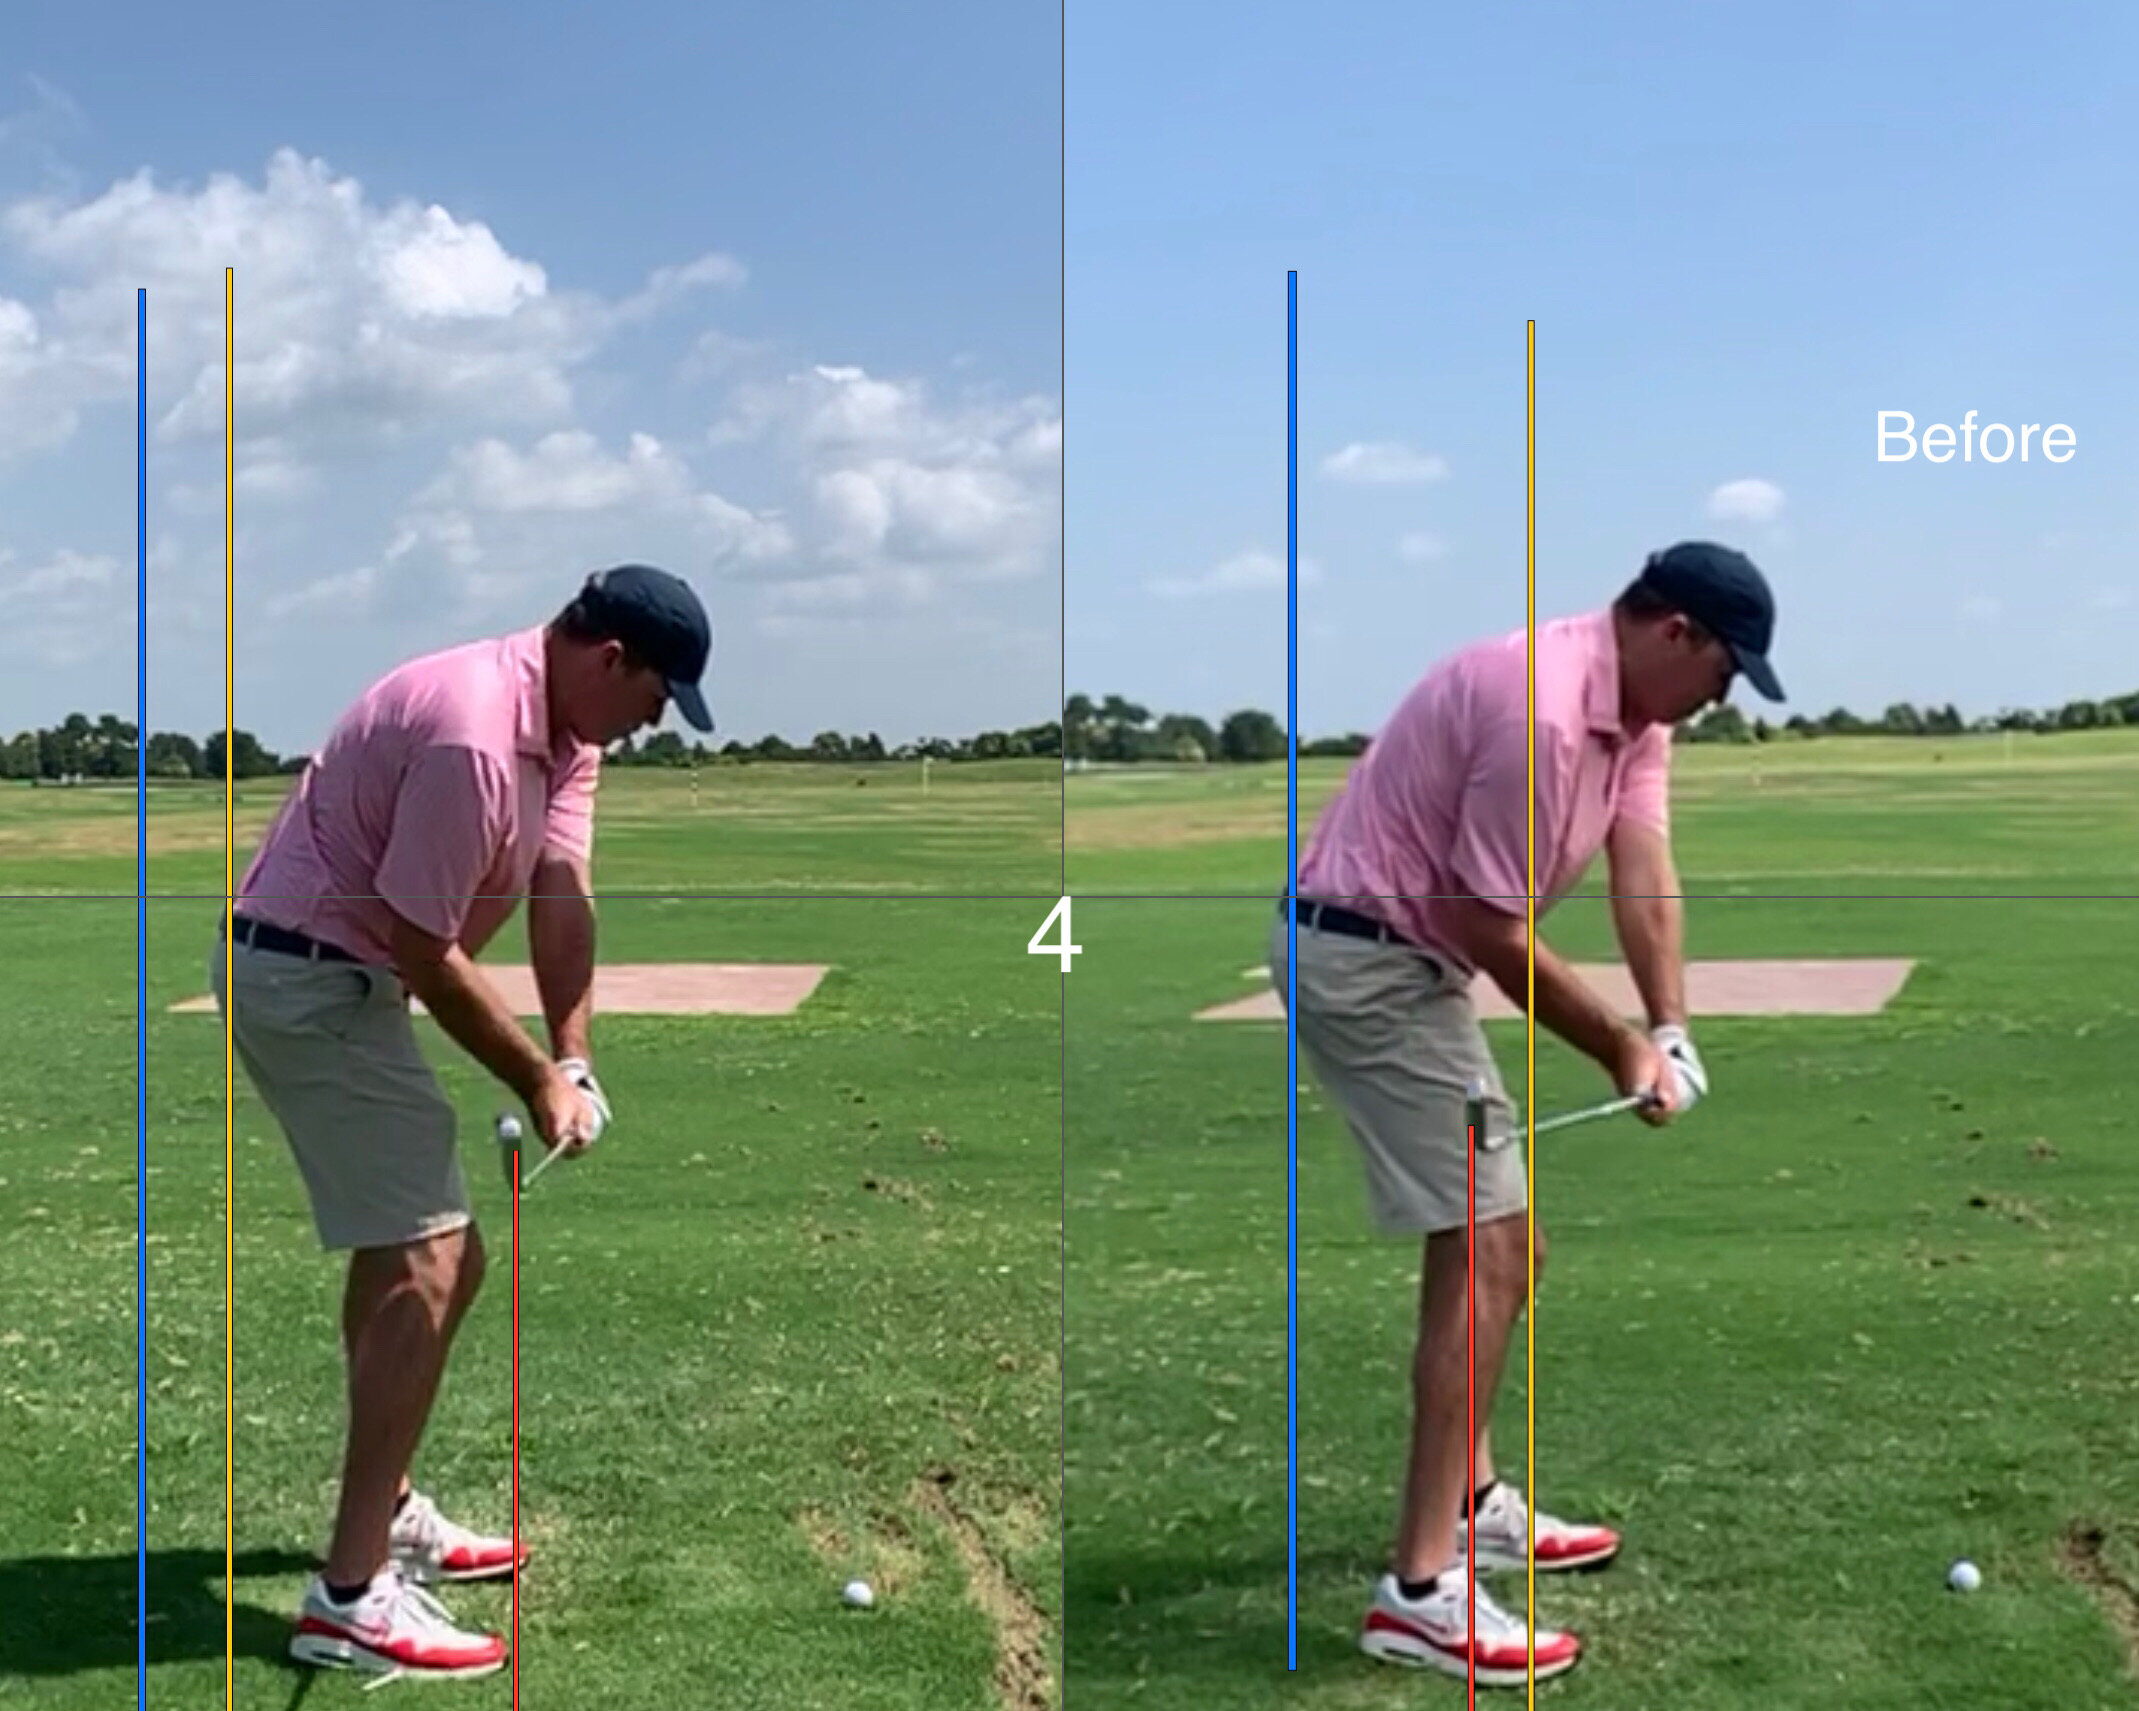
  2. Let’s get DIRECT with this drill and make sure the lead arm stays extended. Keep in mind - face first and then the 9-3 drill demonstrated in the video. Use a 7 iron and keep the drill smaller than you might think. No need to hit it hard just yet. Please make sure that both arms are still extended as things come to a halt after the strike.

I know that if you commit to these two ideas you will not only improve the quality of your ball striking, but you’ll also get rid of the infamous golf swing chicken wing.

Please give this a go and let’s make 2023 your best year on the golf course ever! Cheers.

Tilts & Turns!

If you want the ball to get moving you’ve got to get your body moving and this very simple exercise is a little gem that we all should be practicing on a regular basis. I find it to be an excellent reminder of the tilts, turns and stretches we need to incorporate into the golf swing. Watch…

A few checkpoint to keep in mind when doing the exercise:

  • Hold a club across your shoulders by crossing your arms across your chest

  • Position the handle of the club on the lead/target side of your body

  • In the backswing get the handle to point at the ball or where the ball would be

  • Allow the trail side to extend and the trail knee to straighten

  • The lead side should feel low and the trail side high as it stretches and extends

  • Repeat these feels as the swing moves into the downswing and follow through

  • In the post impact portion of the swing the trail side lowers/shortens while the lead side will elevate and extend

This exercise does such a good job at reminding us what a real swing should FEEL like. While the positions of the drill are a little extreme they carry through nicely into an actual shot. I know this simple, take home exercise will go a long way towards helping a large percentage of the golfers that show up on my lesson tee. Give it a try!

Get the Face in Place!

The ability to control both the face angle and loft at impact is paramount to playing better golf! This element in the golf swing really plays a major role in my teaching philosophy. Here’s a simple, yet illustrative, video that shows what can go wrong and how it needs to work…

So much of what we do in our golf swings is dictated by the face angle in the early part of the downswing. An open face means a stalled pivot and handle to go along with too much loft and an inconsistent strike. On the other hand an overly closed face will encourage too much lateral drive in the downswing and cause the hands to ultimately be too far forward and de-loft the face too much. This image illustrates the two extremes…

7DC28B2C-CA35-46EA-9EF7-0FE3B15876E1.jpg

If you can make, even subtle, upgrades during this all important part of the golf swing you’re going to see a marked improvement in both your ball-striking and flight. Give it a go!

handclubpath.jpg

Top Tier Tempo!

In this article I’m going to share three helpful exercises to help you smooth out the tempo of your golf swing. Let’s get the oil of the golf swing flowing through your engine! Watch….

I work with golfers on an almost everyday basis to help them complete the backswing and ultimately improve the rhythm and flow in their golf swings. These three drills will help:

Three Ball Drill

  • Tee up three golf balls and do this drill with a 9 or 8 iron

  • Keep in mind that the rhythm does not have to be slow here

  • Make full, completed backswings where you flow from one strike straight into the next

Towel/Rope Drill

  • Use a bath towel or heavier, marine gauge rope to do this drill

  • This will encourage patience as the downswing cannot start before the towel completes the backswing

  • Feel how the energy flows down into the end of the towel (clubhead)

towel.jpg

Hideki Pause

  • In this drill you’ll feel an almost invisible pause at the top of your backswing

  • Try to pause for as long as you comfortably can

  • This does a tremendous job to give any golfer the sense of a full and completed backswing

Now, I know that mechanics play a big role in any golf game, but sometimes all we need is a better feel and sense of rhythm in our golf swings to get things headed in the appropriate direction. Give a few of these drills a try and see what it can do for your game. Especially when you get a little anxious and tight out there!

Thanks for your readership and support throughout 2020! I know we have all learned so much together this year and I look forward to learning and sharing together in 2021.

Cheers!

A Lesson to Learn From...

I recently gave an old friend a lesson. Having not taught him for a few years I had an inkling as to what to expect, but things came together so well I thought the information might be beneficial to more than just one student.

This is why looking at still frames of an athletic motion can be deceiving. There are six different images/videos here that we will go through in a specific order. To get the most out of this post please make sure you go through this it slowly. Be sure you comprehend each image before moving to the next…

614EC106-E63C-4C19-B0D3-B858E784B158.JPG

(The original/before is always on the right in all of the images/videos)

Image 1:

Notice how these two images appear to be somewhat similar. I think many of us would give them both a thumbs up! They might be somewhat similar, but the outcomes are very different due to the unseen forces being applied to the club. Do not be deceived!

DB255940-B2A6-477C-B9A5-F8545133331B.JPG

Image 2:

The player at the top of the backswing. The yellow line indicates where the sweet spot is relative to the feet and the golf ball. Notice that in the ‘after’ version the club head is significantly further to the inside than the original. This is shown by the distance between the line and the golf ball.

6F07DEF0-8421-449C-A111-4320A3C4E2B8.JPG

Image 3:

At approximately lead arm parallel to the ground notice how the golfer has had to force the club head to lay down on the before side. This is indicated by the difference in gap between the yellow and blue lines. Not much difference here, but the force the player is exerting on the club is very different here.

F07F5352-2ECE-48A5-BDD0-EE6285807F13.JPG

Image 4:

This is where the difference starts to show. On the right side you’ll notice that the excessive, yet necessary, lay down force has bled over and now has the club head in a position where the path will be too far out to the right, strike quality will be compromised and the player is dealing with blocks and hooks. Notice how the gap between blue and red line on the left is greater on the left side. That’s due to the fact that the golfer is free to rotate instead of having to force the club head to the inside in the downswing. Who wouldn’t want to turn hard and fire in the downswing?

Image 5:

The original downswing! With this move the golfer gets the club head too far to the inside coming into the golf ball and will struggle with blocks, hooks and poor quality strikes. Success with this downswing is very much timing reliant.

Image 6:

The objective for the downswing! With this move the golfer will deliver the club with a more neutral path, will hit down on the ball appropriately and be far less reliant on timing coming into impact. A happy golfer and coach.

So how did we get it done? With a short-ish backswing the club head needed to be in a better position at the top of the backswing as the player had very little time to calibrate and position the club head for a proper delivery. Our goal was to improve the position at the top of the backswing in order to make the downswing free-er so the golfer could rotate hard left through impact. A good recipe for crisp strikes coupled with improved accuracy.

The results here were as intended - a more neutral path and better attack angle for straighter and properly struck shots.

Please don’t ever judge a golf swing by one picture.

Get That Body Moving!

If you want the ball to get going you’ve got to get your body moving. For far too long the golf instruction community has restricted the pivot, but the advent of quality statistics and a deeper understanding of what truly matters in golf has opened our eyes to the value of distance. I get it - we’re all getting older. Me too! We must wage the battle against slower and smaller golf swings on a daily basis. This video in my “3 Keys Series” will help…

If you’re a seasoned veteran or someone that’s new to the game, these keys will help you hit the ball with more authority:

  1. Allow the lead heel to get up off the ground in the backswing and free up the lower body.

  2. Get your belt buckle pointing away from the target as much as you physically can in the backswing.

  3. Feel the lead shoulder stretch away from the target so that you can really feel the tension and torque in your body as you wind up.

I would encourage everybody to start doing this at home with out a club and in front of a mirror. You most likely know what it should look like, but we all need to get a feel for the right look. A mirror will help! From my own experience in working to incorporate these elements into my golf swing it will take some time as you get more comfortable with the bigger pivot, but the gains far outweigh the discomfort.

Stay patient and never give up trying to get better!

Sam Snead

Sam Snead


Take Swing Changes to the Course

If I had a dollar for each time a golfer has said, “I’m great on the range, but I just can’t take it to the course” I’d be a wealthy man! I believe there are multiple reasons for this quandary many find themselves in. Firstly, most golfers don’t know how to practice in order to simulate an on-course environment and secondly it’s because when most golfers work on technical changes they don’t know how to go about assimilating the new moves into a full speed swing. Today we are going to address this important topic: How to take ownership of swing upgrades. Watch…

A few key points:

  • Use a 7 or an 8 iron

  • Use an alignment aid

  • Incorporate multiple rehearsals between each shot (get the FEEL!)

Level 1

  • Technical, slow , tedious and deliberate

  • Ball on a tee

  • Feel the positions

  • Incorporate pauses in the motion

  • Lots of rehearsal

  • Soft, tapping little shots

Level 2

  • Blend in rhythm

  • Slow motion without any pauses

  • Ball on starts a tee and then we get it on the ground

  • Lots of rehearsal between each shot

  • Shots will not go very far

Level 3

  • Start off at about 3/4 speed

  • Ball on the ground

  • Slowly build up to 100% speed

  • Continue to make rehearsals between each shot

Keep in mind that objective of any technical swing work is to upgrade the mechanics while still operating at full, or perhaps even, faster speed. It’s also important to note that this method of practice only addresses the technical side. There is so much more required in order to take it to the course and that’s why I often talk about…

SWING, SKILL & SHOT.

Thanks for tuning in and please share with a friend who you know would benefit!

7.jpg


Making Gains

It seems like just the other day that I embarked on my teaching career, yet it was almost 30 years ago. As a young coach it didn’t take me long to get to a point where I thought I pretty much knew everything there was to know about the golf swing. My how things have changed! I remember saying that one day on Tour we would get to a point where there were no more ‘bad’ or unusual looking swings. Ha! Anyone seen Matthew Wolff’s golf swing?

ManyWays.JPG

When I first started coaching Phil’s backswing would have been too long, Bubba’s feet would have been too active, Jordan could never be successful with a bent lead arm, DJ’s club face would have been impossibly closed and Jim Furyk - well that just had no chance.

Perhaps it’s my experience speaking, but I believe the golf instruction industry has come a long way in the last two decades. We have made more progress in this time than all the years before. Our eyes have been opened to the uniqueness and intricacy of the golf swing and how there truly are many ways to get the job done. A better understanding of the forces and torques that golfers are exerting on both the ground and the club has opened our eyes to perhaps why the players pictured above are successful.

Another important revelation over the last two decades has been the value of skill. Your technique allows you to hit the ball towards your target, but its skill that enables you to adjust the flight, shape, distance and ultimately, the outcome of each unique shot on the course. So many golfers were falsely led to believe that if they simply upgraded their technique/mechanics/swing they would be world-beaters. Technique, no doubt plays a role, but the value of skill can no longer be over looked. The great Seve Ballesteros is a fabulous example of a golfer that relied more on skill, and heart, than technique…

Seve Ballesteros

Seve Ballesteros

I feel that the internet has been an important catalyst in our improvement and understanding as a community of golf coaches. Sound information is out there, if you simply know where to look or who to contact. I cannot overlook the role technology has played either. I know that having the opportunity to teach with TrackMan, SwingCatalyst and K-Motion over the years has served to make me a better informed coach.

We have also improved our knowledge of how people learn and we now know it’s not all about pounding balls and getting your reps in. Sure, we still need to work hard, but we have a better picture of how to effectively take full ownership of changes and better incorporate them into who we are as a golfer.

Are we there yet? Do we have all the answers? As an older, more seasoned coach, I never think I know it all anymore. Our understanding is significantly deeper than it was 20 years, but we still have much to do.

It’s an exciting time to be a coach and a golfer.

A Long Swing or a Short Swing?

The good news is that either one can get the job done, but we cannot view these two very different golf swings through the same lens. There are certain fundamental differences that we must keep in mind. Watch...

For the shorter backswing:

  • Get the wrists, arms and shaft organized early in the backswing
  • The club should favor being laid off at the top
  • The lead wrist should be flat or bowed at the top

For the longer backswing:

  • There is more freedom in the backswing as player has more time available to organize in transition and on the way down
  • The club should favor being across the line
  • The lead wrist can be either cupped or bowed

I do typically prefer slightly longer swings over shorter swings, but above all else I prefer swings that work. If you look at the greatest players of all time you'll see significantly more long swings than noticeably short swings. I have also found that longer swings will typically produce faster club speeds. Never a bad thing!

Keep in mind that these are generalized ideas that have been found to work on the students I have been fortunate to coach over the years. They have also been verified by other coaches and a scientist or two, but they are not set in stone. The objective is always improved performance.

.

Is Your Swing Built on Timing?

We've all played those rounds where we have 14 solid holes and 4 holes where it seems as if we've never held a club before. This is a classic indication that your golf swing is reliant on timing. A situation where the face angle at impact is determined by the golfer "manually" inputing clubface closure through the impact zone

Here's Sam Snead taking the handle "around the corner"....

Here's Sam Snead taking the handle "around the corner"....

While there is no one method or technique that allows us to position the face correctly through impact on a consistent basis there are certain elements in the golf swing that will allow us to do a better job of managing the clubface. Watch...

If you can work towards making the "motorboat" curve around the corner you'll become much better at getting the "tube" to fling around - this way positioning the clubface appropriately through the strike will start to become more automatic and your swing will be less reliant on timing.

Here's a clip to illustrate what the hands should be doing as they pass through the strike...

Ideally the handpath should be traveling inward and upward. Get to work on the proposed drills and you'll start to see a decreased reliance on timing and improved consistency out on the golf course. Thanks for reading...and watching!