Fix Your Most Common Chipping Mistakes

The two most common mistakes I see golfers battle with when chipping are poor pace; the club head travels in a jerky fashion or at speeds that are often too fast for the requirements of the shot and they struggle to get the club to bottom out in the correct location relative to the ball. Pace and low point! Watch the video below and then let’s check in on some of the key points…

Here are a few points to take away:

Pace

  • Feel an even, ‘tick, tock” type pace as you swing the club back and forth

  • A good practice is to hit a few simple chip shots with a 7 iron. This will give you an excellent sense of what the pace should feel like

  • Try to feel the transition be as passive or gentle as you can. That change of direction needs to be silky smooth

Low Point

  • The practice rehearsals I demonstrated in the video are very important. Practice those both, away from the course and when playing

  • Feel your weight staying forward in the backswing as this will aid you in being able to shift the low point forward

As with anything, practice is integral to improvement. Try a few of those 7 iron shots in practice and don’t allow yourself to make a practice motion without having the intent of getting the club to bottom out of the target side of the ball.

I hope these ideas prove to be helpful to you and your enjoyment out on the golf course. Thanks, as always, for your support and readership.

Brett Rumford

Lose Your Chicken Wing

If 2023 is going to be the year where you start compressing the golf ball with some sizzle and penetration off the club face then it’s time to get to work on that pesky little chicken wing you see at impact and beyond in your golf swing. It will take some time, but with a clear picture and a few solid practice sessions it can be done. Here’s how…

The two key areas are as follows:

  1. The club face is invariably the culprit here and its almost always overly weak or open. Practice the “pump drill” demonstrated in the video where you really exaggerate how closed you’re getting the club face. Yes, you’ll hit a few shots to the draw/hook end of the spectrum, but just the same way you learned to hit it “straight” with an open face, is how you’ll learn to hit it straight with a more neutral face.

  2. Let’s get DIRECT with this drill and make sure the lead arm stays extended. Keep in mind - face first and then the 9-3 drill demonstrated in the video. Use a 7 iron and keep the drill smaller than you might think. No need to hit it hard just yet. Please make sure that both arms are still extended as things come to a halt after the strike.

I know that if you commit to these two ideas you will not only improve the quality of your ball striking, but you’ll also get rid of the infamous golf swing chicken wing.

Please give this a go and let’s make 2023 your best year on the golf course ever! Cheers.

A Drill for Better Strikes & Trajectory

This is a fairly straightforward drill that will activate the trail side in the downswing and reduce any “tipping” tendency that might get the clubhead stuck behind the golfer. If you struggle with thins, and fats in tandem with blocks and hooks, then this is one for you to try.

A few points to note:

  • This drill works nicely with a 7 or 8 iron struck off a low tee.

  • Keep the stance fairly narrow and drop the trail foot back about a foot inside where you’d normally place it.

  • Rehearse and then rehearse again. Remember that as you practice this you’re trying to make technical changes, so go slowly and get it right….every time!

  • Try to feel the trail shoulder continuously moving through the impact zone. It should feel as if you’re “covering” the ball with that trail shoulder.

  • As you get more comfortable you can start to pick up the speed and move the back foot into a more neutral position.

This drill really has worked wonders for a few of my students in that it has upgraded both the quality of strike along with the ball flight. The next time you find yourself struggling with either strike or trajectory give this drill a try. I think you’ll be pleasantly surprised.

Rotation Drill

Most of us should be working towards better rotation through impact. One of the biggest differences I see between the everyday golfer and the pros is the amount of hip rotation that has occurred at impact. What I call the “two cheek” impact position where both butt cheeks are visible from down the line at impact. This drill will help! Take a look…

Notes:

  • Grab an 8 or 9 iron and set up to the ball which initially should be on a tee.

  • Wind about halfway back into the backswing and pump down to where the shaft is approximately parallel to the ground. Here you should feel your chest and hips as open as you can possibly get them.

  • After a few rehearsals give the ball a light hit and slowly build up speed while incorporating this sense into full speed swings.

Let’s keep in mind that in order to be able to rotate more freely through impact is largely an indicator of the clubhead and club face being in an acceptable position in the early part of the downswing. If your club face is wide open and you try to rotate more through impact there’s a strong chance you’ll actually hit the ball worse! Start with getting the clubhead deep in the early downswing and the club face fairly strong - from there this drill will work wonders for your ballstriking.

Thanks so much for watching/reading along. I hope that in some small way I am able to contribute to the joy you experience out on the links. Until next time…

Better Ballstriking!

It has been incredible to watch my students work this concept into their golf swing and witness how much better they start to strike the golf ball. It’s ball first, crisp contact where the compression improves almost immediately. If you struggle with thins, scrappy heavy hits and even some blocks and hooks then this thought is a good one for you to try. As always there is a video coming, but today I’m going to lead off with what I’d like you to feel….

  • As you get to the top of your backswing your lead/front side is lower than the trail side. In transition I want you to keep the lead side low for as long as possible into the downswing

  • Feel like you’re “surfing down the wave” into the golf ball

  • Work against drifting the upper body in front of the ball. There should be no upper body sway as you start down

  • While the lead side will elevate at impact, strive to keep that front shoulder staying as low as possible

As you can see in my demonstration above I tend to get my upper body too far forward while I’m ingraining the FEEL, but notice what the upper body does during the actual shot. That’s a little more like it!

I hope that these articles are somehow contributing to your enjoyment of the game. As we all know - better shots lead to greater enjoyment. Thanks for checking in!

Tilts & Turns!

If you want the ball to get moving you’ve got to get your body moving and this very simple exercise is a little gem that we all should be practicing on a regular basis. I find it to be an excellent reminder of the tilts, turns and stretches we need to incorporate into the golf swing. Watch…

A few checkpoint to keep in mind when doing the exercise:

  • Hold a club across your shoulders by crossing your arms across your chest

  • Position the handle of the club on the lead/target side of your body

  • In the backswing get the handle to point at the ball or where the ball would be

  • Allow the trail side to extend and the trail knee to straighten

  • The lead side should feel low and the trail side high as it stretches and extends

  • Repeat these feels as the swing moves into the downswing and follow through

  • In the post impact portion of the swing the trail side lowers/shortens while the lead side will elevate and extend

This exercise does such a good job at reminding us what a real swing should FEEL like. While the positions of the drill are a little extreme they carry through nicely into an actual shot. I know this simple, take home exercise will go a long way towards helping a large percentage of the golfers that show up on my lesson tee. Give it a try!

3 Big Driver Keys

foset1.jpg

Set Up:

  • Tee the ball high if you’re looking for max distance, lower if you’re looking for more accuracy.

  • Tilt your spine away from the target. Set up to hit up!

  • Drop the trail foot back inside the target line to aid in making a bigger turn.

fotop1.jpg

At the Top:

  • Make as big a pivot as your body will allow, trying to feel the trail leg straightening and the trail hip elevating.

  • Get the handle as far back as you can into the backswing. It should travel both up and in.

  • The longer the backswing the greater the energy you can pump into the system and the more time you have to organize on the way down.

foimp1.jpg

At Impact:

  • Drive the weight down and towards the target in the early downswing.

  • As you approach impact push hard on the lead foot. This will raise the handle, elevate the angle of attack and increase the power.

  • Feel your hips opening up nicely to the target.

I know that these simple keys will help to improve both the distance and the accuracy that you have been experiencing off the tee! Give them a go and if you have any questions, please just reach out.

Cheers and thanks for reading !

Precision Pitching

We would all like to get the ball up and down from inside 100 yards, but the reality is that for the majority of us we are more likely to take four to get down than we are to take two. Most of the top players and coaches I’ve discussed pitching with over the years have shared that they utilize some form of a template to encourage feel and familiarity with all the different shots we encounter from inside 100 yards. Here are a few ideas that I’ve found to work best for the everyday golfer. Watch….

I have three primary wedges that I might use for playing pitch type shots. There’s a strong chance that you have a slightly different wedge make up to the one I have. The idea here is to limit the two most lofted clubs to a comfortable distance less than a full swing. Here are my thoughts with each of my clubs:

58º

  • A full swing will carry 85 yards with this club but I never will attempt to hit it that far

  • I will use this club outside of the chipping zone all the way up to 60 yards and no further

  • A sensible “core distance” to practice with this club is 50 yards

  • Ball position is always centered with a narrow stance and the weight favoring the front foot 60/40

54º

  • A full swing will carry 100 yards with this club but I will not try to hit it that far

  • This club covers the 60-90 yard range which means a sensible “core distance” will be 75 yards

  • I will also focus on the feel required to hit this club both 60 and 90 yards

  • Set up and approach is the same with all pitch type shots

50º

  • This club covers the 90-110 yard range

  • A sensible “core distance” to practice with this club is 100 yards

  • An important feel with this club is to practice what 90 yard shots feel like

  • Keep in mind that a full swing for this club is 110 yards and I will use this club for that distance by reverting from a pitching set up to my full swing set up

This will take a little thought and some planning, but doesn’t anything that’s worthwhile doing? Create your zones, commit to the plan, anticipate some early stage discomfort as you acquire the necessary skills and build appropriate practice habits over time.

Give it a try and I know you’ll reach out fairly soon to say how much better you’re able to control your golf ball from inside 100 yards. All the best.

Thanks for reading!

Top Tier Tempo!

In this article I’m going to share three helpful exercises to help you smooth out the tempo of your golf swing. Let’s get the oil of the golf swing flowing through your engine! Watch….

I work with golfers on an almost everyday basis to help them complete the backswing and ultimately improve the rhythm and flow in their golf swings. These three drills will help:

Three Ball Drill

  • Tee up three golf balls and do this drill with a 9 or 8 iron

  • Keep in mind that the rhythm does not have to be slow here

  • Make full, completed backswings where you flow from one strike straight into the next

Towel/Rope Drill

  • Use a bath towel or heavier, marine gauge rope to do this drill

  • This will encourage patience as the downswing cannot start before the towel completes the backswing

  • Feel how the energy flows down into the end of the towel (clubhead)

towel.jpg

Hideki Pause

  • In this drill you’ll feel an almost invisible pause at the top of your backswing

  • Try to pause for as long as you comfortably can

  • This does a tremendous job to give any golfer the sense of a full and completed backswing

Now, I know that mechanics play a big role in any golf game, but sometimes all we need is a better feel and sense of rhythm in our golf swings to get things headed in the appropriate direction. Give a few of these drills a try and see what it can do for your game. Especially when you get a little anxious and tight out there!

Thanks for your readership and support throughout 2020! I know we have all learned so much together this year and I look forward to learning and sharing together in 2021.

Cheers!

Stop the Scoop

Are you tired of putting everything you have into your game, only to see the ball literally limp off the club face after each swing? There’s just no return on the energy you’re putting in. Today I’m going to show you how to get the sizzle back into your ball striking. Watch this video first…

I often ask my students which club imparts the most energy into the ball relative to club speed. The answer? Putter. Why? It has the least loft at impact and delivers the least oblique strike to the ball. Learn to reduce the loft coming into impact in order to start compressing the ball off the club face.

  1. Get the club face in place early in the downswing. This is done by bowing/flexing the lead wrist which in turn will de-loft and strengthen the club face by the time impact occurs.

  2. Try the Preset Club Face Drill. Using a 7 iron, take the club back so that the shaft is parallel to the ground making sure the lead wrist and leading edge are tilted down towards the ground slightly. Wind the arms back 1 foot and rotate through, working to maintain the face and wrist angles. The ball flight should be low and penetrating with a slight draw.

  3. Make sure that the low point of the swing arc is forward of where impact occurs. This can be rehearsed by making two practice swings between each shot you hit on the range where the sole of the club bottoms out well in front of where it was resting on the ground. The handle and weight must be forward at impact in order for this to occur.

compression.jpg

If you’re a scooper you owe it to yourself to give these ideas a try. My 30 years of teaching golf say that they truly do work and with a little patience and persistence you’ll significantly improve the quality of your ball striking.

Remember - there is no magic, only hard work and a good solid plan. Get to it!

A Look into a Lesson

Thank you to all of you who have reached out to let me know how much you’ve gained from the insights I’ve been sharing with my students lately. It truly does make me happy to know how many people can benefit from someone else’s golf lesson. With that in mind, here’s another!

I recently got together with Scott who I started teaching 18 months ago. As a relative beginner when we first met, Scott has really worked hard and made tremendous strides - firing an all time best score of 82 recently. At the onset of our most recent lesson I could see that he had continued to make progress.

In an effort to keep my information simple, accurate and actionable I summarized the talking points for our time together into:

  1. Alignment was too far right which led to misses that finished well right of target

aim.jpg

2. Driver was crashing into the ground which led to pop-ups off the tee

wear.jpg

3. Arm structure was a little soft through impact which didn’t bode well for repeatable, quality strikes

arms.jpg

I’ve always found that too much information can often overwhelm a golfer and as a result I strive to keep it as simple as I can. That doesn’t necessarily mean it’s going to be simple - just as simple as possible while making sound upgrades.

I hope this look behind the curtain to see how I run my lessons somehow influences the way you look at your golf progress moving forward. My advice would be to itemize the important stuff and set a time frame to help you stay focused solely on those items. And of course - work hard!

Build a Better Backswing

If you watch any golf on TV you’ll notice that there certainly doesn’t seem to be one backswing that is universal to all Tour players. Their backswings range from long to short, laid off to across the line and fast to slow. The million dollar question is which one will work best for you and your game. Watch this video to start to understand your options…

Length of Backswing

  1. Don’t be overly anxious to shorten your backswing. If the arms are collapsing or the hands are letting go then by all means work towards making the necessary upgrades.

  2. Longer backswings should almost have an across the line look, while shorter backswings simply must have the clubhead more behind them with a laid off look.

Amount of Time

  1. Ideally the amount of time taken once the club starts the motion away from the ball is right around 1 second. 0.75 seconds up to the top and 0.25 seconds for the downswing.

  2. Try the rapid fire drill to gain a sense of the appropriate amount of time as the vast majority of golfers take too much time and actually swing too slowly.

  3. The rolling start drill gets the club moving as it kicks the motion off.

Clubface Position

  1. Open face golfers will typically have a difficult time hitting low shots and generating enough compression. The clubface is almost always open in the early downswing and this leads to flipping through impact to get the clubface around.

  2. Closed face golfers will struggle to get their long irons in the air. Compression is fine and the ball goes far enough, but getting an appropriate trajectory is a challenge. Get the clubface vertical in the early part of the backswing. Have the intent to hit the ball really high in practice.

Ponder a few of these ideas, try a few of the drills and I hope that a few of these ideas help you to enjoy your next round of golf that much more.

SpiethTop.JPG

Cheers!

Take Swing Changes to the Course

If I had a dollar for each time a golfer has said, “I’m great on the range, but I just can’t take it to the course” I’d be a wealthy man! I believe there are multiple reasons for this quandary many find themselves in. Firstly, most golfers don’t know how to practice in order to simulate an on-course environment and secondly it’s because when most golfers work on technical changes they don’t know how to go about assimilating the new moves into a full speed swing. Today we are going to address this important topic: How to take ownership of swing upgrades. Watch…

A few key points:

  • Use a 7 or an 8 iron

  • Use an alignment aid

  • Incorporate multiple rehearsals between each shot (get the FEEL!)

Level 1

  • Technical, slow , tedious and deliberate

  • Ball on a tee

  • Feel the positions

  • Incorporate pauses in the motion

  • Lots of rehearsal

  • Soft, tapping little shots

Level 2

  • Blend in rhythm

  • Slow motion without any pauses

  • Ball on starts a tee and then we get it on the ground

  • Lots of rehearsal between each shot

  • Shots will not go very far

Level 3

  • Start off at about 3/4 speed

  • Ball on the ground

  • Slowly build up to 100% speed

  • Continue to make rehearsals between each shot

Keep in mind that objective of any technical swing work is to upgrade the mechanics while still operating at full, or perhaps even, faster speed. It’s also important to note that this method of practice only addresses the technical side. There is so much more required in order to take it to the course and that’s why I often talk about…

SWING, SKILL & SHOT.

Thanks for tuning in and please share with a friend who you know would benefit!

7.jpg


How to Shallow the Club Properly

The first question you should be asking is why on earth would anyone want to shallow the club? The primary reason is to stimulate some body/pivot rotation through impact in order to better manage the face angle. This leads to improved predictability. Watch this…

  1. Watch for shallowing in a false fashion where the CLUBFACE becomes compromised leading to a flip through impact.

  2. Watch for shallowing by tipping the spine away from the target where the PIVOT rotation becomes compromised.

A great take home exercise is to get in front of a mirror with a club (be careful!) and 1. Feel the wrist twist on the way down in order to position the clubface for success and 2. Feel the lead shoulder staying lower for longer in transition.

Create the right look, and it’s okay if it’s exaggerated, in front of the mirror and take the necessary feels with you to the practice ground.

Don’t spend an inordinate amount of time with the Wall Scraper Drill, but give it a half dozen attempts or so just to help with organizing the appropriate sense and feel for what a proper shallowing motion really feels like.

All the best and feel free to reach out should you have any questions. Thanks for watching/reading and I sincerely hope this helps your ball striking!

A properly shallowed downswing…

A properly shallowed downswing…

Pixie Dust or a Solid Plan?

Yes, I’m on social media and YouTube as much, if not more than you are. Not so much to look for help with my game, but always looking to see what other coaches and entities are sharing with golf consumers. Of course it feels good as a content provider to put something out there that gets tons of views and likes, but ultimately, getting better at golf is not sexy or miraculous. My thoughts…

I would certainly like a miracle cure for my bad shots and I’m sure you would too, but we know that’s not the way life works. There are no shortcuts and no golfer has ever shaved ten strokes off their handicap overnight. Sorry! Here are a few examples of what you might look to incorporate into your plan:

  • I’m going to commit to a stats plan and keep track of every round I play

  • I’m going to find three solid chipping drills and do them twice per week

  • I’m going to incorporate an alignment rod each time I hit balls on the range

  • I will blend more variety into my practice sessions

  • I’m going to commit to writing a practice plan and keeping a record of each practice session I have

Now you don’t need to include all of the above ideas into your plan, but one or two simple changes will give you a purpose and a simple plan for progress as you move forward. Be creative and thoughtful. Once you have created a sound plan, write it down, indicate the date that the plan expires, fully commit and enjoy the journey.

This is how you are going to improve! Of course, if you need help in building an in-depth and sound plan for your game, you know where to reach me.

FebGS6.jpg


Downswing Matters...

Most of you have been following me for long enough to know that I believe the location and orientation of the clubhead in the early downswing are vital to an effective golf swing. The appropriate position and orientation of the clubhead will enable you to rotate freely through impact, controlling the face and compressing the golf ball. The following short video will help you understand the value of clubhead position in the early downswing and why it’s so important in building a sound impact position

Where you position the clubhead in the early downswing is integral to your ability to rotate and manage the club face through the impact interval. Better rotation means less flipping and more accurate shots. This matters - big time.

In the following short video you will learn why, even though you may have been doing a better job with positioning the clubhead (shallowing the shaft), your game has not improved. Improper shallowing can compromise the club face angle in the early downswing and actually promote active hands or flipping through impact. Here’s the remedy…

There you have it. Getting the clubhead deeper (more BEHIND you) in the early downswing without compromising the face will produce incredible results for almost every golfer I teach. I suspect it will help your game too. A good place to start is in front of a mirror - create the proper look, don’t worry about exaggerating things, take the appropriate feel from that look and go out and practice. Keep reinforcing in front of the mirror.

A Young Jack Nicklaus

A Young Jack Nicklaus


Making Gains

It seems like just the other day that I embarked on my teaching career, yet it was almost 30 years ago. As a young coach it didn’t take me long to get to a point where I thought I pretty much knew everything there was to know about the golf swing. My how things have changed! I remember saying that one day on Tour we would get to a point where there were no more ‘bad’ or unusual looking swings. Ha! Anyone seen Matthew Wolff’s golf swing?

ManyWays.JPG

When I first started coaching Phil’s backswing would have been too long, Bubba’s feet would have been too active, Jordan could never be successful with a bent lead arm, DJ’s club face would have been impossibly closed and Jim Furyk - well that just had no chance.

Perhaps it’s my experience speaking, but I believe the golf instruction industry has come a long way in the last two decades. We have made more progress in this time than all the years before. Our eyes have been opened to the uniqueness and intricacy of the golf swing and how there truly are many ways to get the job done. A better understanding of the forces and torques that golfers are exerting on both the ground and the club has opened our eyes to perhaps why the players pictured above are successful.

Another important revelation over the last two decades has been the value of skill. Your technique allows you to hit the ball towards your target, but its skill that enables you to adjust the flight, shape, distance and ultimately, the outcome of each unique shot on the course. So many golfers were falsely led to believe that if they simply upgraded their technique/mechanics/swing they would be world-beaters. Technique, no doubt plays a role, but the value of skill can no longer be over looked. The great Seve Ballesteros is a fabulous example of a golfer that relied more on skill, and heart, than technique…

Seve Ballesteros

Seve Ballesteros

I feel that the internet has been an important catalyst in our improvement and understanding as a community of golf coaches. Sound information is out there, if you simply know where to look or who to contact. I cannot overlook the role technology has played either. I know that having the opportunity to teach with TrackMan, SwingCatalyst and K-Motion over the years has served to make me a better informed coach.

We have also improved our knowledge of how people learn and we now know it’s not all about pounding balls and getting your reps in. Sure, we still need to work hard, but we have a better picture of how to effectively take full ownership of changes and better incorporate them into who we are as a golfer.

Are we there yet? Do we have all the answers? As an older, more seasoned coach, I never think I know it all anymore. Our understanding is significantly deeper than it was 20 years, but we still have much to do.

It’s an exciting time to be a coach and a golfer.

Watch the What?

Oh you’re going to like this one! This is a little drill I discovered a few weeks ago that will help any golfer who has issues with those small motion chip shots around the greens. Watch…

A few ideas that will help if you tend to struggle from close range:

  • Mark up the club face with a Sharpie dot to give you something to follow visually

  • Determine what your range is for watching the clubhead

  • Practice variety by alternating between smaller chips where you watch the face and bigger ones where you watch the ball

0911F4DE-E03B-49D6-B80E-0378D296660C.jpg

You might be wondering why this works so well? The reason is that it encourages a synchronized rotation through the strike with almost the entire body. Everything flows through impact together. Whether you’re a teacher or a player, whether you need this or not, tuck this little nugget in your back pocket for when you or a friend find yourself in the chipping doldrums.

Thanks for following along!

Some "Different" Chipping Ideas

I’m sure we’ve all at some point or another received the all-time classic chipping advice - get the ball back, weight forward and trap the ball! You won’t hear anything like that in this lesson, but you will perhaps hear and see something you haven’t caught on to before.

Two of the best wedgers in recent memory have been Jose-Maria Olazabal and Brett Rumford. I’m sure you’ve heard of Ryder Cup star and Masters winner Olazabal, but you may not have heard of Rumford. The journeyman pro from Western Australia has won six times on the European Tour and has recently been battling wrist injury. Take it from me when I tell you he is as good, if not better than, anyone you’ve ever seen.

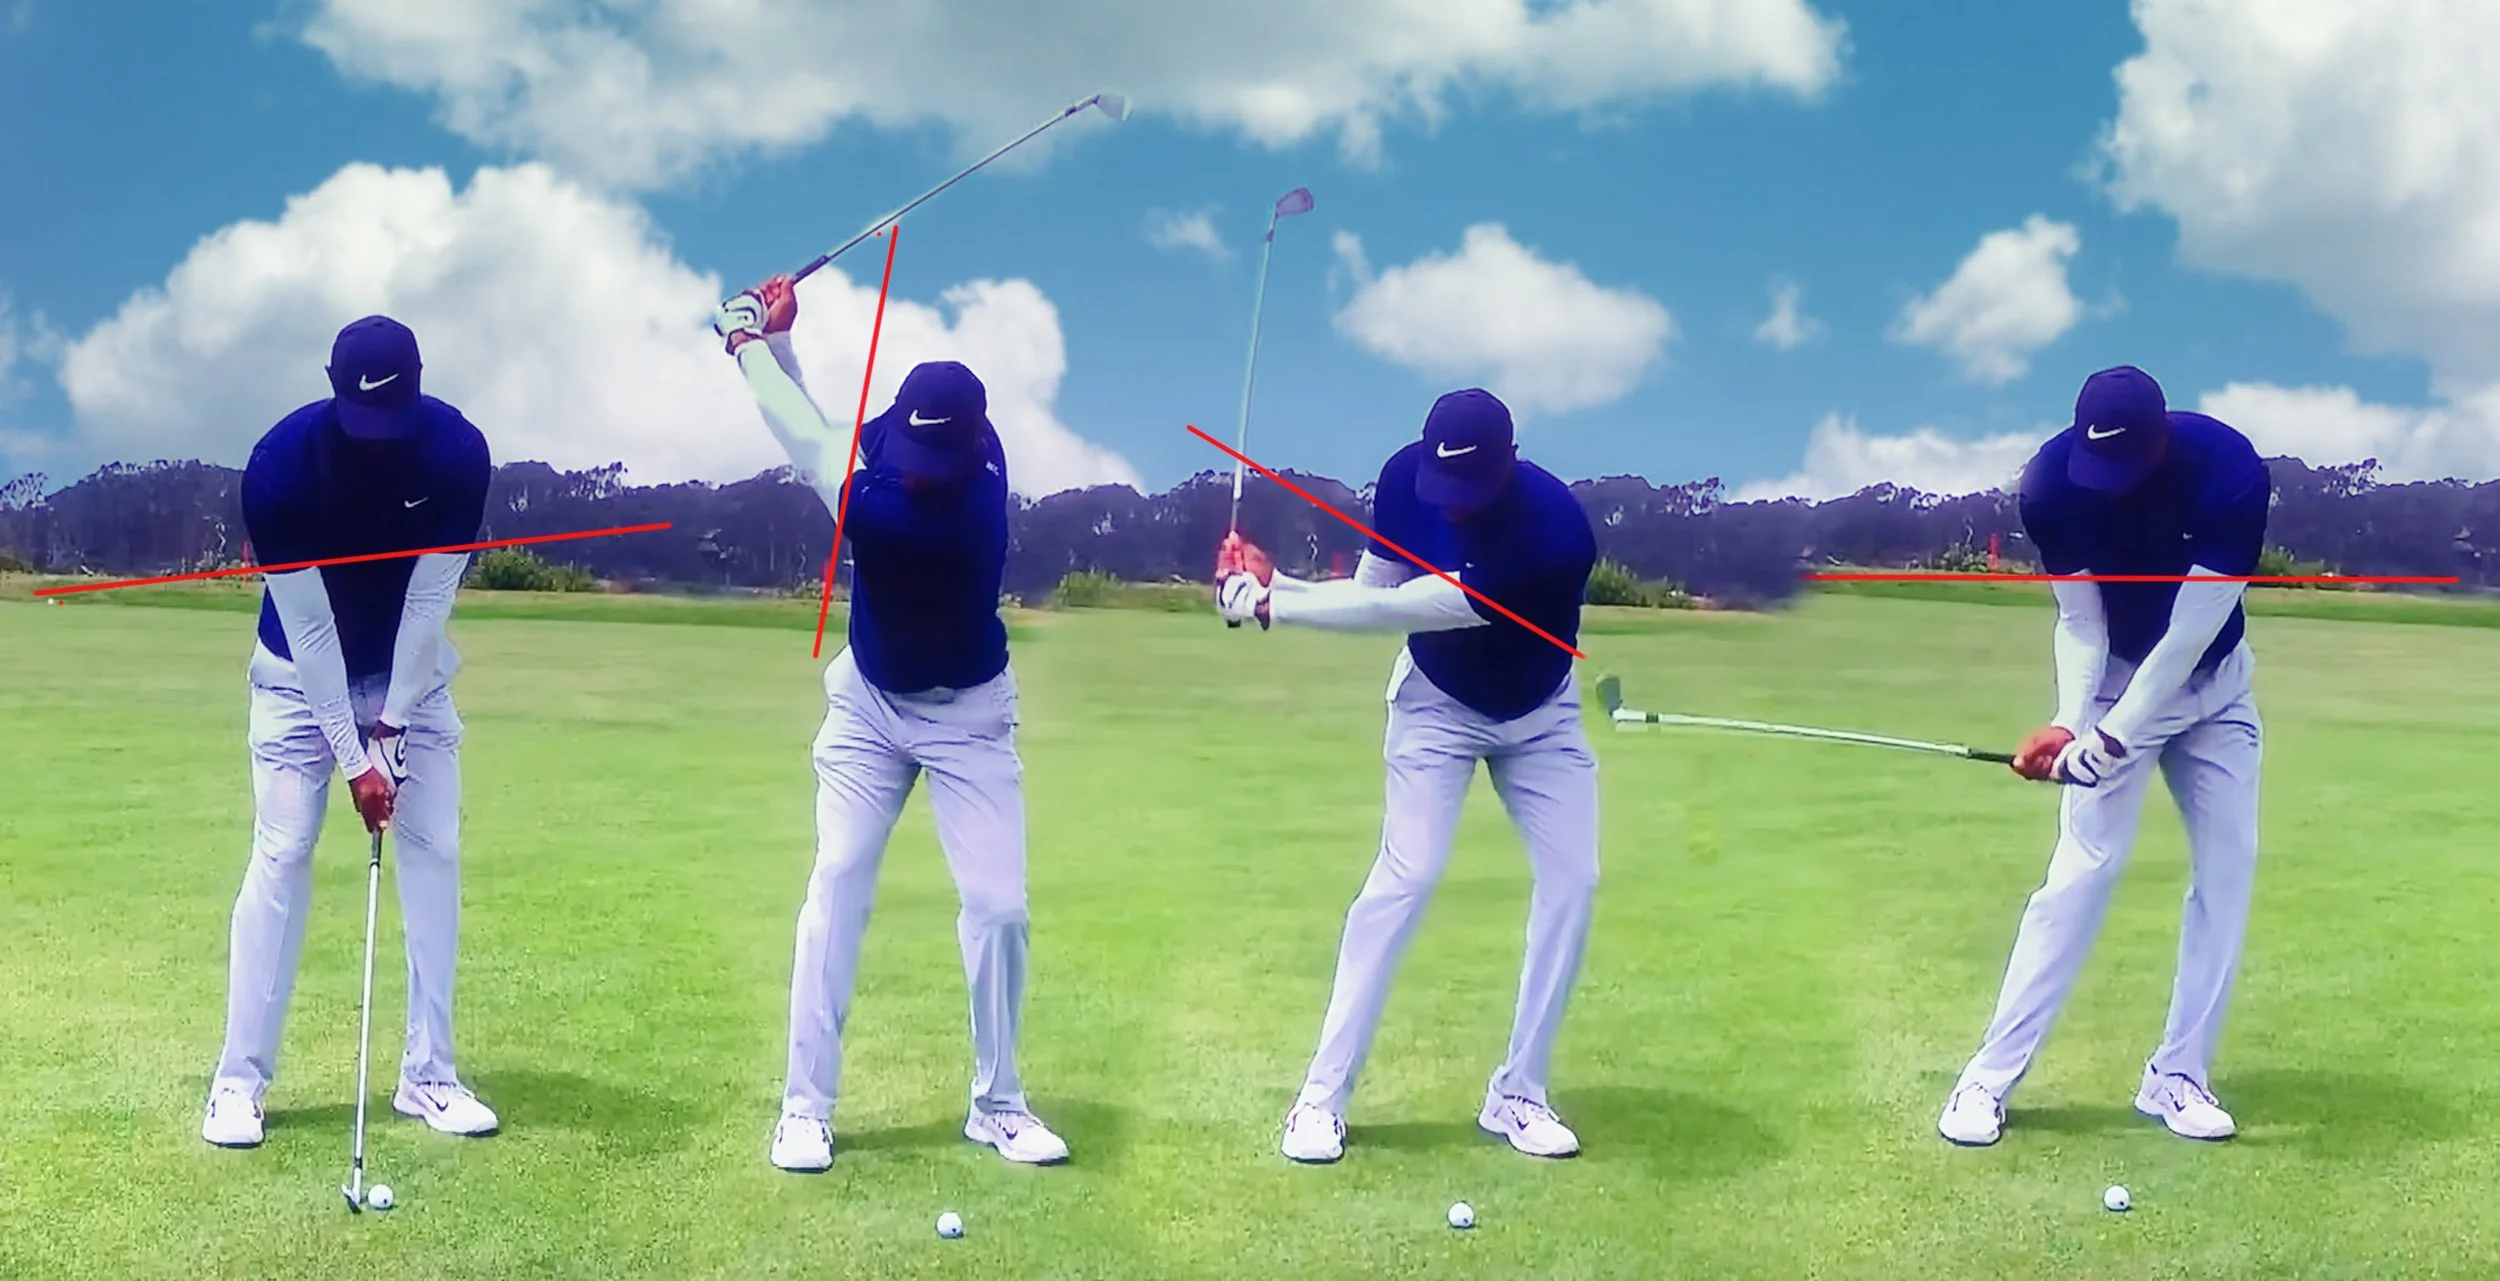
While their form in the video above is not identical (whose is?) there are two important movements they both incorporate. In the backswing they both shift the pressure forward, onto the front foot and in the downswing they both elevate or stand up through the strike.

Notice in the image below how Jose-Maria has moved ahead of the red line as he reaches the end of the backswing. My current opinion is that this stimulates motion (pressure shift) and encourages the chest to rotate through impact.

In the following image you can clearly see how Brett has elevated from the end of his backswing into the strike relative to the red line. This is perhaps the biggest mistake I see golfers make when wedging. They attempt to “stay down” and thus limit rotation and change the radius of their strike. This can have a mortifying effect on strike quality. And we all know that strike is king when it comes to the shortgame!

rumfordchipping.jpg

Be aware that these are not the only two great players that incorporate this motion - just two of the best.

There you have it, two simple ideas to go and try to incorporate into your next wedge practice session. Play around, be patient and I know you’ll start to crisp up your strikes around the greens. Thanks for reading and please share with a friend in need!

The Value of Engagement

Engagement in learning is defined as the degree of attention, curiosity, interest, optimism and passion that students demonstrate. Most of the current research shows that an increase in student engagement leads to improved retention and heightened skill acquisition. What are you going to do about it and how can this impact you as a golfer?

Have you ever had a boring practice session? Headed to the range to get your ‘reps’ in? It’s time for us to move beyond rote practice regimens because when practicing, the ideal environment is one of engagement and ultimately, challenge.

3BallDrill.JPG

Don’t get me wrong – block practice will always have a place on my lesson tee. It just shouldn’t be the only form of practice we put in. Let’s incorporate challenges where you keep track of a score or an outcome. Let’s try to do things you previously have been unable to do. If you’re doing all you can to beat your personal best score for a particular chipping challenge, you cannot help but be passionate, interested and optimistic. That’s where the real growth occurs!

To a certain degree I’ve looked up the research to see if it aligned with what I’ve been seeing anecdotally with my students recently. I’ve created a few games to challenge some of my better golfers during their long hours on the range and the results have been promising. They find themselves spending less time on the technical aspects of their golf swing and more time trying to break ‘records’ and put up a ‘score’ and I like that. They do too!

The research and my experience agree – we get better when we’re very much into what we’re doing. Here are a few challenges that will whip you into learning shape…

16 Shot Driver Challenge

  • 4 sets of 4 balls
  • Each 4 ball set is for a different fairway you select on the practice ground
  • Shot 1 is rough both left and right
  • Shot 2 is rough left and hazard right
  • Shot 3 is hazard left and rough right
  • Shot 4 is hazard both left and right
  • Scoring is 1 for fairway, 2 for rough and 3 for hazard
  • Objective is to score 20 points or less

18 Shot 9-Club Approach Challenge

  • Use the 9 clubs between wedges and driver (3 wood to PW)
  • Hit 2 shots with each club in random order
  • Each of the 2 shots are to a different target
  • Each club hits a shot to the left and a shot to the right of the target
  • Don’t select clubs in a smooth order – keep it random
  • 30 foot zone for <5 handicap
  • 40 foot zone for >5 handicap
  • Scoring is 1 for in the zone, 2 for outside the zone on safe side, 3 for wrong side of the target
  • Scoring objectives are ability/handicap dependent

36 Shot Pitching Challenge

  • 36 different shots inside 60 yards
  • Targets can be flags, balls, divots...anything
  • You compete against your own expectations
  • Balls should be counted out prior to getting started
  • Scoring is 1 for better than expected and 0 for outside expectation

10 Ball Gate Putting Challenge

  • Select a 15 foot putt
  • Place a tee at 15' from the hole and another tee 2' behind the hole
  • After reading the green place 2 coins a putter head width apart in the mid-point of the putt
  • The coins are adjustable and indicate your start line
  • Scoring is 1 for through the gate without touching the coins, 2 for appropriate pace with the ball finishing between the front edge and the back tee and 3 for a make
  • There is the potential for 30 points and the scoring objective is dependent on putt difficulty and player ability
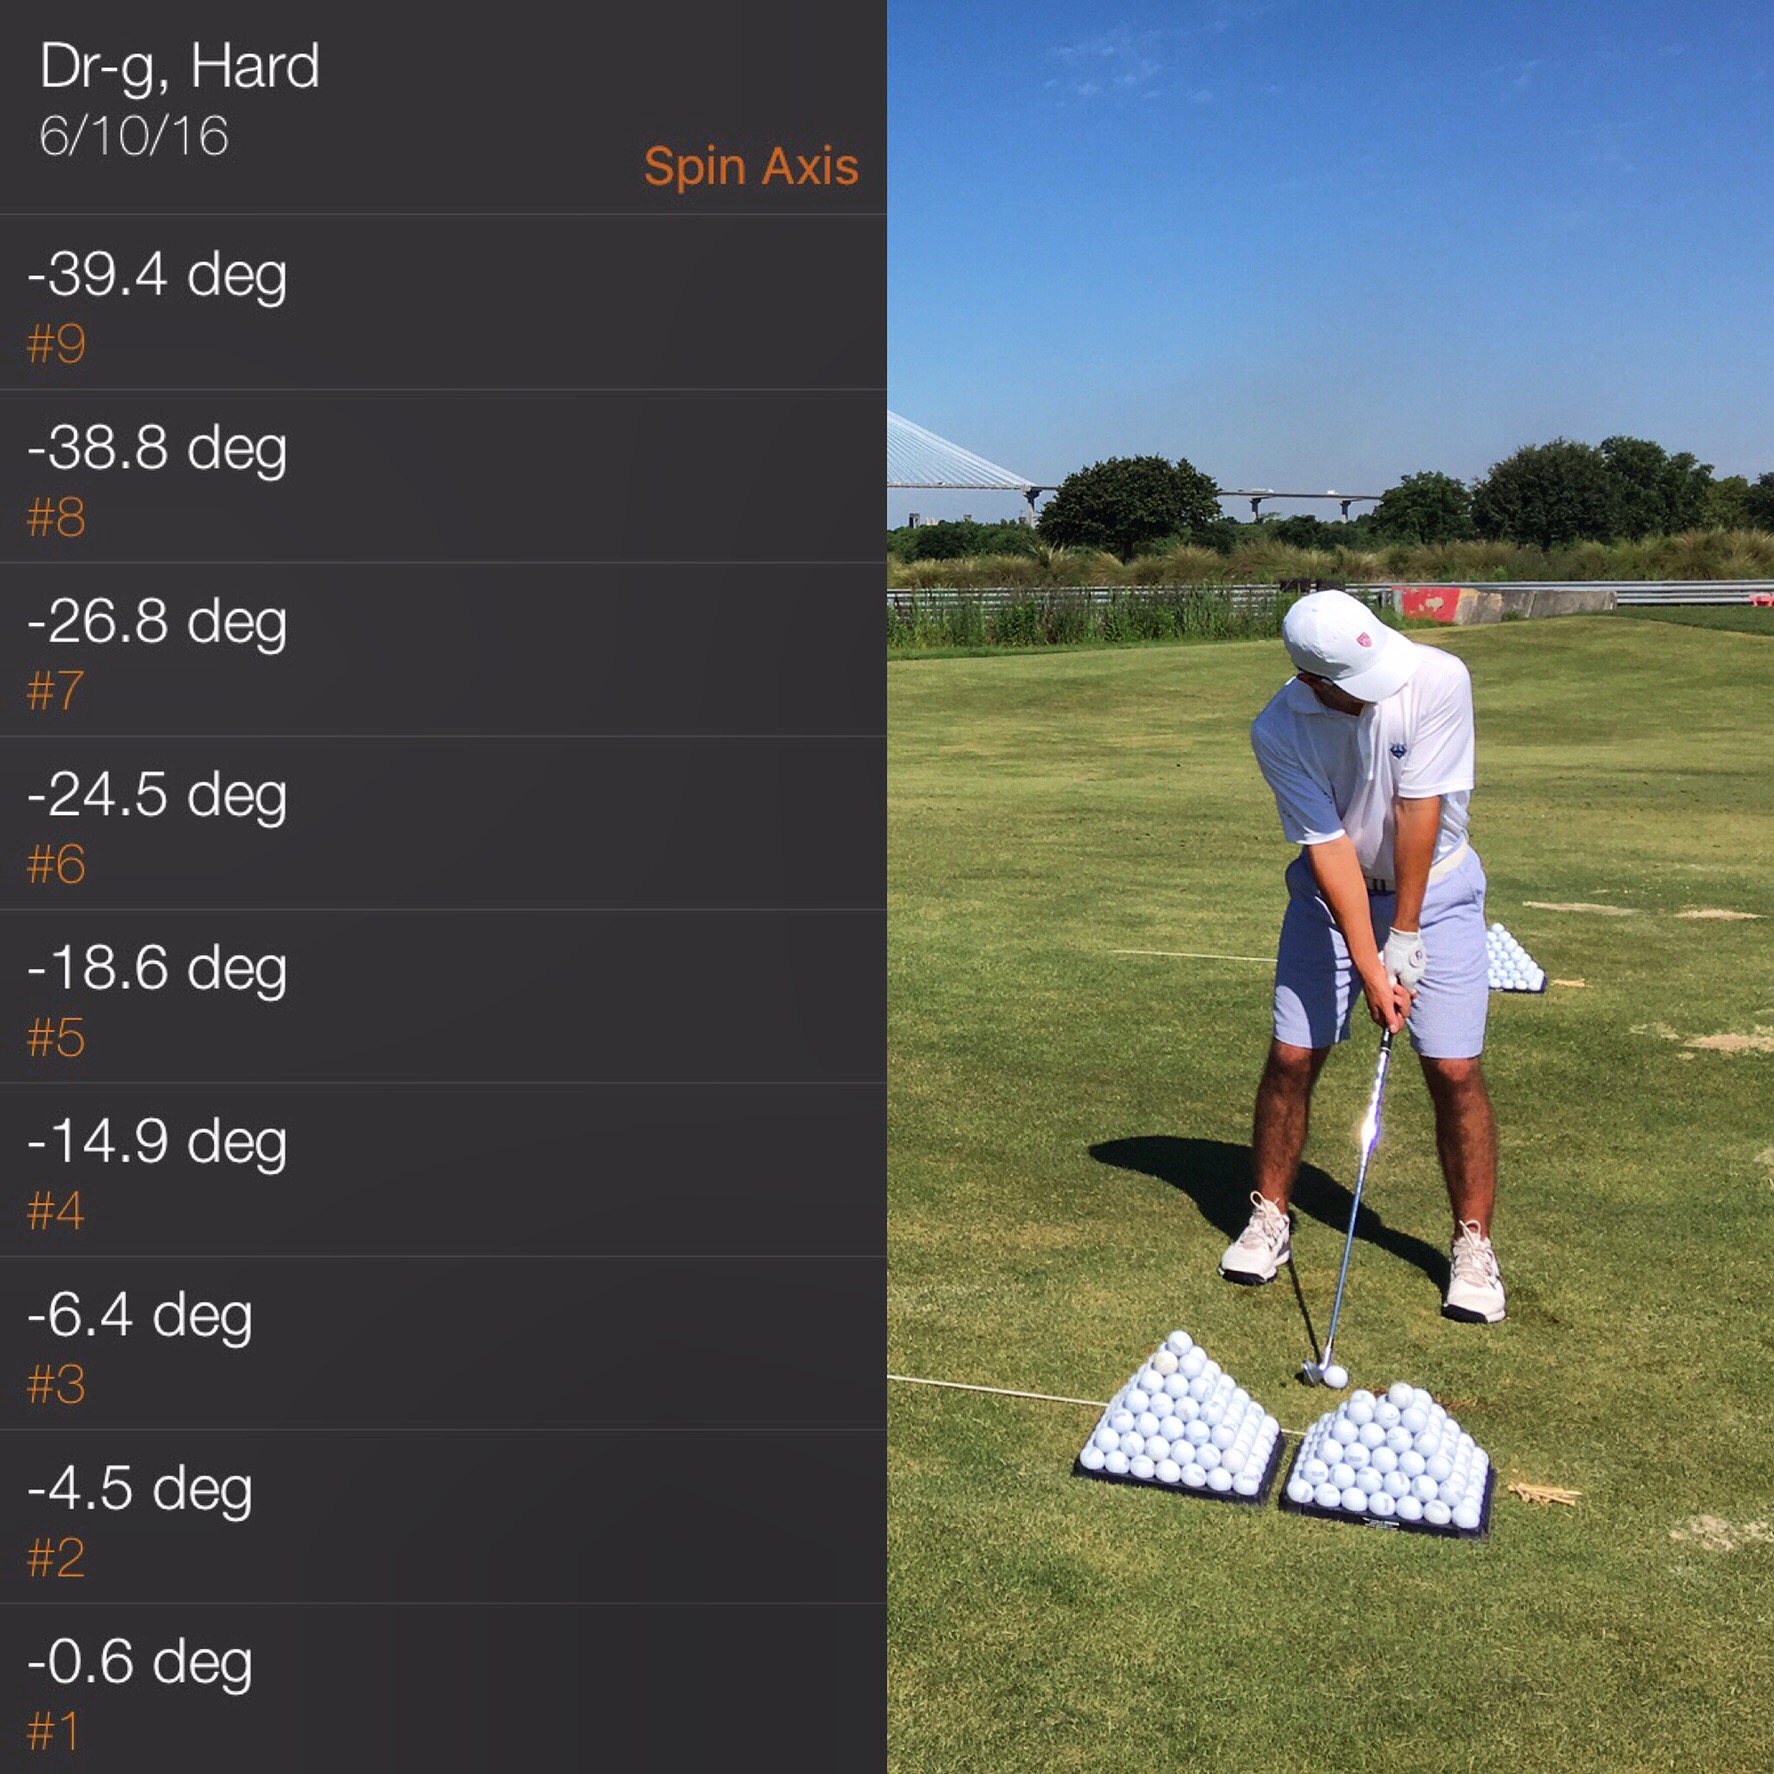
SpinAxisChallenge.JPG

These challenges are really fun to work through and they will certainly engage you in the process of executing better golf shots. I’ve even found that asking students to report there score to me via text or Edufii serves to heighten their level of engagement and thus learning.

My hope is that this article serves to cause you to institute productive changes into your practice routine. Make 2018 the year where your performance finally meets your potential.